Monday, December 4, 2023

Mama Elephant Designer Series Jar of Hearts

Hello crafty friends! Davina here, to share a sweet slimline card I made using lots of beautiful Mama Elephant products. my Designer Series project I couldn’t resist using the wonderful new Jar of Hearts stamps and Creative Cuts. I especially love the delicate bow and detailed lid, and how the dies cut them so perfectly and remove the little parts in the loops. 


I decided to try and create a little gingerbread village across a slimline scene, and I only wish it had enough room for a sentiment on the front. Even though I couldn’t fit a sentiment on the cover, I really love how this candy cane lane. 


I started by stamping out the jar, bow and lid 3 times. I heat embossed the lid on a shimmery cream paper that I gently inked the edges after die cutting. I also die cut 3 snow drifts using the jar die, and gently inking those with a very light blue. 


I stamped and heat embossed some little houses and trees from Little Agenda Houses and a few cute cutie gingerbread men from Little Agenda Gingerbread onto Kraft cardstock. Then built my little jar scenes. After lining them up on the Slim Film City scallop layers I added some candy cane and gumdrop images that I stamped from Holiday Huggers and again the Little Agenda Gingerbread sets. I colored everything in shades of pink and added some sparkle from a Wink of Stella glitter pen. 

I really love combining lots of sets and using them in unique ways. And if these little gingerbread jars don’t convince you to grab your Jar of Hearts stamp set and fill them to your hearts content, then I don’t know what will. I hope I’ve inspired you, just a little bit, with this card and that you make some gingerbread homes of your own. Thank you for stopping by,

Davina 


Sunday, October 29, 2023

Pretty Pink Posh Autumn Theme Week

Hello crafty friends, Davina here to share so fun autumn inspiration. Pretty Pink Posh always has the prettiest fall themed products and I pulled together some of my favorites for you. There are several layered leaf stencil sets, and I gathered together a newly released stencil to use as the background for my scene. 


I started this fall card by inking the Layered Fall Wreath stencil onto the largest Eyelet Rectangle layer. I used shades of yellow, coral, orange, brown and even green for these leaves. I splattered the panel with brown and gold ink and put aside to dry. Next, I die cut the super cute Acorn Shaker Die from creamy cardstock, and inked it with several shades of brown. The large layered mushroom from the Fall Mug Additions is one of my favorite dies, with that fancy little ruffle. I colored it in shades of cream and coral, then added some splashy details. 


The main focus of this scene are the two sweet birds that are also inked die cuts. I cut two of the birds from the Stitched Birds dies, and used the residual ink on my brushes to gently add some color to these cuties. After adding some small copic details, I assembled the pieces. 


I adhered all of my die cut pieces to the stenciled background, then added a stamped sentiment from Autumn Pumpkins to the center. I loved the look of the crisp brown lines so I decided to stamp a few leaves from the same stamp set, and tucked them around the scene. I finished this off with a sprinkling of sequins from the Matte Gold Confetti Mix.

I just love how all of the products from Pretty Pink Posh mix so well together, it makes so easy to put together beautiful cards no matter what your crafty style is. Thank you for dropping by,

Davina 

Monday, October 23, 2023

October Mama Elephant Designer Series

Hello crafty friends! Davina here to share my Designer Series project using the incredible October release from Mama Elephant Stamps. This release is so fun and festive, with all of the holiday themed sets. I especially love the little bundles of goodies from the Deliver Winter Joy set, and how you can shop your stash to find stamps that go along with each image. 


First, I stamped the amazing vintage truck from the Deliver by Truck stamp set. Next, I stamped the bundle of toys and the Christmas tree from Deliver Winter Joy . I found that the adorable elves and toys from Busy Elves and Oh Merry Tree coordinated perfectly for my scene. I couldn’t leave out Santa, and the perfect one was from the Secret Santa set. 


After everything was colored, die cut, and highlighted, I created my base layers. I used the Magic Snow Cover Creative Cuts layered over some patterned and colored cardstock for my foundation. I gave it some gentle inkblending and a few splashes of ink. I wanted this card to be full of dimension, so I popped the images up with foam tape making sure to leave room for my bold sentiment. I used the Everything Nice sentiment set and stamped with red ink for a cheery look. I die cut the sentiment and a piece of foam tape to pop up my word strip instead of glueing many together. 


I finished this off with a sprinkling of snowflakes that I adhered with glue dots to keep them lifted off of the background. I think Santa delivering toys in his pick-up is just as cute as any sleigh, and I hope that you enjoy this little joy filled card. Thank you for stopping by, 

Davina

Saturday, October 21, 2023

Pretty Pink Posh Christmas Cupcakes

Hello crafty friends. The beautiful October release from Pretty Pink Posh is available now and you will love it! This is the largest release ever and full of so much good stuff, like so many fantastic products to bring your winter and holiday projects to life. I created a tiered cupcake stand using the incredibly cute Christmas Cupcakes stamps and dies. I combined serial other new products and previously released items to being this fun card to life. 


I started by using the pretty Pierced Snowflake Plate on Bristol Smooth Cardstock, and inkblending an ombré citrus green background. Once it was completely dry, I trimmed it down 1/4 inch, to  make room for a striped patterned paper background layer. I stamped the cute cupcakes and colored them in before cutting them out with the coordinating dies. I used the cake stand from last summers Fancy Cake Dies to pile on my cupcakes, then I added a bow from the new Holiday Mug Additions


I wanted to add some small stamped details and I found all of the images, and a sentiment, that I needed from one older stamp set. The Holiday Envelopes stamp set from last year had all of the great snowflakes, pine boughs, and the holly with berries images that I used. I stamped some of these in colored ink, including the sentiment, and added them to my treats. Finally, I adhered my images to the inky background, using foam tape behind the cupcake stand, and added my sentiment to a cute scalloped banner from the Sentiment Strips Dies


There are so many wonderful new products to play with and so much inspiration to see, so make sure you hop along with both the New Release Blog Hop and then the Instagram Hop, to see how magically the Design Team used the products and for your chance to win! Thank you for stopping by,

Davina


Wednesday, October 11, 2023

Mama Elephant Designer Series Project

Hello crafty friends! Davina here to share my Mama Elephant Designer Series project, using adorable products from the 11th Anniversary release. I made a winter scene with flat mesh shaker using the Arch Snow Globe and the cute A Capybara Christmas Stamps and Creative Cuts. 


I started by building my snow globe and inkblending the parts and pieces. Once getting the background piece assembled with the snow drifts, I stamped and colored images from A Capybara Christmas. I wanted a tall tree so I stamped one using Busy Elves. I adhered the tree and a capybara onto the snowdrifts then placed a pile of small flat star shaped glitter in the center. On the backside of the snow globe front, I outlined 1/8 inch scor tape. I removed the paper liner and adhered a piece of mesh tulle, making sure to really secure the mesh into the glue. Then I added a second layer of tape over the mesh before trimming the tulle around the globe. Once that is complete I layered it onto the glittery background. The stars move around, but the card is not as bulky as a traditional shaker, and mails much easier. 


I arranged my snowglobe onto a glitter cardstock snow drift and surrounded the base with cute Christmas themed capybaras and ornaments. The top was looking so neglected and empty so I created a tiny capybara with reindeer antlers using two Little Agenda sets, Little Capybara Agenda and Little Reindeer Agenda. I placed him flying over the snow globe and finished it off with an Easy Xmas sentiment strip and a few stars. 


I layered everything onto some Christmas colored plaid patterned paper and think its just the cutest. I love how well everything came together and hope that you do too. Thank you for stopping by, 

Davina 


Thursday, September 28, 2023

Mama Elephant Stamp Highlights Little Capybara Agenda

 Hello crafty friends. Today we continue the Stamp Highlights for Mama Elephants latest release. Today we are featuring the Little Capybara Agenda stamps and dies.


The agenda sets are always my favorite as I love adding a ton of little images to my cards. I used the Six Window cover plate for the base of this card, that I inkblended and backed with printed tropical paper. Then, I created a grounded layer to set the scene. I used the cutie capybaras and added some tropical leaves from The Wild Roar stamps as accessories. I then added some little grass and more capybaras to each window. 


I finished up this card with a banner across the bottom stamped with one of the sentiments from the Capybara Christmas stamp set. I hope you take the time to check out all of the Design Teams inspiration for this cute set. And thank you for stopping by,

Davina 

Monday, September 25, 2023

Mama Elephant Stamp Highlight Holiday Huggers

 Hello crafty friends! As the Mama Elephant Stamp Highlights continue, today we are featuring Holiday Huggers Stamps and Creative Cuts. This adorable set is especially cute with the chubby little critters and all of the items they can “hug”. The die set is great because it cuts out the hands to let the accessories tuck under.


I wanted to use all of the images from the set on my card. So I used the Comic Cover CC for the layout. I backed the frame with some teal holiday paper, and arranged a critter in arch section. I adhered some contrasting paper in the center space and popped up a fancy embossed sentiments from the Make it Merry stamp set.  


I finished this card off with some sparkly green jewels. I hope that you take the time to check out all of the inspiration from the Design Team. Thank you for stopping by,

Davina

Thursday, September 21, 2023

Mama Elephant Stamp Highlight Decorate the Tree

Hello friends. We are continuing the Mama Elephant Stamp Highlights for their 11th anniversary release. Today we are featuring the stamp set Decorate the Tree and creative cuts. I adore this set so much. The big tree is wonderful for surrounding with the cute characters and adding the garlands. 


I stamped my images and colored with copic markers before cutting out with the coordinating dies. While planning my scene, I decided on some festive foiled paper as the background. I cut a snowy hillside to layer on the bottom half, and used the new large Marquee Letters creative cuts to spell out Jolly on the bottom with gold glitter cardstock. 


I thoughtfully arranged my colored images as the focus of my scene and added small white highlights and glittery Wink of Stella to some of the images. To finish this off, I added two word bubbles from Let’s Chat Creative Cuts and the tiny typed sentiments are from an old set called Let’s Go Caroling. 

Please head over to the Mama Elephant Blog to see all of the incredible inspiration from the Design Team. Thank you for stopping by, Davina 

Wednesday, September 20, 2023

Mama Elephant Stamp Highlight Wonders of Winter

Hello crafty friends! Mama Elephant is celebrating their 11th anniversary and today we are featuring the Wonders of Winter  Stamps and Creative Cuts. This background stamp set is especially lovely to help create the background of any scene. It features some snowy hillsides, a trio of birch tree trunks, and a little cabin on a hill. 

I wanted to make a winter pond scene, and I thought the snowy hillside would be perfect to create a snowbank. I stamped the snowy hillside and colored it with COPIC markers. After die cutting, I rotated it upside down and layered it over an aqua inked panel that I would as my pond. I gently inked the new sky portion, then splattered with aqua ink. Next, I heat embossed the birch trees with white embossing powder on kraft cardstock and layered the die cut tree trunks over my inked pond. 

I stamped some adorable critters from the Snow Friends stamp set and arranged them onto the scene after heat embossing a holiday sentiment from the same sentiment into the sky. I centered my scene onto some plaid paper and finished it off with a few glittery snowflakes and a pair of little fluffy clouds. 

I think this set is very versatile and I hope that you head over to the Mama Elephant blog and Instagram feed too see the incredible inspiration from the entire Design Team. 

Thank you for stopping by, Davina 

Tuesday, September 19, 2023

Mama Elephant Stamp Highlight Capybara Christmas


Hello crafty friends. I’m so happy to be a part of Mama Elephants spectacular 11th birthday celebration release. Today we are kicking off the stamp highlights with the Capybara Christmas  stamps and Creative Cuts (CC). I really think this set is so cute and I especially love that they are themed with Christmas accessories making them perfect for fun and playful  holiday cards.


 I combined these adorable images with the new Sweet Shop Frame CC that has the sweetest tiny scallop edge detail, a candy mint and a set of tags. I also added a layered bow from the Mini Bow Box CC set. 

After stamping out the images I colored everything with COPIC markers and cut out using the coordinating Creative Cuts. I added small white highlights then adhered them onto my Sweet Shop frame that I cut out twice and glued together. I arranged the images towards the bottoms so my embossed sentiment would be visible. Then I added my pink inkblended bow. I finished this off by layering over some bright plaid-like patterned paper and adding few star sequins. 


Make sure to head over to the Mama Elephant blog and Instagram feed to see all of the incredible inspiration, and to hop along for your chance to win! 


Monday, July 10, 2023

Mama Elephant July Designer Series


Hello crafty friends. Today I’m super honored to be sharing my first Designer Series project as a member of the incredible Mama Elephant Design Team. It’s such an honor to be considered part of this group of talented cardmakers. 


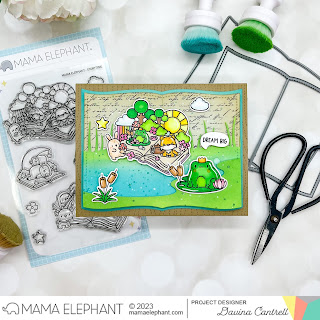
Being an avid reader, the Storybook products really stood out to me, for my first complex scene. I adore the playfulness of the little meadow themed book from Storytime, with the cute frog and fox. I combined this nice large image with a larger frog and cattails spray from Hello Froggy. I colored everything with bright citrus colors and die cut with the coordinating Creative Cuts. 


I used the beautiful Turn the Page Creative Cut die to make a full layered book. I cut layers from colored cardstock for the aqua base, and patterned paper for the smaller stitched layer. I also cut a stitched page from Bristol smooth cardstock, that I die cut with the Pond Scene Creative Cuts. After inkblending, I layered these together and adhered my images, often using foam tape. I folded a pice of plain copy paper into fourths, and die cut that as well with the stitched layer. I stapled those four pages to the aqua base, then gently distressed the edges, before adhering my decorated scene on top. It’s not noticeable on the photos but my book has a “real” appearance with many pages that are easily visible in person 


I finished off my little book scene with a small word bubble that I stamped with a “Dream Big” sentiment from the Storybook Sayings sentiment set. I love the playfulness of this scene, like a fantasy or daydream. 


I hope you enjoyed this card and find some time to Dream Big and get creative in the next few days, make sure to check out all of the inspiration from the Mama Elephant Design Team. Thank you, 

Davina 


Supply List: 

Storybook Stamps & CC

Storybook Sayings & CC

Hello Froggy & CC

Turn the Page CC

Pond Scene CC 


Wednesday, June 28, 2023

Mama Elephant Stamp Highlights Yummy Snacks


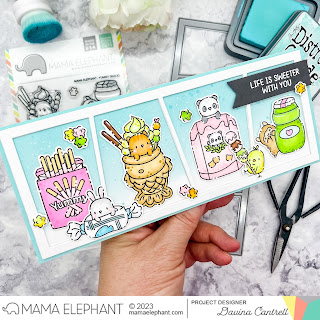
 Hello crafty friends. Today is the last day of a stamp Highlights from the Mama Elephant June Release, and today we are featuring the cutest Yummy Snacks. I absolutely adore these cute critters with all the delicious treats and had to use them all on one giant slimline. 

I stamped and colored all of the wonderful large images using bright happy colors. Then, I die cut them all using the coordinating dies. I made the slimline scene by cutting out the Slim Comic Strip  slimline die 3 times, then glued them together. I adhered the die sit strip to a gently inkblended background panel that I splattered with white and iridescent ink. I arranged the images in and around the scene, and finished it off with a heat embossed sentiment strip. I love how the Star candy looks scattered around like confetti. 

I hope you like this nice big scene, and take the time to see the rest of the incredible projects from the Design Team. Thank you for stopping by,
Davina 


Monday, June 26, 2023

Mama Elephants Stamp Highlight Follow Your Dreams


Hello crafty friends. Today, Mama Elephant, is highlighting the beautiful new scripty stamp set called Follow Your Dreams . It’s such a wonderful large size that it fills up the majority of your cardfront and Creative Cuts perfectly cut it out, even the teeny inside pieces that are often an eyesore.


I used gold embossing powder with this stamp set , and layered it above a dreamy blue in blended background that I die cut with the Galactic Cover Plate. I surrounded the day, cut sentiment with some adorable Little Agenda Unicorns , and a rainbow. To finish it off, I stamped one of the inspirational sentiments on the inside of my card. 


Thank you so much for stopping by, make sure to check out the rest of the design team inspiration using this fantastic new set,

Davina 

Wednesday, June 21, 2023

Mama Elephant Stamp Highlight Boxed Drinks


Hello Crafty friends! I’m back with another Stamp Highlight for Mama Elephant Stamps, and today we are featuring Boxed Drinks. This adorable set has 2 different juice box shapes and several cute critters with fruit, and the coordinating dies ar perfect for making shakers. 


I just loved the little milk carton shaped box so much that I couldn’t help but make a strawberry milk themed card.  I put a pair of cute cows and a hamster up front with some pink strawberries, and arranged everything onto some grassy layers over a bright inkblended sky. I embossed a white sentiment from the set, that I combined with some Lucky Alphas  creative cuts. 


I finished this off with some playful patterned paper and a few little puffy clouds from the Little Agenda Airplanes stamp set. I hope you like this sweet little card and take the time to check out the rest of the talented Design Team projects for more inspiration for the Boxed Drinks Stamp set. Thanks you for stopping by, Davina 


Monday, June 19, 2023

Mama Elephant Stamp Highlight Around The Campfire


Hello crafty friends! The June Mama Elephant release is live and available in the Mama Elephant Shop . Today we are Highlighting the adorable set called Around the Campfire. This camping themed set is perfect for making outdoorsy scenes. It has so many cute critters and  includes a campfire and tent.


I made a fun nighttime slimline card featuring the cuties from the set and built my scene using the Slim Card Basics slimline die set. I inkblended a purple hued sky and splattered with white and black ink. 


Next, I layered some grassy hills across the bottom. I adhered my critters across the scene and added a stamped banner sentiment. I finished this card of by adding holographic die cut stars using a star confetti die from the Party Scene Cover CC

Make sure to head over to the Mama Elephant Blog to see the inspiration from the entire Design Team, thank you for stopping by,

Davina 

Thursday, June 15, 2023

Mama Elephant Stampede


Welcome to the Mama Elephant Design Team blog hop!

Our newest release is now live and available for purchase in the store!

www.mamaelephant.com


I’m so honored to have been invited to join the incredible Mama Elephant Design Team for this term. The June release is full of wonderfully cute illustrations and innovative dies. The card I’m sharing for the Stampede features the new Pop Up Trellis Bloom and the new Banner Greeting dies. 

I loved the idea of creating a window flower box with the pop up portion of this die set. I backed the window pane with a golden inked panel, tucked my garden into my widow box making sure it could all fold flat, and added a sweet pair of garden gnomes from Little Gnome Agenda stamp set.

I adhered my widow upon a brick stenciled background and finished it off with a pink die cut banner from the new Banner Greetings set. I just love the Gnomeo and Juliet vibes the little balcony scene is giving and hope that you enjoy it also. Please hop along to see see all of the incredible inspiration. Asks for stopping by, Davina 


Check out the rest of the hop for amazing inspiration from our Design Team!


To celebrate the new release, Mama Elephant is picking 1 winner to win a prize pack! Open to Domestic & International (winner pays for shipping)


» 1. Leave a comment on the collective Design Team's Instagram Stampede post
» 2. Leave a comment on our Facebook Stampede post
» 3. Leave a comment on any of the Introduction videos on YouTube
 
Each action qualifies for one entry, max 3 entries per stampeder please and good luck!
 
Check out the rest of the hop for amazing inspiration from our Design Team!


Thank you for stopping by! Have a great day from all of us!
 

Tuesday, June 13, 2023

Pretty Pink Posh June Release Blog Hop

Hello crafty friends! Davina here with some incredible new productsfrom Pretty Pink Posh. The new June release is bursting with sweet juicy fruit. And not just regular fruit, but super cute stamps, dies, and stencils that will always be perfectly in season! 


Some of my favorite products are the strawberry themed items. I couldn't wait to use the adorable berry carton in the Fresh Berries Stamp Set. I decided to make a lush boxcard using the Scallop Boxcard Die Set and filled it with grassy layers and stamped images. 


Although it’s not very visible in the photos, I used the new Layered Strawberry Stencils to create a dreamy pink and green background for my boxcard. I gently splattered the paper before using gold embossing paste for the seeds. Next, I assembled the boxcard, creating 3 grassy inserts and adding a 4th little layer of grass behind the very front piece. 


I stamped the strawberry strip from the Fruit Borders Stamp Set in layers to make a sort of patterned paper. I die cut the little scalloped panels for the boxcard, and colored it in with shades of pink and green to match my card. Then, I stamped the leaves and basket onto colored cardstock with matching colored ink. I combined those large images with copic colored berries and sweet little bees from the Bee Friends Stamp Set


I tucked my images throughout the layers, and adhered the little bees to acetate strips for a floating whimsical look. Finally, I finished off this cute little card with a heat embossed sentiment from the Fresh Berry Stamp set. I really love this soft pink basket of berries and hope that you do too. Thank you for stopping by and make sure to hop along to see the inspiration from the Design Team,

Davina 

Wednesday, May 3, 2023

Pretty Pink Posh May Blog Hop

Hello Crafty friends! Davina here, sharing brand new products from the Pretty Pink Posh May release. This beautifully curated release is full of items for all of our spring/summer events, like Graduations and Fathers Day, pretty bird themed sets, and more. 


I especially loved these detailed Decorative Birdhouses Die Set. All of the pretty stitched details and various door options made it so fun to play with. I cut each house from Bristol Smooth Cardstock two times. With one of each design, I inkblended the house with Distress Oxide Ink, then secured the scallop and trim with washi tape from behind. I also added a little bit of marker detail to each house. Next, I adhered the white trim from my second die cut houses, layered on top, and used a darker marker to color the small strips. Then, I cut and added the doors to each little house. 


I was so excited that the birds from A Little Birdie stamp set fit so perfectly with these houses. I stamped and colored three birds to add to my houses, and layered them onto a slimline cardbase that I gently inked.  I stamped the nice long branch from the Spring Birdhouses stamp set onto the cardbase as well. I intentionally left it as an outline so it wouldn’t distract from my little row of cute houses. I finished this off  with a heat embossed sentiment and a sprinkling of colored confetti from the new Rainbow Shimmer Confetti Mix

Make sure you “Hop along” all three days to see the incredible DT samples with this wonderful release,

Davina