Showing posts with label spring. Show all posts

Wednesday, February 26, 2025

February Designer Series with Mama Elephant


Hello crafty friends! Davina here, with Mama Elephant, sharing my Designer Series project for February. I created a bursting pop up box of “Happy Mail” featuring a super cute new stamp set called Handle With Care. I always appreciate when a large block text stamp set has the coordinating dies and this set is not exception, and I especially love all the cute little panda bears that accompany the text. I combined a few other stamp sets to fill this card and love that the older Incoming Mail stamps are also mail themed and pandas! They were screaming for a fun collaboration. 


I decided to make a pop up box card using the 3D Pop Up Box Card Die set, and to make it look like a cute cardboard shipping box. I began by cutting the main box twice using Kraft cardstock and then gently inkblending all of the edges and folds with Distress Oxide Inks. I cut the inserts, using the included hill, from bright patterned papers and assembled the box using hot glue (always my favorite way of making secure box cards)

I stamped the sentiments from Handle With Care with colorful matching ink and cut out using the coordinating Creative Cuts. Then after cutting some panels for the flaps, I adhered and decorated the “box”. I used some small stamps the stamp sets Essential Tag Sayings for even more decoration on the outer box by stamping directly on the box with a taupe colored dye ink. 


For the inside of the pop up design, I stamped and colored the images from Incoming Mail, and arranged them onto my inserts, and also onto the fold down panels. I always adhere my images onto the inserts using hot glue because it sets up quickly and is sturdy enough to hold the images securely, without the risk of them slipping down or shifting on accident. I love how cute everything looks together and the way that the images all complement each other. 


I hope you enjoy this look at my “Happy Mail”, and pull out your older box card dies and make a bursting little box card for yourself. Thank you for stopping by, Davina 


Saturday, February 15, 2025

Mama Elephant February Stampede Blog Hop


Welcome to the Mama Elephant Design Team blog hop!

Our newest release is now live and available for purchase in the store!

www.mamaelephant.com


Today I’m sharing a fun trip of cloche type glass jars, that I created out of several die cuts, to fill some some beautiful Easter images from a couple of the new release sets. I used May Your Dreams, Basket of Goodies, along with that chick & eggs from Delivering Spring Happiness, to make some grass and flower filled displays. I used the B2B Arches and and trimmed the scallop frames for the bottom from Two Scallop Frames CC. I finished this off with a Spring Banner and love how fresh and vibrant this is.


Check out the rest of the hop for amazing inspiration from our Design Team!


To celebrate the new release, Mama Elephant is picking 1 winner to win a prize pack (winner will be notified in their comment on Instagram, Facebook or YouTube)! Open to Domestic & International (winner pays for shipping)


» 1. Leave a comment on the collective Design Team's Instagram Stampede post
» 2. Leave a comment on our Facebook Stampede post
» 3. Leave a comment on any of the Introduction videos on YouTube
 
Each action qualifies for one entry, max 3 entries per stampeder please and good luck!
(Winner will be announced and notified directly as a reply to the winning comment)
 
Check out the rest of the hop for amazing inspiration from our Design Team!
 
@mamaelephant
@vera_rhuhay
@nicholspohr
@dasmimz
@popsiclesticks
@cre8iveli


Thank you for stopping by! Have a great day from all of us!


Sunday, April 21, 2024

Pretty Pink Posh Spring Theme Week

Hello crafty friends! Davina here, buzzing by with a Spring themed mini slimline card. I used several cute Pretty Pink Posh products, new and older, to make this sweet little scene. 


I started by selectively cutting the largest  Slimline Scallop Frames Die to get the proportions I wanted. I like to make my mini slimline cards 6.5 x 3.5 in dimension. Which is only 2 inches shorter than a standard slimline card. This frame die is only 8 x 3, so I will trim it to 6 x 3, then add a background layer. I accomplished this by placing the top cutting mat an inch short of the edge of the die. Then I measured and marked where 6 would be, and very carefully placed the edge of the die at the marked point, while making sure the scallops fit back into the frame. I taped it in place with washi tape to avoid any slippage, and cut only that last inch. 

I watercolored a panel for the background using multiple shades of yellows and allowed that to dry before trimming it to fir the back of my frame and cutting some cute stitched hexagons using a die from the new Spring Mug Additions Die Set


I stamped several adorable bumblebees from the Bee Friends stamp set and heat embossed the sentiment in the upper area of my watercolored panel. I also stamped and colored the large jar from the Spring Jar set and the little decorative bow. I used the Spring Mug Additions Dies to cut some small flowers, leaves, and the honey dipper before coloring each item with a combination of ink blending and COPIC coloring. 


I used foam tape strips to adhere the scalloped frame to the watercolored background, the centered the whole thing onto a patterned panel that is 6.5 x 3.5. I adhered my hexagons, honey jar, bees and flowers using foam tape hot glue. Then I finished it off by adding some sparkly Wink of Stella to the bees wings. 

Thank you for stopping by, make sure to check out all of the Spring Theme Week inspiration on the Pretty Pink Posh Blog, 

Davina 

Wednesday, March 6, 2024

Pretty Pink Posh Spring Release Blog Hop


Hello crafty friends! Davina here to share Spring Joy with the new Pretty Pink Posh release Blog Hop. This beautiful release is full of Easter and Spring products sure to make you fall in love. As always there is a diverse amount of products from stencils and stamps to many new die sets and so many gorgeous butterflies! There are also add ons to our favorite lines, like the super cute themed cupcakes and playful train sets. Make sure to “Hop Along” and leave a comment at each stop for your chance to win one of 3 $30 gifts.


I made a Spring shaker card using a combination of several new items. I started by cutting a background using the Butterfly Cover Plate from heavy cardstock. I made it a shaker by mounting it with foam tape over a pretty pastel plaid backgroundand and filling it with the new assortment of shaker beads called Pastel Party. I’ve been adding an extra 1/4 inch to my cards recently, so that my pattered papers can extend beyond the A2 cover plates. So I’ve been cutting larger card bases from my extensive stash of 12x12 cardstock. 


I stamped and colored two of the spring themed cupcakes from Easter Cupcake Set, and die cut using the now de-tabbed coordinating dies! They are incredible. I also die cut several butterflies from the new Stitched Butterflies Dies that are so perfect and detailed for year around projects. I arranged my images onto my card and topped the cupcakes with a glittery “Spring” that I cut from the new Spring Script Die.

I finished off this card with an embossed sentiment from Ester Sentiments Strips Stamps Set on a layered Sentiment Strips Banner, and a few sparkling sequins. I hope you love this new release as much as I do and take a few minutes to participate in the blog hop. Make sure you leave a comment at each blog for your chance to win one of 3 $30 prizes. 

Pretty Pink Posh blog 
Nichol Spohr
Amy Rysavy
Marine Simon
Barbara Tarayao
Lindsey Larsen
Kristie Marcotte
Lea Lawson
Carly Minner
Davina Cantrell  you are here 


Thursday, June 15, 2023

Mama Elephant Stampede


Welcome to the Mama Elephant Design Team blog hop!

Our newest release is now live and available for purchase in the store!

www.mamaelephant.com


I’m so honored to have been invited to join the incredible Mama Elephant Design Team for this term. The June release is full of wonderfully cute illustrations and innovative dies. The card I’m sharing for the Stampede features the new Pop Up Trellis Bloom and the new Banner Greeting dies. 

I loved the idea of creating a window flower box with the pop up portion of this die set. I backed the window pane with a golden inked panel, tucked my garden into my widow box making sure it could all fold flat, and added a sweet pair of garden gnomes from Little Gnome Agenda stamp set.

I adhered my widow upon a brick stenciled background and finished it off with a pink die cut banner from the new Banner Greetings set. I just love the Gnomeo and Juliet vibes the little balcony scene is giving and hope that you enjoy it also. Please hop along to see see all of the incredible inspiration. Asks for stopping by, Davina 


Check out the rest of the hop for amazing inspiration from our Design Team!


To celebrate the new release, Mama Elephant is picking 1 winner to win a prize pack! Open to Domestic & International (winner pays for shipping)


» 1. Leave a comment on the collective Design Team's Instagram Stampede post
» 2. Leave a comment on our Facebook Stampede post
» 3. Leave a comment on any of the Introduction videos on YouTube
 
Each action qualifies for one entry, max 3 entries per stampeder please and good luck!
 
Check out the rest of the hop for amazing inspiration from our Design Team!


Thank you for stopping by! Have a great day from all of us!
 

Wednesday, May 3, 2023

Pretty Pink Posh May Blog Hop

Hello Crafty friends! Davina here, sharing brand new products from the Pretty Pink Posh May release. This beautifully curated release is full of items for all of our spring/summer events, like Graduations and Fathers Day, pretty bird themed sets, and more. 


I especially loved these detailed Decorative Birdhouses Die Set. All of the pretty stitched details and various door options made it so fun to play with. I cut each house from Bristol Smooth Cardstock two times. With one of each design, I inkblended the house with Distress Oxide Ink, then secured the scallop and trim with washi tape from behind. I also added a little bit of marker detail to each house. Next, I adhered the white trim from my second die cut houses, layered on top, and used a darker marker to color the small strips. Then, I cut and added the doors to each little house. 


I was so excited that the birds from A Little Birdie stamp set fit so perfectly with these houses. I stamped and colored three birds to add to my houses, and layered them onto a slimline cardbase that I gently inked.  I stamped the nice long branch from the Spring Birdhouses stamp set onto the cardbase as well. I intentionally left it as an outline so it wouldn’t distract from my little row of cute houses. I finished this off  with a heat embossed sentiment and a sprinkling of colored confetti from the new Rainbow Shimmer Confetti Mix

Make sure you “Hop along” all three days to see the incredible DT samples with this wonderful release,

Davina 


Saturday, March 18, 2023

Spring Theme with Pretty Pink Posh

Hello crafty friends! Davina here to share some Spring inspiration using some gorgeous products from Pretty Pink Posh. I combined some brand new products along with some of my favorites from last year, and I hope you love it. 


First, I used the incredible new Scallop Box Card to die cut the pieces for my card. I used some pretty colored cardstock that coordinated with some spring colored plaid patterned paper. I cut 3 of the front pieces, and trimmed two of them in half to make the “layers”. I added some trimmed grassy paper panels to the front of those “layers” before adhering them into my box. 


From colored cardstock, I also created my carrot forest, using the carrot die from the Easter Mug Add On die set. I gently inked the edges with Distress Oxide Inks and added some details with copic markers. I stamped lots of images from the Easter Signs and Easter Wreath stamp sets. I colored everything in using bright spring colors and cut out using the coordinating dies.


I used the large scalloped die to cut out two panels. One for the front, and one for the back. I inked a pink and yellow blended ombré for the front with lots of sparkly splatter, and for the back piece I stamped my sentiment. I adhered the panels and went to work filling up my layers with all the fun goodies. 


I attached all the carrots together into one piece before adding them into my second layer. It left plenty of room for my butterflies to flutter on acetate strips on that back layer. Then I assembled my main images up front. For the very front I layered the garden sign with a popped up “Spring” that I made with the new Happy Spring Shadow Dies

Everything looks great from all angles and this new  boxcard die set  is just the cutest! I hope that you feel inspired to create some beautiful spring projects for yourself. 

Thank your for stopping by, 

Davina 

Tuesday, March 15, 2022

Pretty Pink Posh March Release Blog Hop


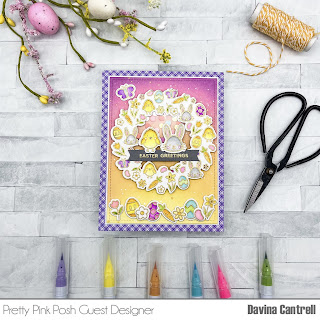
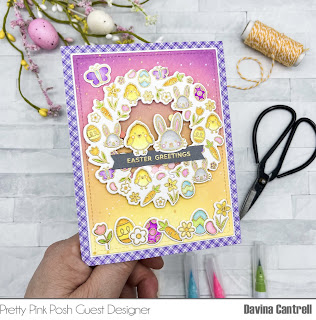
Hello crafty friends! I’m very excited to be participating with the incredible Pretty Pink Posh design team this month, as a guest designer. This release is available now and full of the cutest spring and Easter themed stamp and die sets, as well as several generous giveaways. I’ve created quite a few projects with them, but for todays blog hop, I would like to share a fun gold embossed shaker card with you. 


For this inky beauty, I stamped and heat embossed the grand image from Easter Wreath, along with many of the smaller images, then I colored them with Zig Real Brush markers. After using the coordinating dies to cut out my images, I adhered a circle of acetate behind the wreath. I mounted it upon an inkblended background that I splattered with white and gold ink. I added a heaping teaspoon of spring colored clay confetti to the center before securing firmly with foam tape. I used a patterned paper layer to ground the scene, then created a row of images along the bottom. To finish this off, I stamped the sentiment from the set into a straight line, then heat embossed with more gold. I really love how bold this turned out. 


And now for the juicy details of the blog hop! There will be 3 $25 gift certificates awarded, one winner each day. Winners will be chosen randomly along the blog hops, so make sure you leave a comment at each stop. Comments must be left by 11:59 pm est on 3/20/2022  and the winners will be announced on the PPP blog. 

Thank you so much for stopping by, Your next stop along the blog hop is Elaine 
Pretty Pink Posh blog 
Mona Toth
Rebecca Keppel
Davina Cantrell ( you are here)
Elaine Wakeling
Dana Kirby
Jeanne Jachna


Saturday, February 19, 2022

Mama Elephant Stamp Highlight: Celebration Hamsters

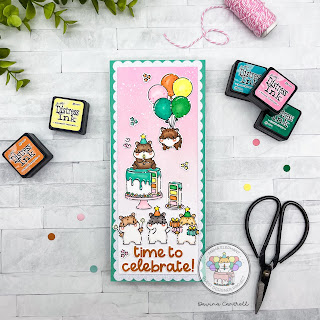
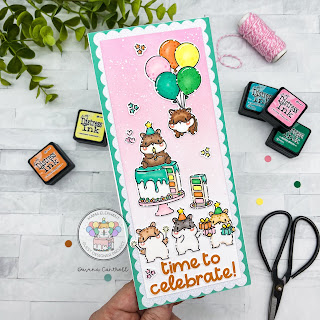
 Hello crafty friends! Today Mama Elephant  is highlighting the super cute stamps and creative cuts Celebration Hamsters. I really love the cute hamster and the all the little party poses! I can’t pick a favorite image, they are all so great. I really enjoy that they match the small images from Little Hamster Agenda too. I really wanted to make a large slimline card for these cuties, so I would have plenty of room for very image and a large sentiment. 


I started by cutting an aqua panel using the new B2B Slimline CC dies. I like that little bit of extra space these dies give you. They perfectly divide a standard 8.5 x 11 card into 3 equal sized pieces. That means I had plenty of room for these cute critters to fit on my scene. I made a glittery scalloped panel using the Slim Card Basics CC, and then a third panel from Bristol Smooth Cardstock using the the 2nd largest B2B slimline CC. I inked that panel with bright pink ink and gave a few splatters with glittery perfect pearls and white ink. 


I stamped and colored all of the images using copic markers before cutting out with the coordinating dies. I arranged all of my images onto the scene leaving a few inches in the white bottom space for my sentiment. I stamped a lovely sentiment from Wishes Enclosed and adhered it to the open area. I decided I wanted a few little extra embellishments, so I stamped and colored the stars that are included in the set and glued them down around my images. 

This entire release is amazing, and is so fun to create with. I hope you enjoy this card and get inspired to get crafty this weekend. Don’t forget to drop by the Mama Elephant Blog  to see all the wonderful cards from the entire team. Thank you for stopping by, Davina  

Sunday, February 28, 2021

Heffy Doodle and Sunny Studio Stamps Collaboration Blog Hop


Welcome to the Heffy Doodle and Sunny Studio Stamps Collaboration Blog Hop!

Design Team members from both companies are sharing inspiration using products from both companies! 

I’m so honored to be participating in this fun collaboration. Both wonderful companies provide such amazing products and with such cute themes. It was so simple to bring them both together since my creativity was flowing with excitement, and I love the the way they look together. 

I knew right away when I saw the cute mini stamp set from Sunny Studios called Just Bee-Cause that I wanted to combine the images with Heffy Doodles signature bears. I stamped out some of the cute bears from Beary Big Heart and colored everything with copic markers before die cutting with the coordinating dies.  I was so happy to have the perfect Country Scenes Stamp   to easily create the wooded background for my card. I added a die cut grassy layer on the bottom using the Grassy Lass Borders and popped it up on some foam tape. 

I inkblended a cloudy sky panel using Cloudy Skies Stencil and distress oxide inks, then splattered with water, white and gold ink.  I created a custom sentiment for the sky using the Rascal Alphabet Stamps And Dies and Scattered Straw Distress Oxide ink. I surrounded my Bee Kind sentiment with cute Sunny Studios he’s, and a few gold stars then mounted my image panel onto a contrasting black layer and some patterned paper. 

I love the way these companies products blend together, and hopefully as you hop along to all of the inspiration from both DTs, you will be motivated to do a little mixing and collaborating your self. 


BLOG HOP DETAILS:

To be entered to win the giveaway, all you need to do is comment at each stop along the Blog Hop!
Sunny Studio Stamps will be giving away $35 and Heffy Doodle will be giving away £25 to their respective stores!  Be sure to comment before 11:59 PM on March 3rd to be entered to win!

Each company will post their random winner on March 4th at 10AM EST!  Make sure to check the Heffy Doodle Blog and Sunny Studio Stamps Blog to see if you’re a winner!

(Optional:  You should have come from [link to person before you in the hop] and the next stop is [link to next person]. )


Saturday, March 7, 2020

Countdown to Confetti Day #3


Hello my inky fingered friends. Today is Day 3 of the countdown to Reverse Confettis 50th Release! I have 3 cards to share with you today all featuring the incredible critter Illustrations by Dawn Machell.

I used the same color palette for all three cards,  it used variations of colors in each. For example, the pink is a different shade of pink in each card, giving each project a different feel, even though the same four colors are used. Pink, sunshine yellow, blue , and navy.

For the first card I inkblended a rosy pink onto my card panel and splattered it with water, white ink, and shimmer. I stamped my images from School Days  onto bright white Neenah Cardstock and copic colored. After cutting out with the School Days Confetti Cuts, inadded white dot highlights.

I adhered the images onto my inkblended panel then added a heat embossed banner strip. I finished it off with a sprinkling of clear iridescent sequins.

On my second card I used the new Chalk it Up stamp set and matching dies. I also used a new cover panel  die called Double Stitched Window, it reminded me of a decorative Polaroid photo, so I created a shaker card with it.

I trimmed 1/8th inch off of each of the four sides and adhered some clear acetate on the back. I framed it out with thick Tombow foam tape, and prepared my panel.

I inkblended my background in sky blues and green before splattering with the same combination as my first card. Then I stamped and copic colored all of my images. I gave a playful dotted texture to these images before highlighting and glueing down my images.

I added a generous pile of sequins to the center and mounted my “Polaroid” over top. Then I mounted the entire shaker upon some pink textured cardstock. I love that the glossy heat embossed texture is shiny right next to the reflective acetate.

On my third card, I used the new Spring Bunnies stamps and dies. I inked my sky onto the upper portion of the panel creating a crisp deep sky. I loved the sunny cloud from Chalk it Up so much, I used it here too.

I created a little butterfly catching scene and adhered it over a pink embossed banner. I used a trio of hearts from the Huggable stamp set, and used those instead of sequins. I really love this trio of cRds. I used so many of the same elements and colors and techniques. Yet achieved such different results in each card.

There will be a $15 Reverse Confetti gift certificate  for one lucky blog commenter, who hops along and comments on each Designers Countdown to Confetti Sneak Peeks. Comments will be closed on the 7th at noon with a winner announced at 5pm CST. There’s a second prize for those who comment on the Reverse Confetti FB so head on over Reverse Confetti Facebook 

Eileen Ong
Thank you for stopping by, Davina