Hello crafty friends! I’m very excited to share this next project with you. Sadly, it is my last project as a guest designer for the incredible Mama Elephant team, so I wanted to make something with Pop! I created a nice big Center Window Card using the cute images from
Celebration Hamsters and the new larger
B2B Slimline CC die set. I have made cards like this before, using a specific die set, but they were much smaller. So since I was familiar with the workings of the pieces, I was able to create this with just a few dies and my paper trimmer.
I started by cutting the bases for this card. Using the two largest frames from the B2B Slimline CC I cut 3 pieces of cardstock. For the outer layer, I used the largest die and some colored cardstock. For the inner portion, I cut 2 pieces of white cardstock with the 2nd die. I measured, scored, and folded each piece in half the long ways. Using one of the smaller white panels, carefully trim 1.5 inches from each side, then score at about 1/3 inch from each new side. The center portion should now be about 4 inches with the fold in the middle. I used the 3rd largest circle die from Circle Combo CC die set to remove the center portion for the “window”.

It is easiest to color the inside before attaching the window. Whether you choose to add patterned paper or inkblend the 2 white panels, now is the time to do that. I added glitter cardstock cut with a grassy border to look like the hay inside a hamster cage. I did add that over and under my window. It takes fiddling, and created tons of bulk. If you are planning on mailing a card like this, I would recommend not adding extra thick glitter cardstock haha.

Once your background in finished, measure your window for placement. With the tabs folded and creased in, turn window right side facing into the crease of the base, and lightly mark with a pencil where the edge is. It should be approximately at the 2 inch point. Then, face the window forward and adhere with double sided scor tape, making sure the fold line is at the pencil mark. The center of the window should not extend beyond the edges of the base when closed. I also added two layers inside of the window to attach images to. I used a remnant scrap piece of white cardstock that I trimmed 1/2 inch tall long strip. I did the measurements in the same way I did the window. Fold in half, measured 1.5 inches, score, and trim after 1/3 inch. I did this on both sides of the center fold. I made another that is 3/4 inch long. I covered mine with more glittery cardstock (after attaching) but you could use one long piece of colored cardstock (instead of using plain white card and covering) with a decorative edge, instead of layering all the paper like I did. As I mentioned before it was a little too bulky.

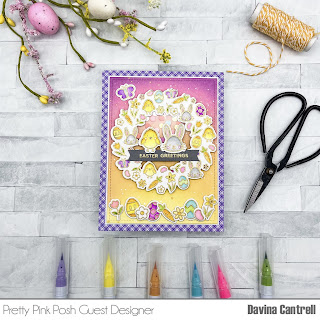
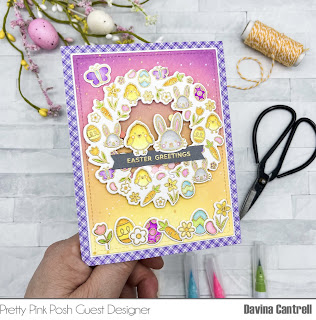
Once all of my layers were adhered, I stamped and colored images from
Celebration Hamsters and
Little Hamster Agenda. I added the images throughout my scene and used some strips of acetate to give a floating appearance. I adhered my decorative center into the larger folded panel, then decorated the front. I layered some pretty papers and created a golden sentiment using the
Wishes Enclosed stamps and dies and gold embossing powders. I added one more little hamster and finished it off with a few sparkling sequins.
If you made it this far, I thank you very much! I really enjoyed engineering this explosion of a party, and I hope you give it a try yourself. Thank you again,
Davina