Showing posts with label Pretty Pink Posh. Show all posts

Saturday, June 8, 2024

Pretty Pink Posh Sneak Peek Outer Space

Hello crafty friends! Davina here with some “out of this world”, sneak peeks, featuring the June Pretty Pink Posh release. This playful release is full of imaginative play themed sets like construction, first responders, and space. I made a pair of cards that feature some of the space theme products and hope that you are as excited as I was. 

Both cards were created using the Outer Space stamp sets with the coordinating dies, and they are both shaker cards, using the new Shaker Beads mix called Beach Day. I felt like this color combo would be perfect for my space scenes and love the fiery gold and orange with the shades of blue. 


For the first card, I started by die cutting my background using the Pierced Star Plate from Bristol Smooth Cardstock. I inkblended my panel with a blue gradient starting with a light aqua and finishing with a dark teal around the edges. After splattering with several inks, including gold, I put it aside to dry while i worked on the other components. 


I made the shaker element using the new Planet Shaker Die Set. I inkblended the center using the warm colors, and cut the ring from holographic cardstock. I filled the shaker about 1/3 of the way full for maximum effect. Next, I stamped and colored my images using copic markers and added white highlights and some glittery Wink of Stella accents. I backed my star panel with some starry patterned papers I had in my craft stash, and assembled the cards with the shaker in the center. I finished the card off with a sentiment from the stamps set, on a bold white banner. 


I loved the results so much I decided to make a second version of the card but with the new Rocket Shaker Die Set, and the other images from the Outer Space stamp set. I backed this card in a dark navy blue version of the same patterned paper and used the larger more decorative sentiment from the set. I think the reflective holographic paper was absolutely the way to go with these shaker die sets, as the colors pick up so much from the copic colored images, and really bring the scenes to life. 

I hope you like this pair of cards as much as I do, and are inspired to stock up on the new release for these “out of this world” collection of products! Thank you for stopping by, Davina 

Sunday, April 21, 2024

Pretty Pink Posh Spring Theme Week

Hello crafty friends! Davina here, buzzing by with a Spring themed mini slimline card. I used several cute Pretty Pink Posh products, new and older, to make this sweet little scene. 


I started by selectively cutting the largest  Slimline Scallop Frames Die to get the proportions I wanted. I like to make my mini slimline cards 6.5 x 3.5 in dimension. Which is only 2 inches shorter than a standard slimline card. This frame die is only 8 x 3, so I will trim it to 6 x 3, then add a background layer. I accomplished this by placing the top cutting mat an inch short of the edge of the die. Then I measured and marked where 6 would be, and very carefully placed the edge of the die at the marked point, while making sure the scallops fit back into the frame. I taped it in place with washi tape to avoid any slippage, and cut only that last inch. 

I watercolored a panel for the background using multiple shades of yellows and allowed that to dry before trimming it to fir the back of my frame and cutting some cute stitched hexagons using a die from the new Spring Mug Additions Die Set


I stamped several adorable bumblebees from the Bee Friends stamp set and heat embossed the sentiment in the upper area of my watercolored panel. I also stamped and colored the large jar from the Spring Jar set and the little decorative bow. I used the Spring Mug Additions Dies to cut some small flowers, leaves, and the honey dipper before coloring each item with a combination of ink blending and COPIC coloring. 


I used foam tape strips to adhere the scalloped frame to the watercolored background, the centered the whole thing onto a patterned panel that is 6.5 x 3.5. I adhered my hexagons, honey jar, bees and flowers using foam tape hot glue. Then I finished it off by adding some sparkly Wink of Stella to the bees wings. 

Thank you for stopping by, make sure to check out all of the Spring Theme Week inspiration on the Pretty Pink Posh Blog, 

Davina 

Wednesday, March 6, 2024

Pretty Pink Posh Spring Release Blog Hop


Hello crafty friends! Davina here to share Spring Joy with the new Pretty Pink Posh release Blog Hop. This beautiful release is full of Easter and Spring products sure to make you fall in love. As always there is a diverse amount of products from stencils and stamps to many new die sets and so many gorgeous butterflies! There are also add ons to our favorite lines, like the super cute themed cupcakes and playful train sets. Make sure to “Hop Along” and leave a comment at each stop for your chance to win one of 3 $30 gifts.


I made a Spring shaker card using a combination of several new items. I started by cutting a background using the Butterfly Cover Plate from heavy cardstock. I made it a shaker by mounting it with foam tape over a pretty pastel plaid backgroundand and filling it with the new assortment of shaker beads called Pastel Party. I’ve been adding an extra 1/4 inch to my cards recently, so that my pattered papers can extend beyond the A2 cover plates. So I’ve been cutting larger card bases from my extensive stash of 12x12 cardstock. 


I stamped and colored two of the spring themed cupcakes from Easter Cupcake Set, and die cut using the now de-tabbed coordinating dies! They are incredible. I also die cut several butterflies from the new Stitched Butterflies Dies that are so perfect and detailed for year around projects. I arranged my images onto my card and topped the cupcakes with a glittery “Spring” that I cut from the new Spring Script Die.

I finished off this card with an embossed sentiment from Ester Sentiments Strips Stamps Set on a layered Sentiment Strips Banner, and a few sparkling sequins. I hope you love this new release as much as I do and take a few minutes to participate in the blog hop. Make sure you leave a comment at each blog for your chance to win one of 3 $30 prizes. 

Pretty Pink Posh blog 
Nichol Spohr
Amy Rysavy
Marine Simon
Barbara Tarayao
Lindsey Larsen
Kristie Marcotte
Lea Lawson
Carly Minner
Davina Cantrell  you are here 


Saturday, January 20, 2024

It’s Your Lucky Day with Pretty Pink Posh


Hello crafty friends! Davina here to share a bit of Luck with you. I just can’t get over how cute the newest Pretty Pink Posh release is. All the beautiful Valentines Day and St.Patricks Day products make me smile. One of the first projects I made was this St. Patricks Day Cupcake themed card. 


I used the fantastic new Big Valentines Day Cupcake Dies and the Lucky Stamp set and dies combined with the older Leprechaun image from the Best of Luck stamp set. After stamping, coloring, and ink blending my images, I assembled them over a clover filled back ground that I made using the Layered Shamrocks Stencil. I gently splattered some metallic gold ink and matted with yellow and green layers. 


I embossed my sentiment onto a black banner cut from the Sentiment Strip Die Set, and added a bakers twine bow to the top corner. I finished this off with the addition of some clay embellishments from the new St. Patricks Day Clay Confetti Mix

Thanks you for stopping by and I hope that you check out all of the fabulous inspiration from the incredible Design Team,

Davina 

Sunday, October 29, 2023

Pretty Pink Posh Autumn Theme Week

Hello crafty friends, Davina here to share so fun autumn inspiration. Pretty Pink Posh always has the prettiest fall themed products and I pulled together some of my favorites for you. There are several layered leaf stencil sets, and I gathered together a newly released stencil to use as the background for my scene. 


I started this fall card by inking the Layered Fall Wreath stencil onto the largest Eyelet Rectangle layer. I used shades of yellow, coral, orange, brown and even green for these leaves. I splattered the panel with brown and gold ink and put aside to dry. Next, I die cut the super cute Acorn Shaker Die from creamy cardstock, and inked it with several shades of brown. The large layered mushroom from the Fall Mug Additions is one of my favorite dies, with that fancy little ruffle. I colored it in shades of cream and coral, then added some splashy details. 


The main focus of this scene are the two sweet birds that are also inked die cuts. I cut two of the birds from the Stitched Birds dies, and used the residual ink on my brushes to gently add some color to these cuties. After adding some small copic details, I assembled the pieces. 


I adhered all of my die cut pieces to the stenciled background, then added a stamped sentiment from Autumn Pumpkins to the center. I loved the look of the crisp brown lines so I decided to stamp a few leaves from the same stamp set, and tucked them around the scene. I finished this off with a sprinkling of sequins from the Matte Gold Confetti Mix.

I just love how all of the products from Pretty Pink Posh mix so well together, it makes so easy to put together beautiful cards no matter what your crafty style is. Thank you for dropping by,

Davina 

Saturday, October 21, 2023

Pretty Pink Posh Christmas Cupcakes

Hello crafty friends. The beautiful October release from Pretty Pink Posh is available now and you will love it! This is the largest release ever and full of so much good stuff, like so many fantastic products to bring your winter and holiday projects to life. I created a tiered cupcake stand using the incredibly cute Christmas Cupcakes stamps and dies. I combined serial other new products and previously released items to being this fun card to life. 


I started by using the pretty Pierced Snowflake Plate on Bristol Smooth Cardstock, and inkblending an ombré citrus green background. Once it was completely dry, I trimmed it down 1/4 inch, to  make room for a striped patterned paper background layer. I stamped the cute cupcakes and colored them in before cutting them out with the coordinating dies. I used the cake stand from last summers Fancy Cake Dies to pile on my cupcakes, then I added a bow from the new Holiday Mug Additions


I wanted to add some small stamped details and I found all of the images, and a sentiment, that I needed from one older stamp set. The Holiday Envelopes stamp set from last year had all of the great snowflakes, pine boughs, and the holly with berries images that I used. I stamped some of these in colored ink, including the sentiment, and added them to my treats. Finally, I adhered my images to the inky background, using foam tape behind the cupcake stand, and added my sentiment to a cute scalloped banner from the Sentiment Strips Dies


There are so many wonderful new products to play with and so much inspiration to see, so make sure you hop along with both the New Release Blog Hop and then the Instagram Hop, to see how magically the Design Team used the products and for your chance to win! Thank you for stopping by,

Davina


Tuesday, June 13, 2023

Pretty Pink Posh June Release Blog Hop

Hello crafty friends! Davina here with some incredible new productsfrom Pretty Pink Posh. The new June release is bursting with sweet juicy fruit. And not just regular fruit, but super cute stamps, dies, and stencils that will always be perfectly in season! 


Some of my favorite products are the strawberry themed items. I couldn't wait to use the adorable berry carton in the Fresh Berries Stamp Set. I decided to make a lush boxcard using the Scallop Boxcard Die Set and filled it with grassy layers and stamped images. 


Although it’s not very visible in the photos, I used the new Layered Strawberry Stencils to create a dreamy pink and green background for my boxcard. I gently splattered the paper before using gold embossing paste for the seeds. Next, I assembled the boxcard, creating 3 grassy inserts and adding a 4th little layer of grass behind the very front piece. 


I stamped the strawberry strip from the Fruit Borders Stamp Set in layers to make a sort of patterned paper. I die cut the little scalloped panels for the boxcard, and colored it in with shades of pink and green to match my card. Then, I stamped the leaves and basket onto colored cardstock with matching colored ink. I combined those large images with copic colored berries and sweet little bees from the Bee Friends Stamp Set


I tucked my images throughout the layers, and adhered the little bees to acetate strips for a floating whimsical look. Finally, I finished off this cute little card with a heat embossed sentiment from the Fresh Berry Stamp set. I really love this soft pink basket of berries and hope that you do too. Thank you for stopping by and make sure to hop along to see the inspiration from the Design Team,

Davina 

Wednesday, May 3, 2023

Pretty Pink Posh May Blog Hop

Hello Crafty friends! Davina here, sharing brand new products from the Pretty Pink Posh May release. This beautifully curated release is full of items for all of our spring/summer events, like Graduations and Fathers Day, pretty bird themed sets, and more. 


I especially loved these detailed Decorative Birdhouses Die Set. All of the pretty stitched details and various door options made it so fun to play with. I cut each house from Bristol Smooth Cardstock two times. With one of each design, I inkblended the house with Distress Oxide Ink, then secured the scallop and trim with washi tape from behind. I also added a little bit of marker detail to each house. Next, I adhered the white trim from my second die cut houses, layered on top, and used a darker marker to color the small strips. Then, I cut and added the doors to each little house. 


I was so excited that the birds from A Little Birdie stamp set fit so perfectly with these houses. I stamped and colored three birds to add to my houses, and layered them onto a slimline cardbase that I gently inked.  I stamped the nice long branch from the Spring Birdhouses stamp set onto the cardbase as well. I intentionally left it as an outline so it wouldn’t distract from my little row of cute houses. I finished this off  with a heat embossed sentiment and a sprinkling of colored confetti from the new Rainbow Shimmer Confetti Mix

Make sure you “Hop along” all three days to see the incredible DT samples with this wonderful release,

Davina 


Saturday, March 18, 2023

Spring Theme with Pretty Pink Posh

Hello crafty friends! Davina here to share some Spring inspiration using some gorgeous products from Pretty Pink Posh. I combined some brand new products along with some of my favorites from last year, and I hope you love it. 


First, I used the incredible new Scallop Box Card to die cut the pieces for my card. I used some pretty colored cardstock that coordinated with some spring colored plaid patterned paper. I cut 3 of the front pieces, and trimmed two of them in half to make the “layers”. I added some trimmed grassy paper panels to the front of those “layers” before adhering them into my box. 


From colored cardstock, I also created my carrot forest, using the carrot die from the Easter Mug Add On die set. I gently inked the edges with Distress Oxide Inks and added some details with copic markers. I stamped lots of images from the Easter Signs and Easter Wreath stamp sets. I colored everything in using bright spring colors and cut out using the coordinating dies.


I used the large scalloped die to cut out two panels. One for the front, and one for the back. I inked a pink and yellow blended ombré for the front with lots of sparkly splatter, and for the back piece I stamped my sentiment. I adhered the panels and went to work filling up my layers with all the fun goodies. 


I attached all the carrots together into one piece before adding them into my second layer. It left plenty of room for my butterflies to flutter on acetate strips on that back layer. Then I assembled my main images up front. For the very front I layered the garden sign with a popped up “Spring” that I made with the new Happy Spring Shadow Dies

Everything looks great from all angles and this new  boxcard die set  is just the cutest! I hope that you feel inspired to create some beautiful spring projects for yourself. 

Thank your for stopping by, 

Davina 

Thursday, January 5, 2023

Pretty Pink Posh January Release Blog Hop


Hello Crafty Friends! Welcome to the first Blog Hop of 2023, I’m so excited for the January Pretty Pink Posh release. This release is huge and full of the most beautiful items. They have even added a new line to the brand, Hot Foil Dies! With so many cute Valentines themed products I chose to share an all die cut card today. 


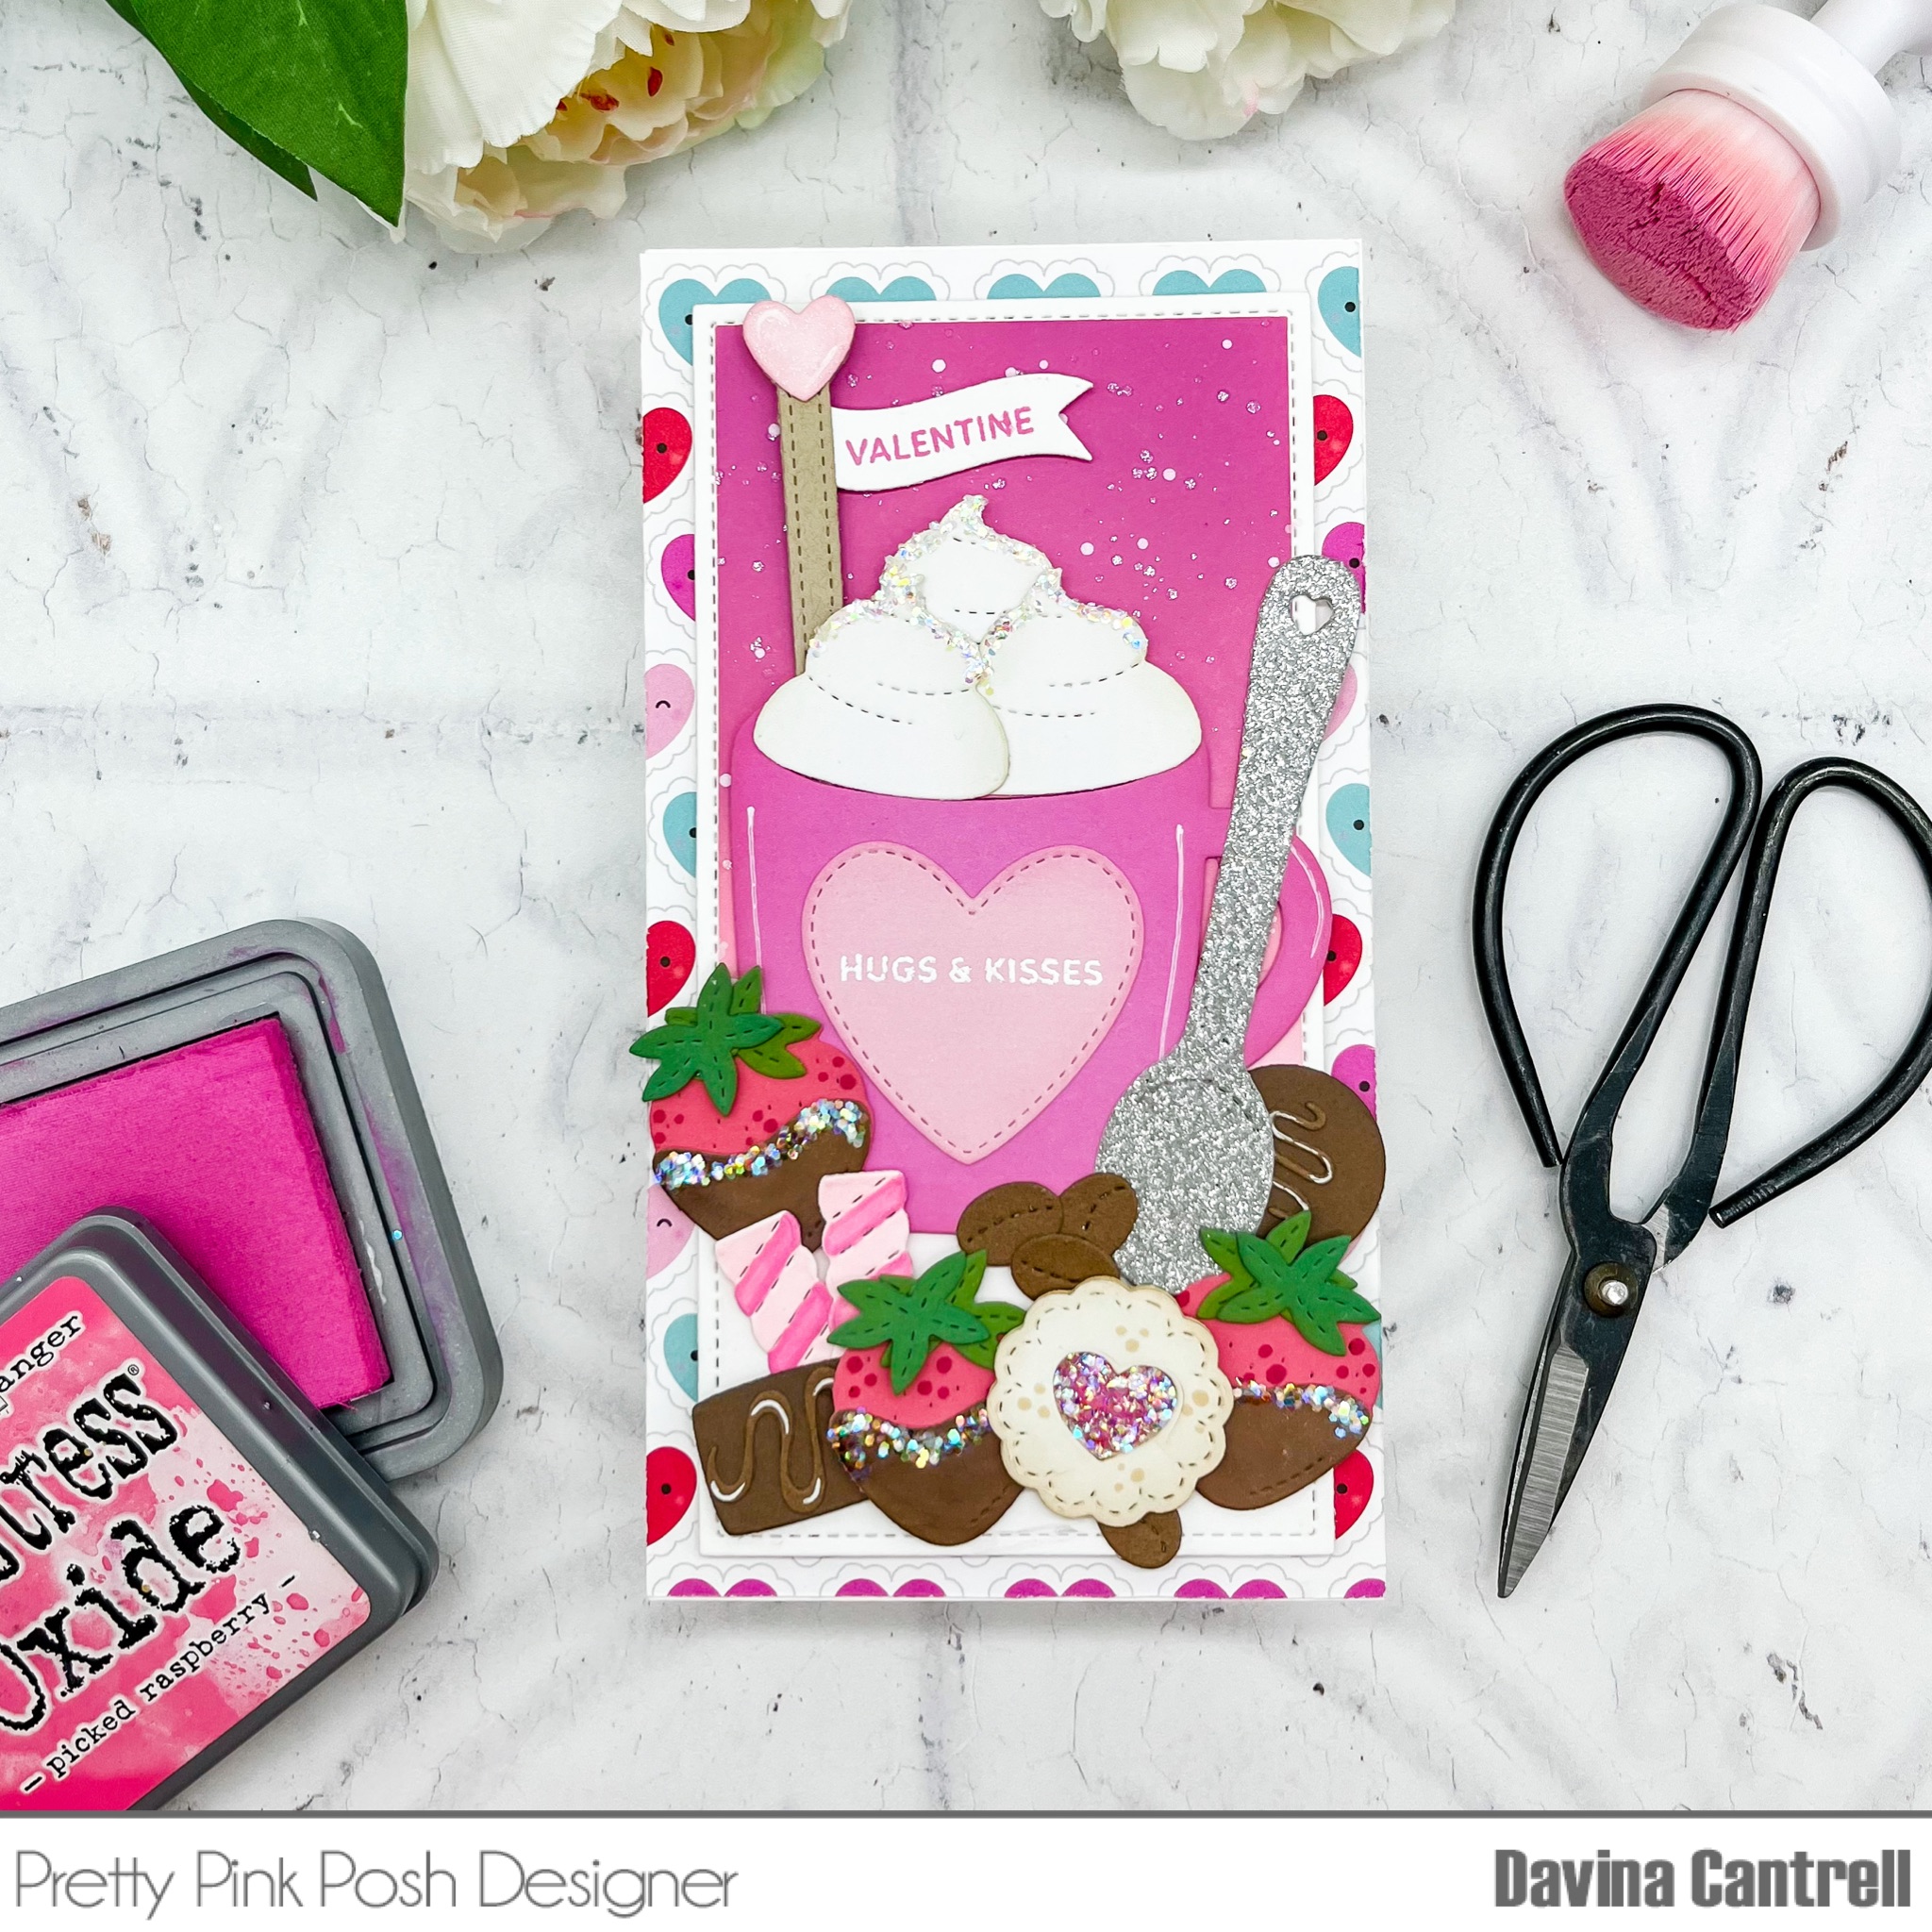
One of the most fun companion die sets ever is available today, Valentine Mug Additions. This fantastic add on set is full of accessories for the popular Winter Mug Dies. I created a mini slimline sized card that I filled to the brim with goodies created with these dies. 


I cut multiple whipped creams to overflow the coffee mug and stashed a layered drink stirrer out of the top. Then I surrounded the mug with chocolates, dipped strawberries, and a spoon. There are a pair of candies and a sparkly cookie that I made using dies from Candy Treats Dies. I gently inked the edges of my die cut pieces before assembling, and added some chunky glitter to many of them. I love the full dimensional look of the final card. 

Hop along with the Pretty Pink Posh Team, all 3 days, to see all of the gorgeous inspiration. Leave a comment at each stop for your chance to win one of three $30 gift certificates. Here is todays line up,


Pretty Pink Posh blog
Caly Person
Raquel Arribas
Melissa Phillips
Davina Cantrell
Kristie Marcotte
Zsofia Molnar


Winners will be picked randomly along the blog hop. Comments must be left by 11:59 PM PST on 1/12/2023. Winners will be announced on the PPP blog.


Wednesday, January 4, 2023

Valentines Release Sneak Peek


Hello Crafty Friends! Today I’m sharing some super sweet “Sneak Peek” projects for the most amazing Pretty Pink Posh  January release. This release is full of the cutest Valentines products and everything from stamps and dies, to stencils, and now Hot Foil Plates! It’s all so exciting and I can’t wait for everyone to see the new goodies!


I made some adorable little note card Valentines using the new Sweet Note Die and a few of the new sets, Potted Roses and Sweet Cherries . I die cut some colored cardstock using the Sweet Note set, and adhered some bright patterned paper to the exterior that I cut with the notecard die, and trimmed to fit the folds. I love the sweet stitching detail and the little square panel that is included for the interior. I stamped images from both sets (and a mouse and accessories from previous sets) and colored them up in bright colors to match my patterned paper. 


I created very simple scenes for both the exterior and inside of each card. Making sure to use the same layout on each card. The gorgeous cherries are the perfect size to add to the large cupcakes, and those roses are so pretty and fun to color.

Make sure you keep checking the Pretty Pink Posh Blog to see all the amazing inspiration and product reveals from the Design Team. 

Thank you for stopping by,

Davina 


Wednesday, November 30, 2022

Pretty Pink Posh Holiday Week


Hello crafty friends! Today I’m very excited to be participating in the Pretty Pink Posh Holiday Week! I just love creating with Pretty Pink Posh products, I really appreciate the cute illustrations and how wonderfully the stamp sets coordinate with previously released products. The cute Christmas Boxcard that I’m sharing today has a blend of Holiday sets from present to past. 


I built this boxcard with mint colored cardstock and some patterned papers that have red, pink, green, and mint. For the background panel, I inkblended some pretty pink shades and splattered with water and white ink. Then I used the Layered Snowflake stencils  to create a pink and white blizzard which includes some  raised embossed snowflakes. 


I like to focus my coloring, to match with my papers, so that it all feels themed. I stamped many images from Happy Santa and Reindeer Friends. After coloring the images and using the coordinating die cuts to perfectly cut my images, I added small white dot highlights. I adhered my images throughout the layers of my boxcard making sure that none were completely hidden. Then I heat embossed some snowflakes on vellum and tucked them into the scene on skinny acetate strips so they look like actual snowfall. 


To finish off the boxcard, I used gold embossing powder for the scripty “Joy” sentiment from the new Pine Wreath stamp set (I love that it has a coordinating die!) and mounted it onto a white banner that reads “to the world” from an older Joy stamp set. I think the bright red cardstock really packs a punch for the front. 


Finally, I stamped my sentiment onto the back and added a few little details and one more reindeer to make this beautiful from all angles. I hope that you enjoy this festive and bright card, make sure that you visit the the PPP shop to see the incredible products and take advantage of all of the holiday deals! 

Thank you for stopping by,

Davina 

Saturday, October 1, 2022

Pretty Pink Posh Halloween Week


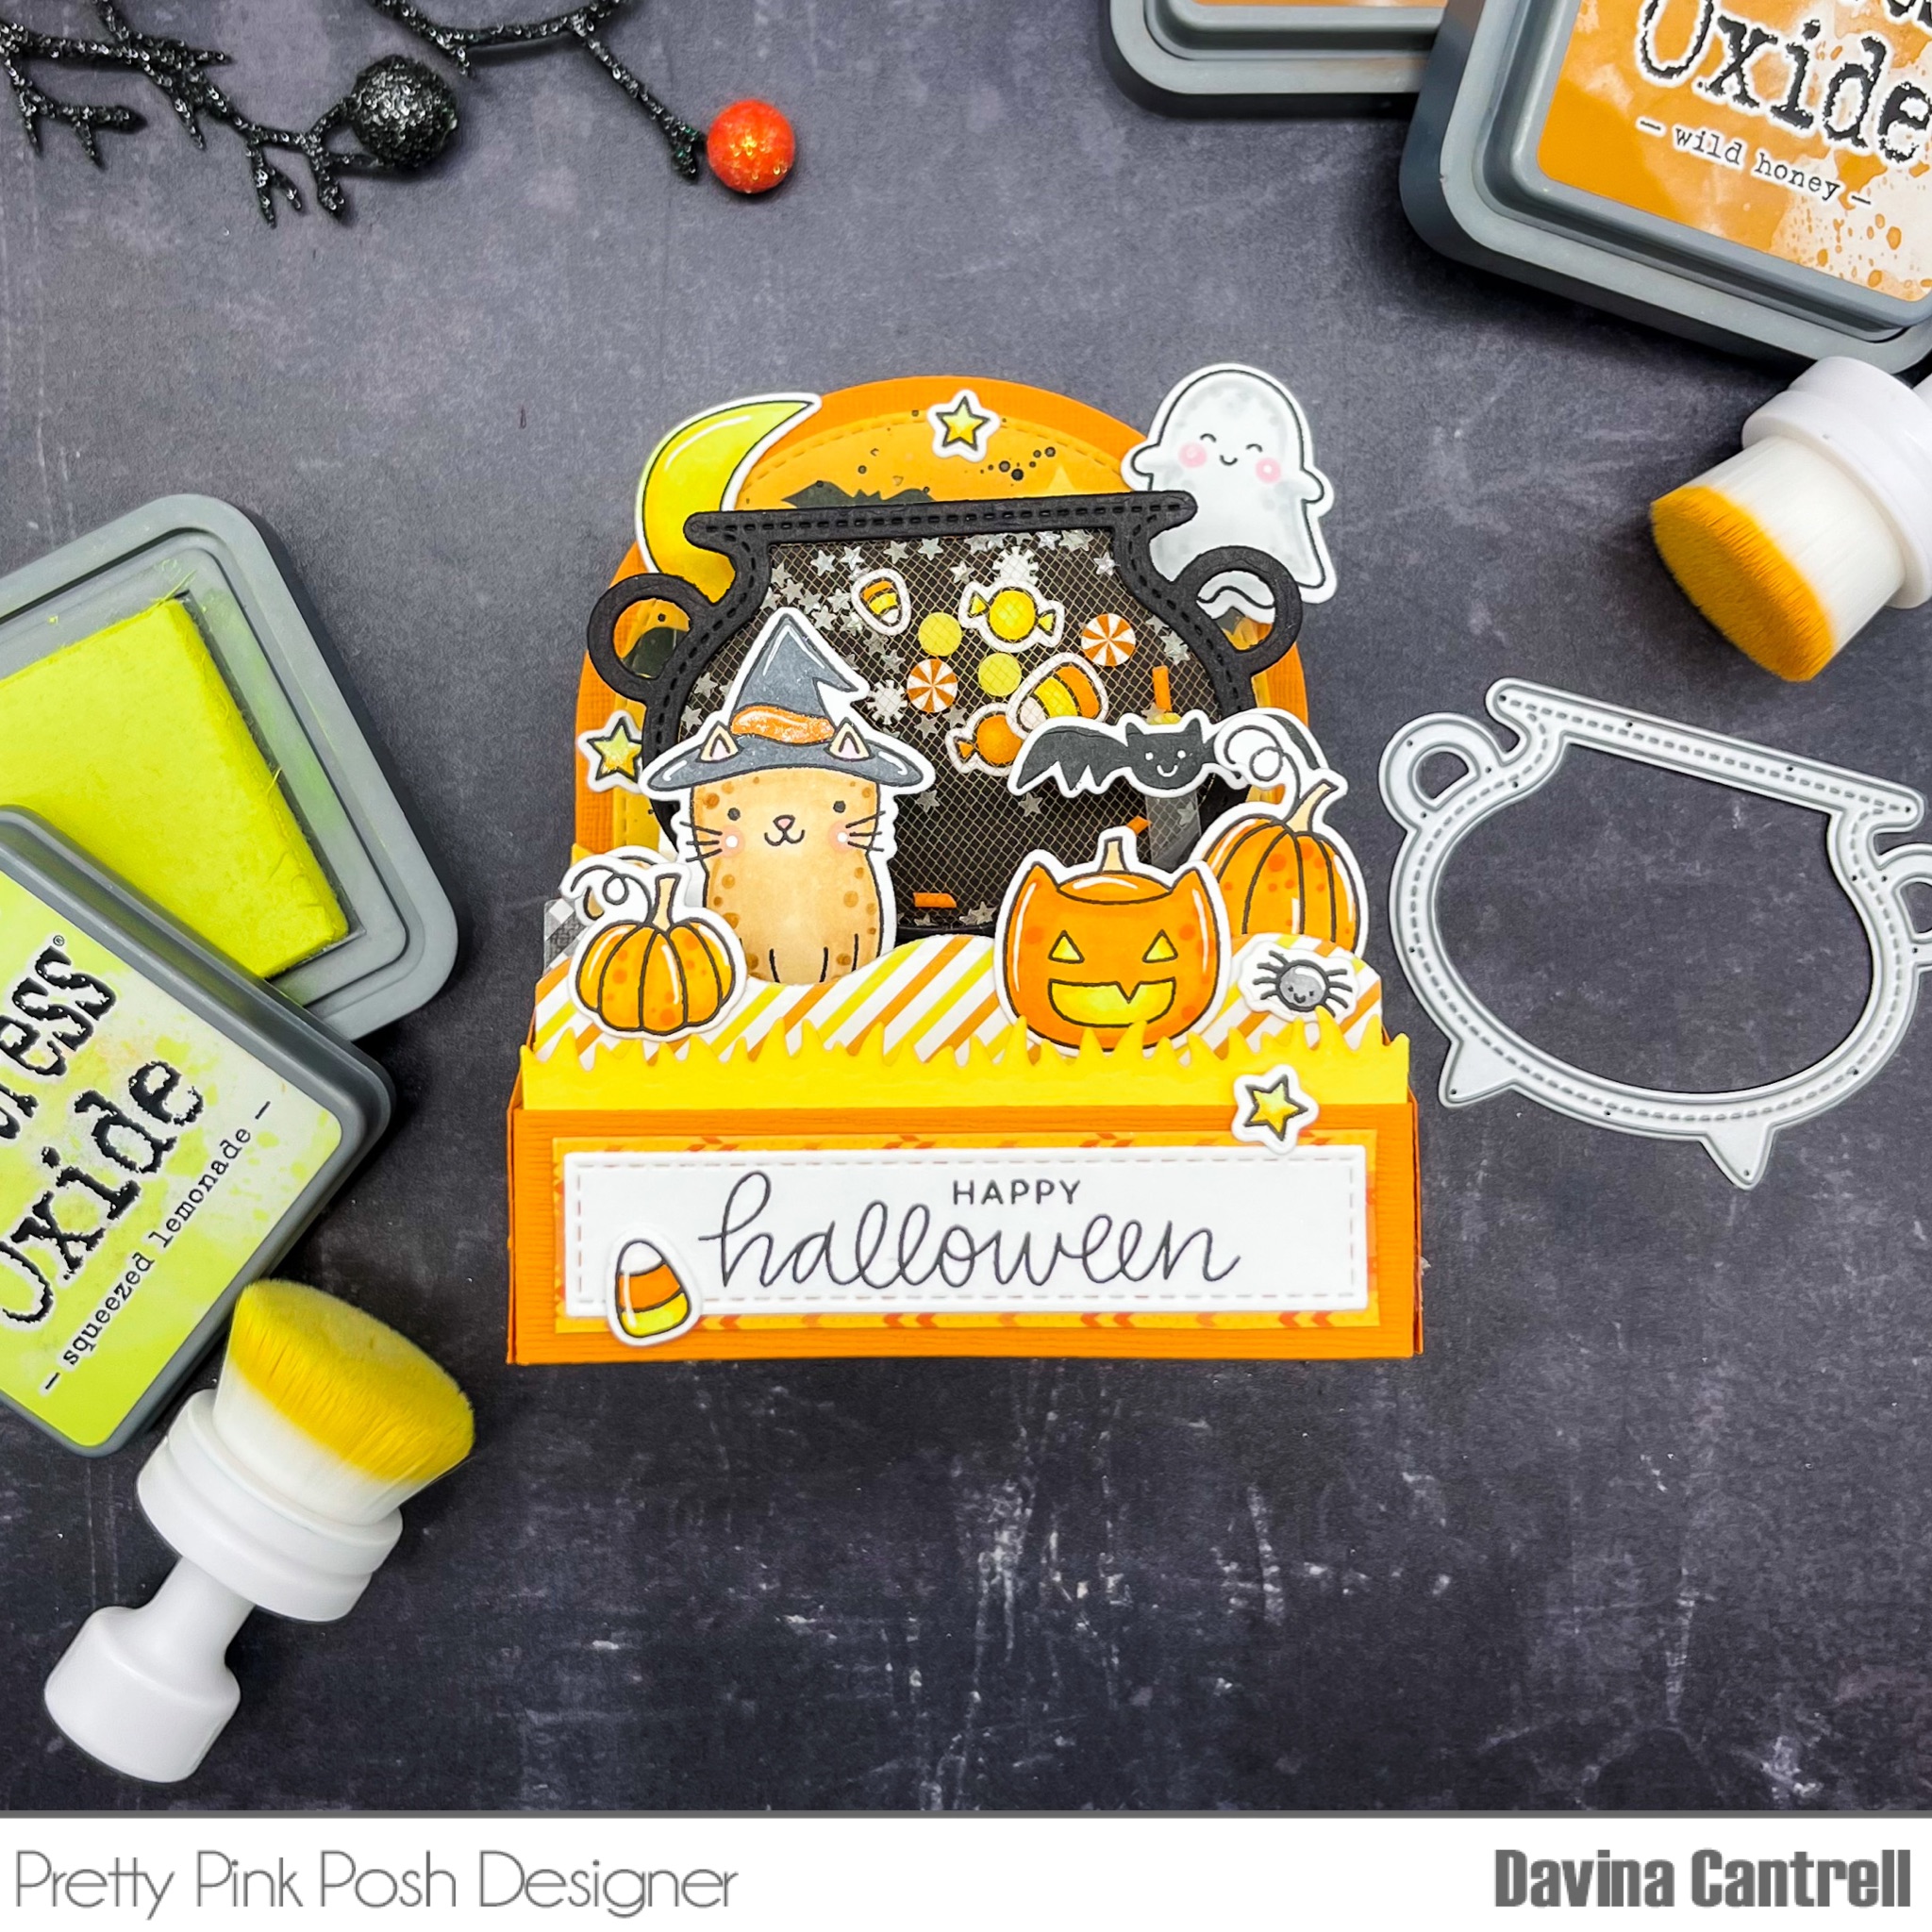
Hello Crafty Friends! I’m so excited to be participating in the Pretty Pink Posh Halloween Theme Week. All of their products are so wonderfully illustrated and designed, that it is a breeze to pull multiple stamp sets, stencils and dies together to make the cutest cards and decor. I did just that for this bright and bold shaker boxcard. 


I stamped images from newer and older sets to build this scene. Halloween PalsGhost FriendsHalloween friends, and Giving Thanks to name a few. I always use the coordinating dies to achieve a clean and polished look to my images. 


Before assembling this card, I created a flat mesh shaker using the new Cauldron Shaker Die. I cut the shaker twice, added a few stamped images along with some glow in the dark mini stars and some clay confetti pieces from the Halloween Party Mix. I sandwiched a small piece of orange tulle mesh to make a flat shaker using 1/8 double sided tape. 


For the background I inkblended an orange ombré sky and used the Spooky Sky Stencil to ink the bats and emboss the clouds onto my Bristol cardstock. I gently splattered with water and black ink to distress and “spookify” the sky. 


I was excited to use up several pieces of patterned paper remnants, that I had in my stash, for each of the layers and side panels of the box. I adhered my images and shaker through the layers and even made sure to have some floating pieces using acetate strips. I finished this up by stamping a sentiment on the back and adding a final pumpkin. 


I hope you love this fun and spooky card and appreciate you stopping by to see how I created it. Now is the perfect time for you to stock up on your Halloween supplies at Pretty Pink Posh, all of the Halloween items are on sale so don’t miss out! 
Davina 


Monday, September 19, 2022

Pretty Pink Posh September Release


Hello crafty friends. Davina here, to celebrate, the Pretty Pink Posh September Release. I’ve made several cards using these beautiful fall products and I am participating in the Instagram Hop today! Hop along leaving comments at each stop, for your chance to win $30 to the Pretty Pink Posh Shop


Every set in this release is gorgeous, and they all mix together with wonderful results. This release has several stencils, stand alone dies sets, and stamp sets that could not get any better. I used the Fall Basket Die Set as the centerpiece for this card. I blended the wooden strips with light brown ink and tiny splatters, then cut the pumpkins from orange cardstock that I accentuated with lighter and darker oranges. I used several of the cute mice from the Mouse Friends stamp set to bring an element of cuteness to this scene. Then, I assembled everything on top of a stenciled background that I created with the Layered Foliage Stencils. 


It’s so easy to make stunning backgrounds using the many detailed stencils that are offered by PPP. I created a completely different look with the Falling Branches stencil, that I used white embossing paste over a soft inkblended background. I assembled a sunflower filled scene using the new Fall Envelopes stamps combined with Potted Sunflowers and the Thanks  stand alone scoot die. 


My final card is super cute and uses the pretty Fall Borders stamps set. I layered the pumpkin strip over a Fall Tree die cuts and some falling leaves and sentiment from the  Autumn Wreath  set. I finished this card off with the adorable pup from the Halloween Critters.

Thank you so much for stopping by, don’t forget to visit the Pretty Pink Posh Blog to see the Inspiration from the entire team. 

Davina