Tuesday, November 26, 2019

You’re the Best with PPS

I have a critter filled card to share with you today using  Penguin Palace Stamps and patterned paper. I often find myself coloring a ton of images and not always using everything I stamped and colored, but I like full scenes and lots of dimension. I created something today that I really love but didn’t take 5-6 hours like many of my cards do. 

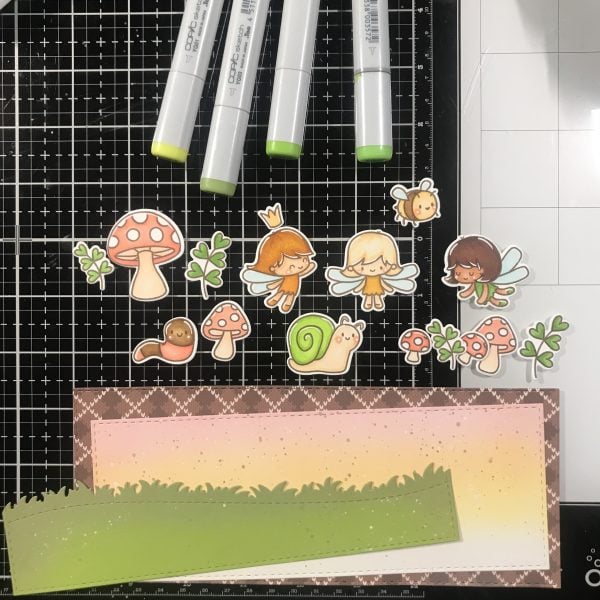
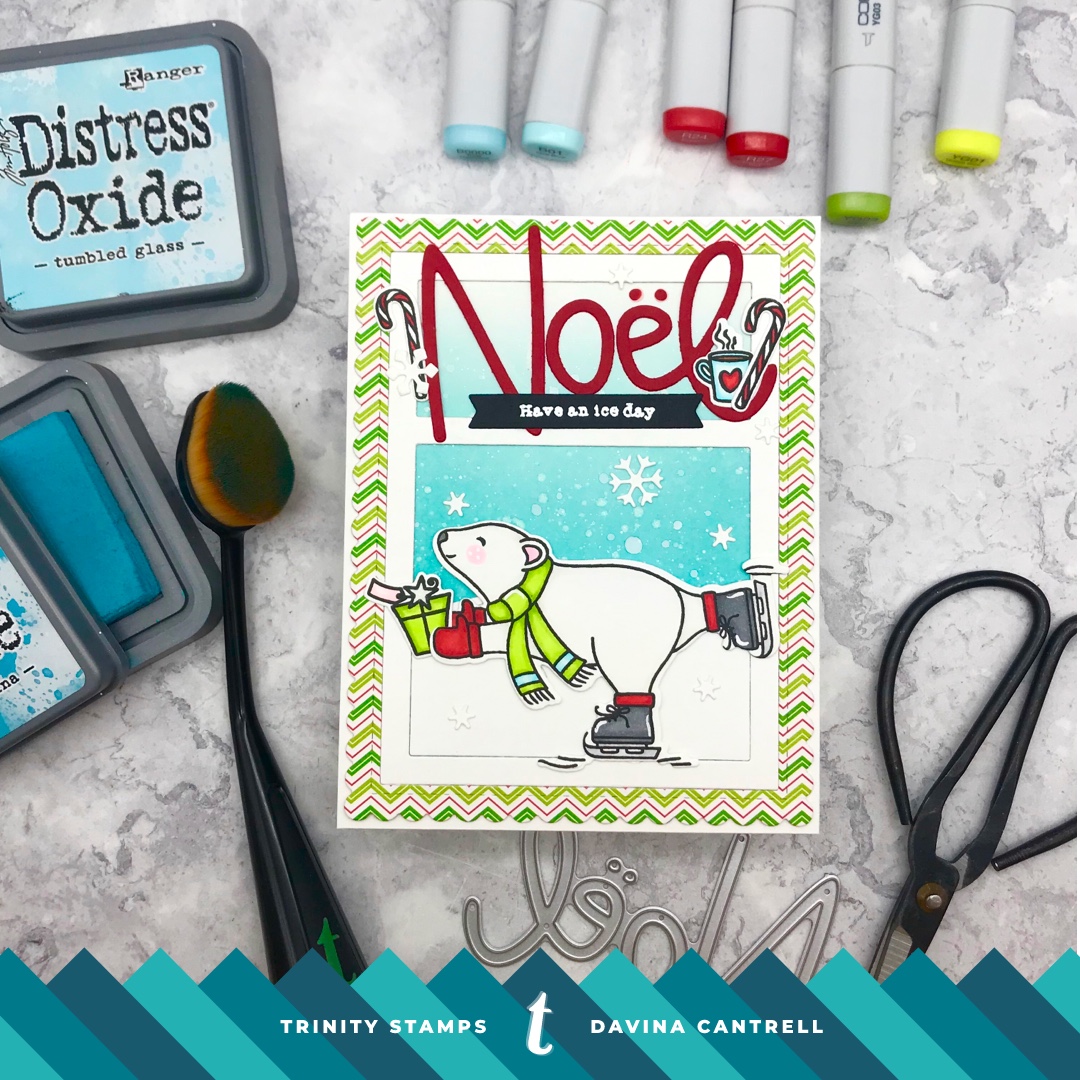
I chose some papers from a pad of patterned paper that were very subtle on their own, but give lots of interest when layered together. And since many of the images in the paper pad were outlined in navy blue and not black, I applied the same technique myself. I stamped some critters from Happy Track & Field Chpt. 2 using a navy blue ink pad and my stamp platform. I was unsure about how the dye ink would react with my Copic markers, so I decided to use very simple coloring to avoid excessive blending and smudging my stamping. I used a few colors from the patterned paper and applied some dotting for texture. Then, I die cut the images with the coordinating Penguin Cuts

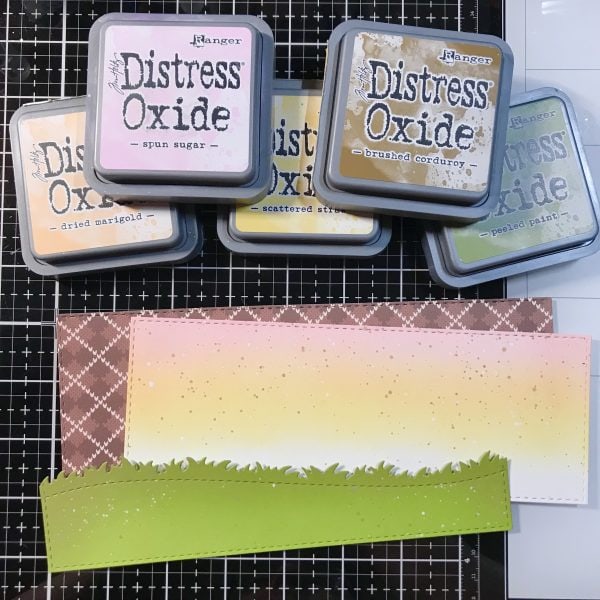
Next, I die cut some layers from several different papers. My largest and darkest layer is cut from a teal tree covered pattern, and two from a smaller layer in both textured white and a white dot pattern. I cut a mustard layer 1/4 inch larger to mount the white layer upon. Then I used a reverse scallop circle die to remove the center of the textured white paper so that the colorful dots could show through. I mounted the canvas textured white over the dotted using foam tape, then mounted that onto the mustard paper. 

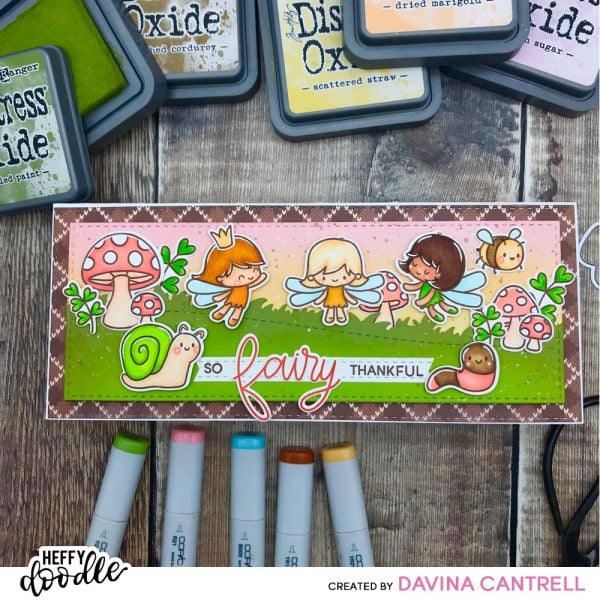
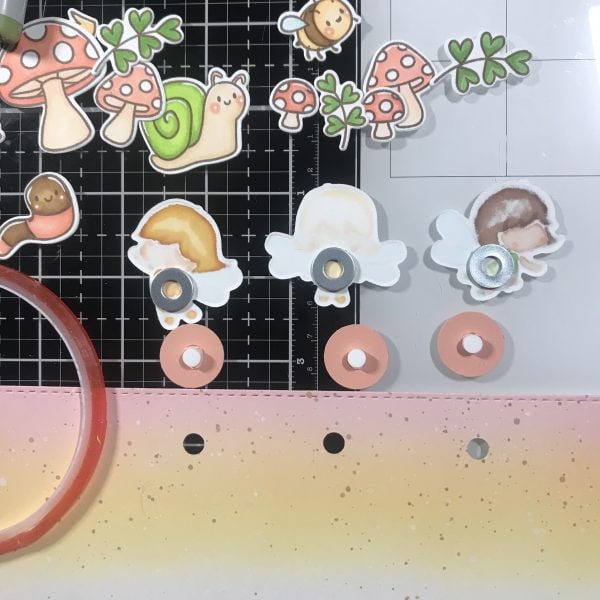
I stamped a small sentiment onto a white strip of paper, and used a banner punch to give it dovetails. After glueing it to the top corner, I added a little flag for some excitement. I adhered all of my characters then mounted it all onto the largest teal layer. Once I used Scor Tape to attach it all to my card base, I decided it still needed some oomph, so I sprinkled some white sequins. I just adore the combination of the textured cardstock over the patterns and I hope you to too. Thank you for stopping by,
Davina

Saturday, November 23, 2019

Christmas Fishes

Hello crafty friends, Davina here to share an under the sea interactive card with you. I always buy tons of stamps that I have every intention of using, and eventually I get to them. Today I’m using Christmas Fishes from the Lawn Fawn winter release, that I really loved, and plan on using for many of my Christmas cards.

For my color inspiration I used the November Mood/Color board, and water colored my images using colored ink refills and a water brush. The colors this month are a deep pomegranate red, Juniper green, a rustic pumpkin orange, and metallic gold. This color palette worked wonderfully for this card.

I stamped my images from Christmas Fishes onto Bristol smooth cardstock using a watercolor safe ink. Then carefully painted my images making sure there wasn’t too much water on my brush and picking up just a little bit of ink at a time. I have a lovely metallic gold watercolor but it’s not very opaque on its own. So I used a honey yellow ink first. Then went over it with the metallic gold after it dried.

Once my images dried completely, I die cut them using the coordinating Christmas Fishes Lawn Cuts and added dot highlights using simple white acrylic paint and a dotting tool. I cut a stitched panel from watercolor paper using a stitched die, then painted a watery wash of green for the background. I wanted to make some of my images dance while they were singing, so I made a mechanism out of paper strips and mini brads to twist and spin. I did not come up with this idea on my own , I referenced a die that is offered by MFT stamps, which unfortunately I don’t own. But, it worked so I’m happy.

I cut two 1/2 circles circles where I wanted my jellyfish and crab to be. Layered it over a second, same sized piece of paper, and marked the center. Then went about attaching all of my other images. I made the mechanism using paper strips and brads, then assembled it all on my second (not colored layer), before sandwiching the two panels together using foam tape. I connected the jelly fish and crab to the two spin disks, then mounted it on two layers of colored and patterned paper.

I really love the results, and will be heading over directly to purchase the Meet in the Middle dienamics! There are so many ideas filling my brain that I want to bring to life. Please head over to my instagram @popsiclesticks to see this card in action!

Thank you for stopping by,
Davina

Tuesday, November 19, 2019

Sea-sons Greetings

Today I’m sharing a dreamy pastel, slimline Holiday Card. I really love making slimline cards, both the long 8.5 length ones, and a shorter 6.25 version. Today’s project is the shorter version, which I’ve made using multiple stamp and coordinating die sets, and a new stencil, all from Penguin Palace Stamps
I started by cutting two panels from Bristol smooth cardstock both sized at 6 x 3.25. The cardbase will be 6.25 x 3.5, I really like this size for many reasons. It looks cute, it is the same size as my cellphone, and when using patterned paper as a base layer, I can use a piece from a 6 x 6 paper pad and still have a little white boarder all the way around. 
I gently inked up my base panel using pink spun sugar, and crushed concord distress oxide inks. Next I cut my 2nd piece of Bristol smooth about 1.5 inches tall using a wavy border die to create an ocean layer. I inked up this piece using tumbled glass and peacock feathers. I splattered both lightly with clean water and bright white ink. Then I taped the Crystal Snowflakes  stencil over my sky panel and used white embossing paste to create a snowy purple sky. Then I placed these to the side to dry while I worked on my images.  
I used my stamp platform and a gray ink pad to stamp my images from Penguin Agenda  and Get Well Soon  (and music notes fromFun Night Out ). I chose very light pastel colors for my characters and gave my little Penguins a rosy purplish outline on their bellies, since my sky is almost sunset/dusk. I wanted this to be a wintery holiday party and used penguins with balloons and party hats. My little mermaid couldn’t resist joining in the fun! 
I die cut a glittery stitched hill for my snowy iceberg and glued it to the sky layer, then adhered the wavy water on top making sure each layer was flush on the bottom. I placed my images onto the iceberg, and stamped some holiday sentiments with the same gray ink, before glueing down the music notes. I mounted this on a lavender piece of textured cardstock before finally mounting it to my card base using Scor Tape. 

It’s not a traditional Christmas card, but I love it for a wintery Greeting. Thank you for stopping by,
Davina 

Tuesday, November 12, 2019

May the odds be ever in your favor ...

Today I’m sharing a simple “Good Luck” card that I made using the latest release from Penguin Palace Stamps. I used a stencil to create an intricate background, but in fact it was very easy and quick to achieve wonderful results. 

The stencil is called  Cyber Wallpaper and it is made up of gradient diamonds. I stenciled the center in shades of green onto my paper, making sure to tape my paper panel down , with washi, to avoid shifting for nice crisp lines. Then I die cut the panel and layered over two pieces of colored cardstock. 

I stamped my images from the new set called Lucky Break and colored with Copic marker in limited colors to achieve the look I wanted. Then I die cut using the coordinating Penguin Cuts. I mounted the two main images onto fun foam for a 3D effect, and attached my images to the stenciled background. I used white embossing powder on a strip of black cardstock for my sentiment and popped it up on black foam dots under my images. Finally, I sprinkled some green iridescent jewels around for some bling. 

This was my first time using this style of stencil, and I’m very happy with the final results. I hope that you enjoy this and try something new today too! Thank you for stopping by, 
Davina 


Sent from my iPad

Tuesday, November 5, 2019

Cheerleader with Penguin Palace

Hey there crafty friends, I have a simple yet great card to share with you today using Penguin Palace Stamps . Lately it seems like stencils are all the rage, and with the most recent release of Penguin Palace Stamps products you won’t be disappointed. There are 4 new stencils to choose from and they are nice and thick and clean up wonderfully.

The card I’m sharing today uses the Vintage Basket Weave  stencil in conjunction with distress oxide inks. I chose to color an entire background to create a sort of patterned paper effect. I used a combination of ink that I love that creates a glowing under sea effect. I used Cracked Pistachio in the center, with Peacock Feathers blending in from the edges, then Mermaid Lagoon around the very edges. I layered this over a piece of teal cardstock that magically matched perfectly. Then I created a smaller panel to fit onto the center to layer my images on. 

I stamped and colored the cheerleaders from the Happy Track & Field Chapter 2set, using my Stamp Platform and Copic markers. I limited my color choices to similar colors that I used for the background. Giving an almost monochromatic look to the card. Next, I die cute out my cheerleaders and Pom poms using the coordinating Penguin Cuts. Then I heat embossed my sentiment, from the same set, onto black cardstock using white embossing powder. I glued down all of my images and added a few black jewels for some Wow! factor, then mounted it onto my cardbase using Scor Tape. After looking at it a few times I added a black and white bakers twine bow to the top and it gave it just what it needed.  Now it’s ready to send off! 

I hope you like this inky beauty and thanks for stopping by,
Davina 


Monday, November 4, 2019

So Fairy Thankful with Heffy Doodle

Hello Crafty Friends, Davina here with my very first blog post for Heffy Doodle  . I’m so happy and proud to be a new member of the Heffy Doodle Design Team. You may be familiar with me as @popsiclesticks on Instagram, and if not, I hope you head over and check out my account. Today I’m sharing a Thankful fall inspired slimline card, that I hope you love.

Slimline cards are a non traditional style of cards that I really enjoy making. I have seen several different sizes and styles but the size I prefer is 8.5 x 3.5 This unique size allows me to make a cardbase, and use the remaining cardstock to create my image panel from a piece of standard 8.5 x 11 heavyweight paper. I begin by trimming off 4 inches from the 11 inch length of the paper, then scoring the remaining 7 inches down the center at 3.5 inches. I fold along the score line, then use my bone folder, and my cardbase is ready for later use.
For this card I wanted a fall patterned paper base. I used some Stictched Slimline Dies (available from Trinity Stamps) to cut a perfect stitched panel from brown patterned paper. Then I used a smaller stitched die layer to run my remaining white cardstock through the big shot to build my scene upon. I wanted a soft pink sky so I chose my favorite combination of Distress Oxide Inks in Scattered Straw, Dried Marigold, and Spun Sugar. I inkblended my sky and placed it to the side. I cut a piece of green cardstock with the same smaller die layer, then cut a sloped grassy hillside down the middle. I will save the unused portion for a later project. I used some Peeled Paint and Brushed Corduroy Oxide Ink to blend onto the grassy edges to create some interest and add visual dimension.  I really love this effect on colored cardstock. Once finished, I splattered both the green layer and the pink sky layer with brown diluted ink and white opaque ink.
I used my stamp platform and brown Momento Ink to stamp images from several adorable Heffy Doodle Sets onto Smooth white card. The stamps sets I used are Absotoothly Awesome Big Bug Hugs, and Gnome Matter What. I used a variety of Copic Markers to color up my images in shades of coral, pink, brown, green, and orange. I really love the soft look the brown ink gives with the limited color palette. I die cut the images with the coordinating dies, then highlighted with white gel pen.
I played with the placement of the images on my panels, before deciding to make my Fairies dance in the sky. I marked the placement lightly with pencil before I created simple swinging elements using a standard hole punch, slider discs, and small washers. Normally I would se a penny to weigh down the bottom of the images to swing easily, but the little legs were small so I used some small metal washers that we had at home, and attached them to my images with 1/8 inch double stick tape. I punched 6 3/4 inch circles from scrap card ( glueing two pieces together with liquid glue to create 3 circles) and attached a slider disc to each circle. I used the hole punch to cut out 3 holes from the sky and got to work creating the rest of my scene. Using a variety of adhesives I attached the remaining images to my panel, and the sentiment banner that I made using the Strips of Ease die cuts.
I fed the slider discs through the holes and attached the fairies. Next, I flipped over the panel and added a layer of foam tape all the way around making sure the sliding circles weren’t impeded. I removed the backing paper and attached it to the brown patterned paper. Finally I used scor tape to attach the entire thing to my premade cardbase. I love the finished results and really enjoy playing with the card and making the Fairies swing back and forth. This is an idea you could easily whip up without having to purchase expensive interactive Dies. I hope you try it out and thank you for stopping by,
Davina

Friday, November 1, 2019

Winter Release with Trinity Stamps


Today’s the day! It’s November 1st, and Trinity Stamps is live with their winter releases do blog hop  and it’s full of so many incredible Stamp sets and Dies. I’m so excited for the new Slimline Die sets and know they will be a huge hit. The cardmaking community has been wanting them for ages and now we have them. The stitched layers and scalloped layers are fantastic and work great together, and the long landscapes will make creating a scene so much easier! A shared a card on Instagram earlier this week using the slimline dies to create a long scene with the new Do Re Meow set and I couldn’t be happier with the results.

It’s so easy to create a slimline card starting with one sheet of 8.5x11 cardstock. Simply trim off 4 inches from the long side of the cardstock, then score the remaining 7 inch side at 3.5 inches to create a cardbase sized at 8.5x3.5 Then use the remaining 4 inch piece to die cut with the new Slimline Dies to begin your cardbase. I love layering patterned papers and colored cardstock along with my inkblended and stamped images to make vibrant full scenes.

There are many new stamps and stand alone die sets, as well as a couple of stencils in the new release. Everything is so fun and very cute, I can’t wait to use them all. I’d like to share another card I made using the Have an Ice Day stamp and die set along with the Noel word die.

The nice large ice skating polar bear is part of a small 3x4 set that comes with a few great accessories and typed sentiment strips. I used all of the images and colored them with Copic markers in a limited color palette that matched my pattern paper background. I inkblended the sky splattered with white and glittery ink for a snowy effect. I attached my images to the lower portion of my panel before layering the die cut “Noel” sentiment and accessories to the upper portion. Then I heat embossed one of the typed sentiments onto black paper and die cut a banner shape that it included in the Christmas Senti-Mini coordinating Dies.

I finished it up with a few snowflake confetti pieces and think I might make a whole set of these as part of my Christmas cards since they came together so quickly and easily and tuned out so cute. And it’s a great way to use up so much of the pretty Christmas patterned paper that I have in my collection.

Now it’s your turn to follow along the blog hop for your chance to win some swag from Trinity stamps. Thank you for stopping by,
Davina
Davina Cantrell (you are here)