Showing posts with label copic markers. Show all posts

Friday, June 28, 2024

Trick or Treat with Mama Elephant

Hello crafty friends! Davina here, with a spooky cute pink Halloween card I made using the new Mama Elephant June release. I love that some not so spooky fall items were released so early in the year since Halloween cards are my favorite to make.


I wanted to make a neighborhood scene with ghost trick or treaters so I went into my stamp stash and pulled out the Little Agenda House set. I also stamped the ghosts, candy, and stars from the new Big Boo stamps, and the witchy ghost from Deliver Fall Fun. I colored the images using shades of pink, orange and charcoal then cut out with the coordinating dies. I felt like the houses needed a little Halloween decor which I found on the Little Witch Agenda stamp set. The teeny kitties and pumpkins were perfect. 


For the card base I die cut the Comic Cover Basics  cover plate from bristle smooth card stock and a dark charcoal textured card stock. I ink blended the white card in shades of pink, orange and black then gave a little splattering of black and iridescent ink. Then i cut some grassy layers from the remnants of the charcoal card stock and inked them even darker. I arranged the little scenes in the openings and mounted the heat embossed sentiments centered on top. The selection of Halloween sentiments from the new Be Scary sentiments are amazing as usual and never disappoint. 


I finished this card off with lots of tiny sparkly stars and some spiderwebbed pink patterned paper. I really love making pink Halloween cards and hope you enjoy this one. Thank you for stopping by, Davina  

Saturday, June 8, 2024

Pretty Pink Posh Sneak Peek Outer Space

Hello crafty friends! Davina here with some “out of this world”, sneak peeks, featuring the June Pretty Pink Posh release. This playful release is full of imaginative play themed sets like construction, first responders, and space. I made a pair of cards that feature some of the space theme products and hope that you are as excited as I was. 

Both cards were created using the Outer Space stamp sets with the coordinating dies, and they are both shaker cards, using the new Shaker Beads mix called Beach Day. I felt like this color combo would be perfect for my space scenes and love the fiery gold and orange with the shades of blue. 


For the first card, I started by die cutting my background using the Pierced Star Plate from Bristol Smooth Cardstock. I inkblended my panel with a blue gradient starting with a light aqua and finishing with a dark teal around the edges. After splattering with several inks, including gold, I put it aside to dry while i worked on the other components. 


I made the shaker element using the new Planet Shaker Die Set. I inkblended the center using the warm colors, and cut the ring from holographic cardstock. I filled the shaker about 1/3 of the way full for maximum effect. Next, I stamped and colored my images using copic markers and added white highlights and some glittery Wink of Stella accents. I backed my star panel with some starry patterned papers I had in my craft stash, and assembled the cards with the shaker in the center. I finished the card off with a sentiment from the stamps set, on a bold white banner. 


I loved the results so much I decided to make a second version of the card but with the new Rocket Shaker Die Set, and the other images from the Outer Space stamp set. I backed this card in a dark navy blue version of the same patterned paper and used the larger more decorative sentiment from the set. I think the reflective holographic paper was absolutely the way to go with these shaker die sets, as the colors pick up so much from the copic colored images, and really bring the scenes to life. 

I hope you like this pair of cards as much as I do, and are inspired to stock up on the new release for these “out of this world” collection of products! Thank you for stopping by, Davina 

Tuesday, May 28, 2024

Mama Elephant Designer Series featuring Celebrate You

Hello crafty friends! Davina here with a fun interactive card featuring Celebrate You from the latest Mama Elephant release. The May release had two fantastic sentiment sets and I really love them both, but today I wanted to use the more delicate text on the Celebrate You set. I adore the pretty script paired with the signature “kissie alpha” font. I also really wanted to use the beautiful whales from last months release called Me and My Whale, and I knew they would be a perfect combination. I pulled out an older interactive set called Wiper Surprise and got to work designing this fun, moving, under water scene. 


I’ve been using pattern papers and marker combos from the same paper pack all month and I’m so happy to be able to achieve such different looks on every card. I die cut the card base from a dotted patterned paper, and two from a piece of pistachio colored cardstock. I die cut a wavy pattern on each piece of colored cardstock, at different hieghts, then ink blended some gradient ocean blues onto them. Before folding anything, I used scor tape to  adhere the taller blue paper to my full piece background. Then, I used my bone folder to really reinforce the scored fold line before finally folding the panel. 


I heat embossed my sentiment in white, onto the shorter panel, before gluing it in place for the front piece and making sure to apply the little tab on the inside first. Once assembled, I trimmed off a small amount of the tab that was extending beyond the bottom when closed. I watched an older YouTube video on the mechanics of the tabs before getting started. Just to make it easier since it had been so long since I used it. Sometimes you just need that refresher. 


I stamped my beautiful whales and some slightly larger mermaids from the Little Mermaiden Agenda stamp set, and colored them with copic and ohuhu markers. There was also some similar clouds in the Me and My Legend stamp set, and I used the double cloud image on my card. After die cutting and adhering the images to my scene, I added some water splashes using an acetate strip for a little extra oomph. Once it was all assembled I applied a sturdy piece of cardstock to the back so it wouldn’t bend or get warped.


I really love how this turned out, and hope it inspires you to get out some of your older die sets and use them with new stamps and accessories. It’s just much fun to blend all of your supplies together. Thank you for stopping by, Davina 

Sunday, April 21, 2024

Pretty Pink Posh Spring Theme Week

Hello crafty friends! Davina here, buzzing by with a Spring themed mini slimline card. I used several cute Pretty Pink Posh products, new and older, to make this sweet little scene. 


I started by selectively cutting the largest  Slimline Scallop Frames Die to get the proportions I wanted. I like to make my mini slimline cards 6.5 x 3.5 in dimension. Which is only 2 inches shorter than a standard slimline card. This frame die is only 8 x 3, so I will trim it to 6 x 3, then add a background layer. I accomplished this by placing the top cutting mat an inch short of the edge of the die. Then I measured and marked where 6 would be, and very carefully placed the edge of the die at the marked point, while making sure the scallops fit back into the frame. I taped it in place with washi tape to avoid any slippage, and cut only that last inch. 

I watercolored a panel for the background using multiple shades of yellows and allowed that to dry before trimming it to fir the back of my frame and cutting some cute stitched hexagons using a die from the new Spring Mug Additions Die Set


I stamped several adorable bumblebees from the Bee Friends stamp set and heat embossed the sentiment in the upper area of my watercolored panel. I also stamped and colored the large jar from the Spring Jar set and the little decorative bow. I used the Spring Mug Additions Dies to cut some small flowers, leaves, and the honey dipper before coloring each item with a combination of ink blending and COPIC coloring. 


I used foam tape strips to adhere the scalloped frame to the watercolored background, the centered the whole thing onto a patterned panel that is 6.5 x 3.5. I adhered my hexagons, honey jar, bees and flowers using foam tape hot glue. Then I finished it off by adding some sparkly Wink of Stella to the bees wings. 

Thank you for stopping by, make sure to check out all of the Spring Theme Week inspiration on the Pretty Pink Posh Blog, 

Davina 

Wednesday, March 27, 2024

Mama Elephant Designer Series Capybara Party

Hello crafty friends! Davina here, with some slimline shaker card goodness. I loved the fun celebration theme of this latest release from Mama Elephant, and all of the balloons and cute critters. I wanted to make a shaker card using one of the new standalone die sets called Round Balloon Shaker CC , and I thought it would be nice to line up a few smaller ones on a slimline card base, and combine the Capybara Party stamps with it.


I cut my slimline base using the Slim Card Basics CC dies, and carefully marked where i wanted to place my balloons. I cut the balloon shape out 3 times and reserved the decorative pierced portion. I cut a second slimline base and lined it with pretty mint colored paper. Next, I created a frame with foam tape around the patterned paper portion, including two supports between the balloons. I filled the frame with lots of sequins, iridescent stars and pastel clay confetti. 


I gave the reserved die cut balloons pieces a quick coloring using a light minty COPIC marker, then glued them back into place on top of acetate, creating the windows. Then I carefully applied the top portion directly over the sequin filled frame. I was fortunate that it went on perfectly because I have had some mishaps in the past. Next, I mounted my shaker frame onto a scalloped layer (also from the Slim Card Basic CC die set) that I cut from a darker shade of minty cardstock. 

I stamped my images onto Bight White Neenah Solar Crest cardstock and gave them a very light pastel coloring that matched the confetti sequins. I added a few white highlights and my signature dots to the images before adhering them onto my scene. I felt as though it needed a little something extra to fill the negative space, so I created a small layered banner using the backside of the patterned paper, some stripes, and a glittery star. 


I really love how simple and pretty this turned out  and nothing beats a shaker card for excitement. I especially like how the teeny iridescent stars stay clinging to the acetate in the windows, so even if the other bits are at the bottom of the balloons, the little stars are still distributed all over. 

Thank you so much for stopping by, I hope this project brings a smile to your day,

Davina 


Friday, March 15, 2024


Welcome to the Mama Elephant Design Team blog hop!

Our newest release is now live and available for purchase in the store!

www.mamaelephant.com


Hello crafty friends! I’m so happy to be participating in the March Mama Elephant Blog Hop. This rerelease is simply adorable with so many different styles of stamp sets but all from a “celebration” theme. The project I’m sharing is using the new Little Agenda Ice Cream stamp and CC set. The LItlle Agenda series is my favorite series of all time. I love putting tons of images onto little mini scenes and these are perfect for creating my favorite types of projects. I also love that they all play together perfectly because they are all illustrated in the same style. 


I made a Slimline sized card using the Slim Card Basics CC die set, and all of the images from the Little Agenda Ice Cream stamp set. I cut 3 grassy layers from colored cardstock, and gently inked the grass tops in a darker Mowed Lawn green. I also tucked an inked wavy brown layer in between for my ice cream truck to park on. I colored all of my images in colors found ion the plaid patterned background paper, and die cut with the coordinating Creative Cuts. 


I added a sun and cloud into the sky from the Beary Good Day stamp set and the cutest popsicle hamster ever from an exclusive collaboration with Ellen Hutson. That set is no longer available, but that is why it is so important to always grab those limited edition sets, because over a year later, TaDaaaaaa! Essential images hahaha. I finished this card off with a great little sentiment from the new Way To Go sentiment set. These sentiment sets are also my favorites with their fun font and great size.


I really love this littler masterpiece and I hope you do too. Now go hop along for your chance to win and see all the amazing inspiration from the Design Team, Davina.

Check out the rest of the hop for amazing inspiration from our Design Team!


To celebrate the new release, Mama Elephant is picking 1 winner to win a prize pack (winner will be notified in their comment on Instagram, Facebook or YouTube)! Open to Domestic & International (winner pays for shipping)


» 1. Leave a comment on the collective Design Team's Instagram Stampede post
» 2. Leave a comment on our Facebook Stampede post
» 3. Leave a comment on any of the Introduction videos on YouTube
 
Each action qualifies for one entry, max 3 entries per stampeder please and good luck!
 
Check out the rest of the hop for amazing inspiration from our Design Team!
 
 
Thank you for stopping by! Have a great day from all of us!
 

Thursday, March 14, 2024

March Release with The Greeting Farm


The March 2024 New Release is now available for purchase in The Greeting Farm Store. This month we introduced 3 new stamp sets. Our first set called BAKING ANYA features Anya with a mixing bowl and cute cupcake earrings ready to bake up some yummy goodness with love. Next, we brought you BIRTHDAY CATS to wish your friends and family a very happy purr-thday! Our final set called FEEL BETTER has a big Anya and Ian sending get well wishes.


Today I’m sharing a card I made with the new Baking Anya stamp set  I layered her over an inky rainbow background full of heart streamers. I also made a tiered trayof her delicious cupcakes and finished it off with some black accents and banners. I love how easy it is to create full fun scenes with the nice large Anya images and all of the fabulous accessories.


To celebrate this release we are having a short BLOG HOP! One lucky fan will take home the entire release!! You have until March 18th, 12pm CST/1pm EST to leave your comments on each Designer's Blog. Then head back to The Greeting Farm Blog to let us know you completed the hop.

**Remember to qualify for the prize you MUST leave a comment on each Designer's Blog AND The Greeting Farm Blog letting us know you completed the hop.

NOTE: Comments on The Greeting Farm Blog are admin approved so it may take a day for your comment to be visible. Please only comment once, and use the same name on all the blogs when leaving a comment. Do not pick the Anonymous option (otherwise we won't be able to verify that it's you).

We will announce the random winner later in the week on the Blog and in our Facebook Group: The Greeting Farm Fan Page.

TGF Design Team:
Cynthia
Davina
Elisabete
Meg

This is a short hop and definitely worth playing along! If you want to grab your favorites now, you can purchase the new stamps HERE. We will have more cards featuring the New Release from our Design Team Leaders starting on the 20th so be sure to stop by The Greeting Farm Blog to see more inspiration.

Happy Hopping!


Monday, July 10, 2023

Mama Elephant July Designer Series


Hello crafty friends. Today I’m super honored to be sharing my first Designer Series project as a member of the incredible Mama Elephant Design Team. It’s such an honor to be considered part of this group of talented cardmakers. 


Being an avid reader, the Storybook products really stood out to me, for my first complex scene. I adore the playfulness of the little meadow themed book from Storytime, with the cute frog and fox. I combined this nice large image with a larger frog and cattails spray from Hello Froggy. I colored everything with bright citrus colors and die cut with the coordinating Creative Cuts. 


I used the beautiful Turn the Page Creative Cut die to make a full layered book. I cut layers from colored cardstock for the aqua base, and patterned paper for the smaller stitched layer. I also cut a stitched page from Bristol smooth cardstock, that I die cut with the Pond Scene Creative Cuts. After inkblending, I layered these together and adhered my images, often using foam tape. I folded a pice of plain copy paper into fourths, and die cut that as well with the stitched layer. I stapled those four pages to the aqua base, then gently distressed the edges, before adhering my decorated scene on top. It’s not noticeable on the photos but my book has a “real” appearance with many pages that are easily visible in person 


I finished off my little book scene with a small word bubble that I stamped with a “Dream Big” sentiment from the Storybook Sayings sentiment set. I love the playfulness of this scene, like a fantasy or daydream. 


I hope you enjoyed this card and find some time to Dream Big and get creative in the next few days, make sure to check out all of the inspiration from the Mama Elephant Design Team. Thank you, 

Davina 


Supply List: 

Storybook Stamps & CC

Storybook Sayings & CC

Hello Froggy & CC

Turn the Page CC

Pond Scene CC 


Monday, June 26, 2023

Mama Elephants Stamp Highlight Follow Your Dreams


Hello crafty friends. Today, Mama Elephant, is highlighting the beautiful new scripty stamp set called Follow Your Dreams . It’s such a wonderful large size that it fills up the majority of your cardfront and Creative Cuts perfectly cut it out, even the teeny inside pieces that are often an eyesore.


I used gold embossing powder with this stamp set , and layered it above a dreamy blue in blended background that I die cut with the Galactic Cover Plate. I surrounded the day, cut sentiment with some adorable Little Agenda Unicorns , and a rainbow. To finish it off, I stamped one of the inspirational sentiments on the inside of my card. 


Thank you so much for stopping by, make sure to check out the rest of the design team inspiration using this fantastic new set,

Davina 

Thursday, January 5, 2023

Pretty Pink Posh January Release Blog Hop


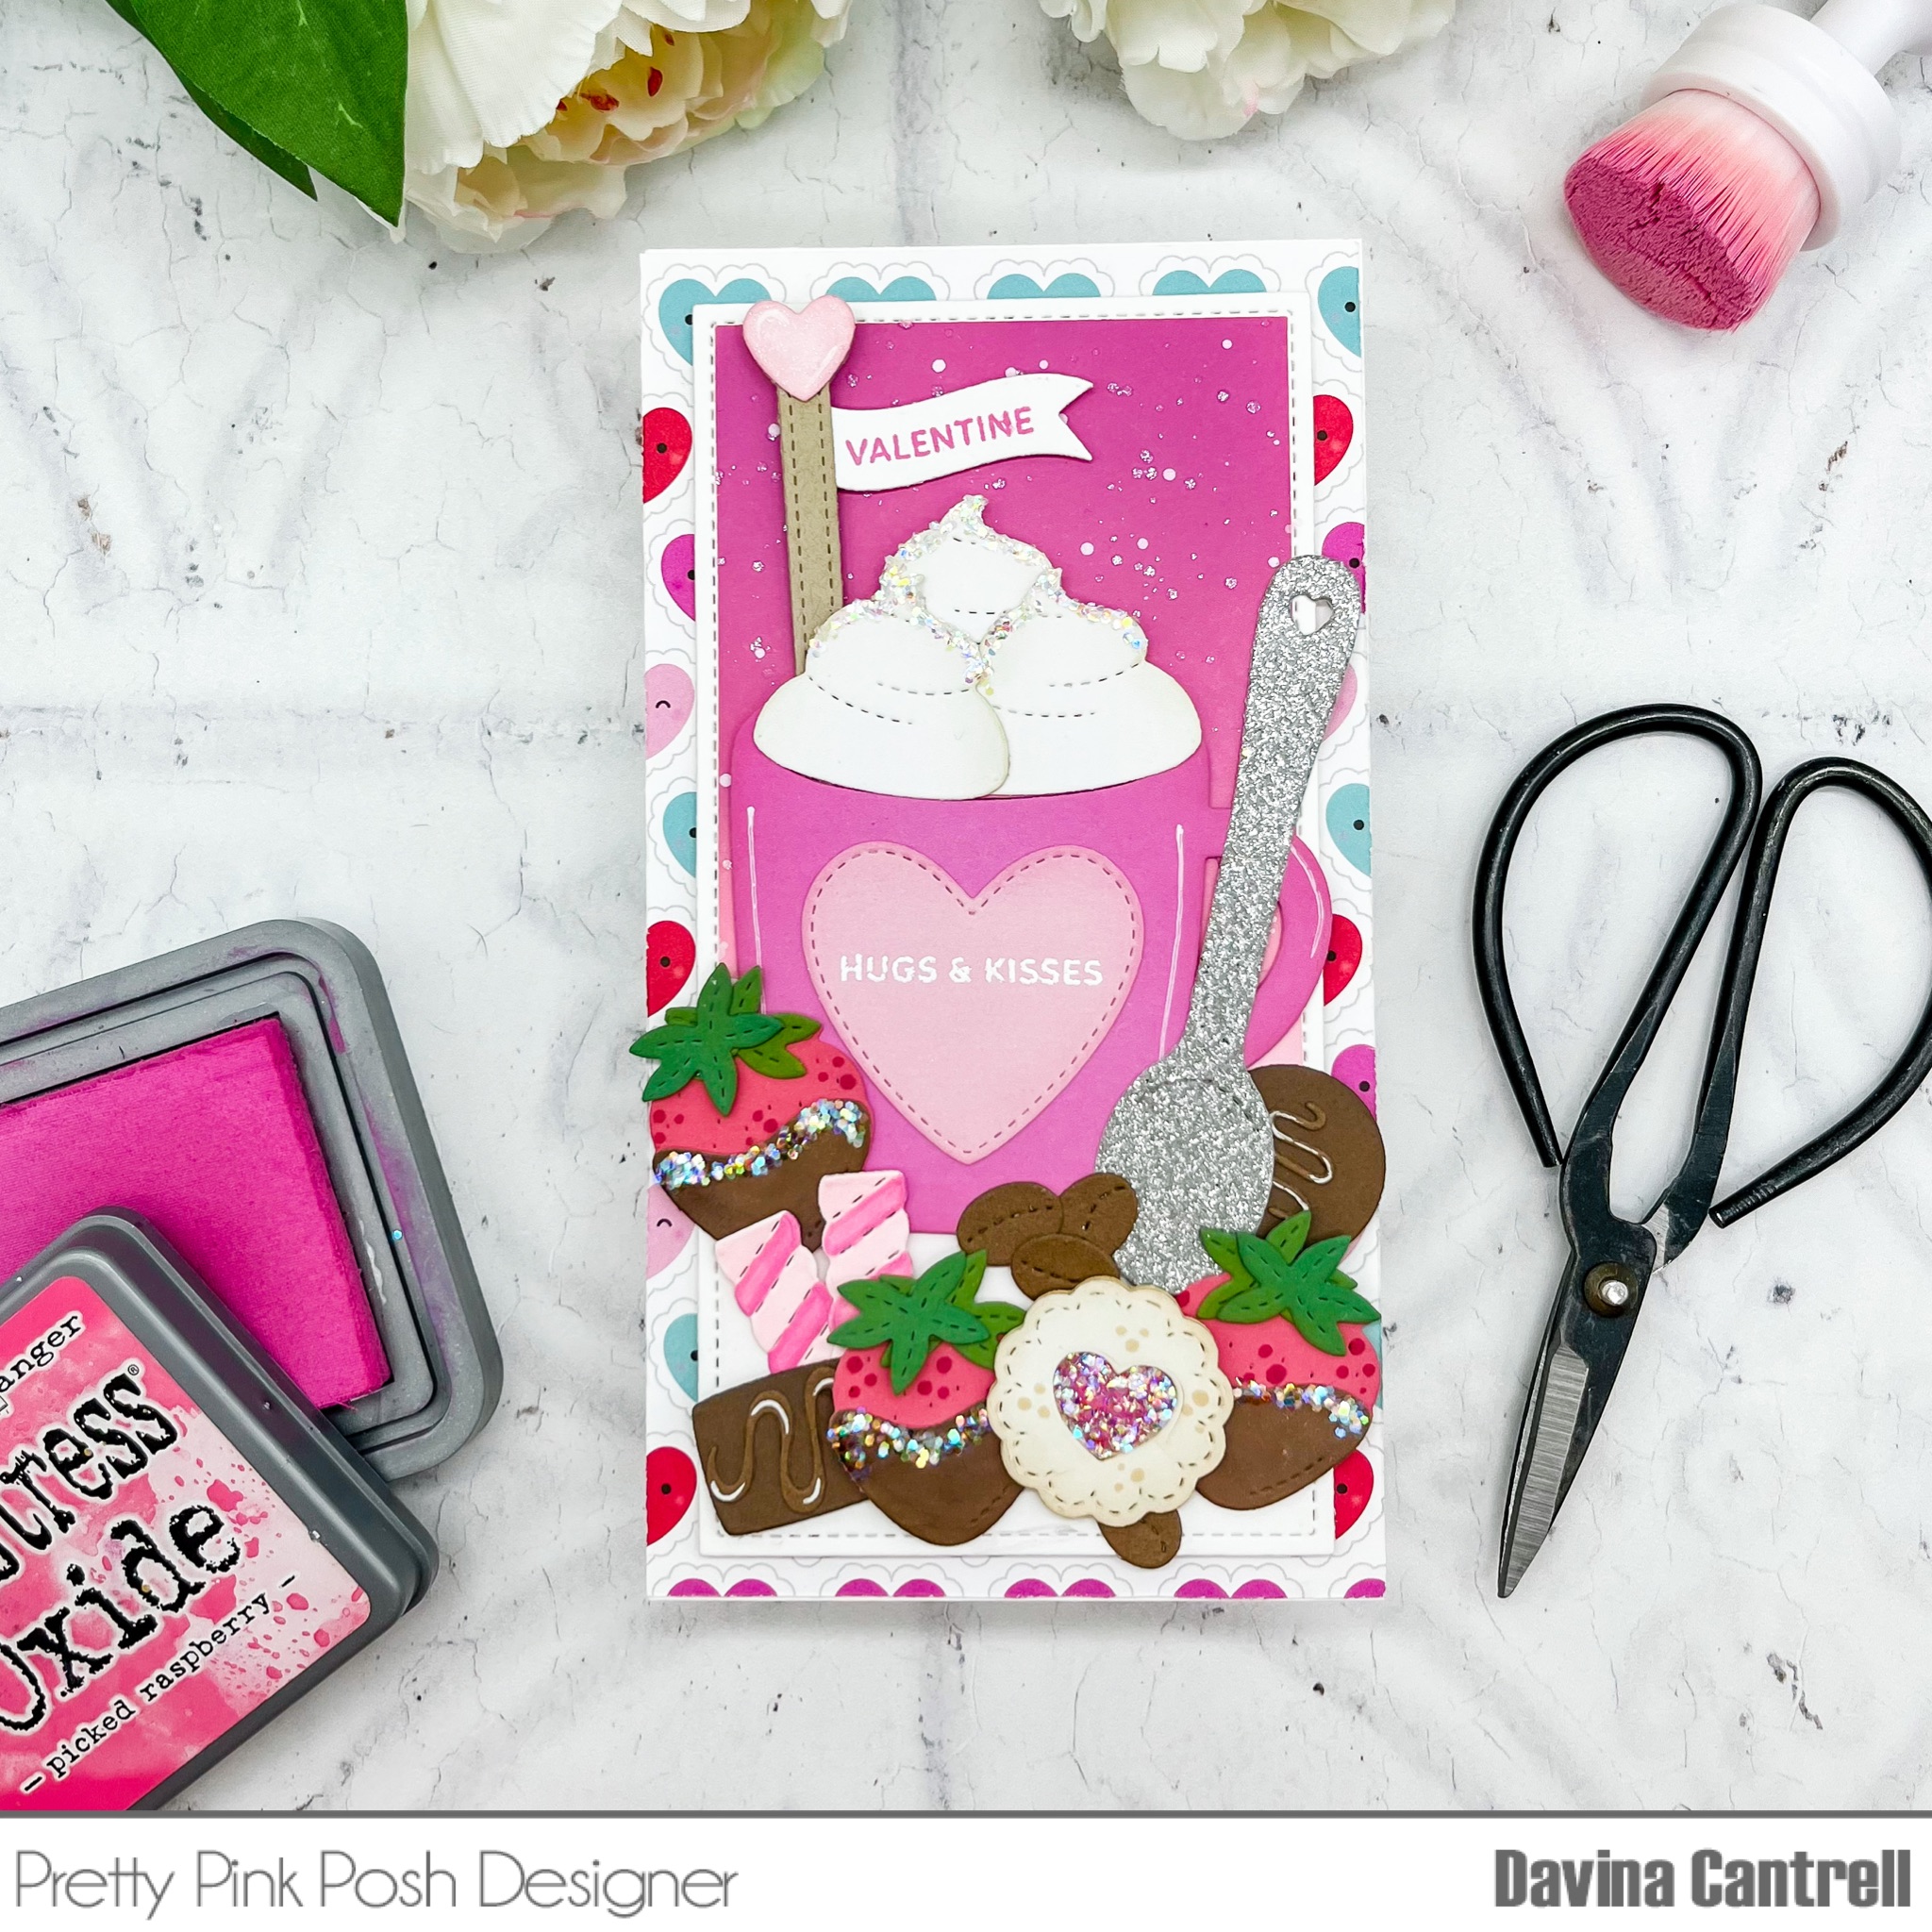
Hello Crafty Friends! Welcome to the first Blog Hop of 2023, I’m so excited for the January Pretty Pink Posh release. This release is huge and full of the most beautiful items. They have even added a new line to the brand, Hot Foil Dies! With so many cute Valentines themed products I chose to share an all die cut card today. 


One of the most fun companion die sets ever is available today, Valentine Mug Additions. This fantastic add on set is full of accessories for the popular Winter Mug Dies. I created a mini slimline sized card that I filled to the brim with goodies created with these dies. 


I cut multiple whipped creams to overflow the coffee mug and stashed a layered drink stirrer out of the top. Then I surrounded the mug with chocolates, dipped strawberries, and a spoon. There are a pair of candies and a sparkly cookie that I made using dies from Candy Treats Dies. I gently inked the edges of my die cut pieces before assembling, and added some chunky glitter to many of them. I love the full dimensional look of the final card. 

Hop along with the Pretty Pink Posh Team, all 3 days, to see all of the gorgeous inspiration. Leave a comment at each stop for your chance to win one of three $30 gift certificates. Here is todays line up,


Pretty Pink Posh blog
Caly Person
Raquel Arribas
Melissa Phillips
Davina Cantrell
Kristie Marcotte
Zsofia Molnar


Winners will be picked randomly along the blog hop. Comments must be left by 11:59 PM PST on 1/12/2023. Winners will be announced on the PPP blog.


Wednesday, November 30, 2022

Pretty Pink Posh Holiday Week


Hello crafty friends! Today I’m very excited to be participating in the Pretty Pink Posh Holiday Week! I just love creating with Pretty Pink Posh products, I really appreciate the cute illustrations and how wonderfully the stamp sets coordinate with previously released products. The cute Christmas Boxcard that I’m sharing today has a blend of Holiday sets from present to past. 


I built this boxcard with mint colored cardstock and some patterned papers that have red, pink, green, and mint. For the background panel, I inkblended some pretty pink shades and splattered with water and white ink. Then I used the Layered Snowflake stencils  to create a pink and white blizzard which includes some  raised embossed snowflakes. 


I like to focus my coloring, to match with my papers, so that it all feels themed. I stamped many images from Happy Santa and Reindeer Friends. After coloring the images and using the coordinating die cuts to perfectly cut my images, I added small white dot highlights. I adhered my images throughout the layers of my boxcard making sure that none were completely hidden. Then I heat embossed some snowflakes on vellum and tucked them into the scene on skinny acetate strips so they look like actual snowfall. 


To finish off the boxcard, I used gold embossing powder for the scripty “Joy” sentiment from the new Pine Wreath stamp set (I love that it has a coordinating die!) and mounted it onto a white banner that reads “to the world” from an older Joy stamp set. I think the bright red cardstock really packs a punch for the front. 


Finally, I stamped my sentiment onto the back and added a few little details and one more reindeer to make this beautiful from all angles. I hope that you enjoy this festive and bright card, make sure that you visit the the PPP shop to see the incredible products and take advantage of all of the holiday deals! 

Thank you for stopping by,

Davina 

Saturday, October 1, 2022

Pretty Pink Posh Halloween Week


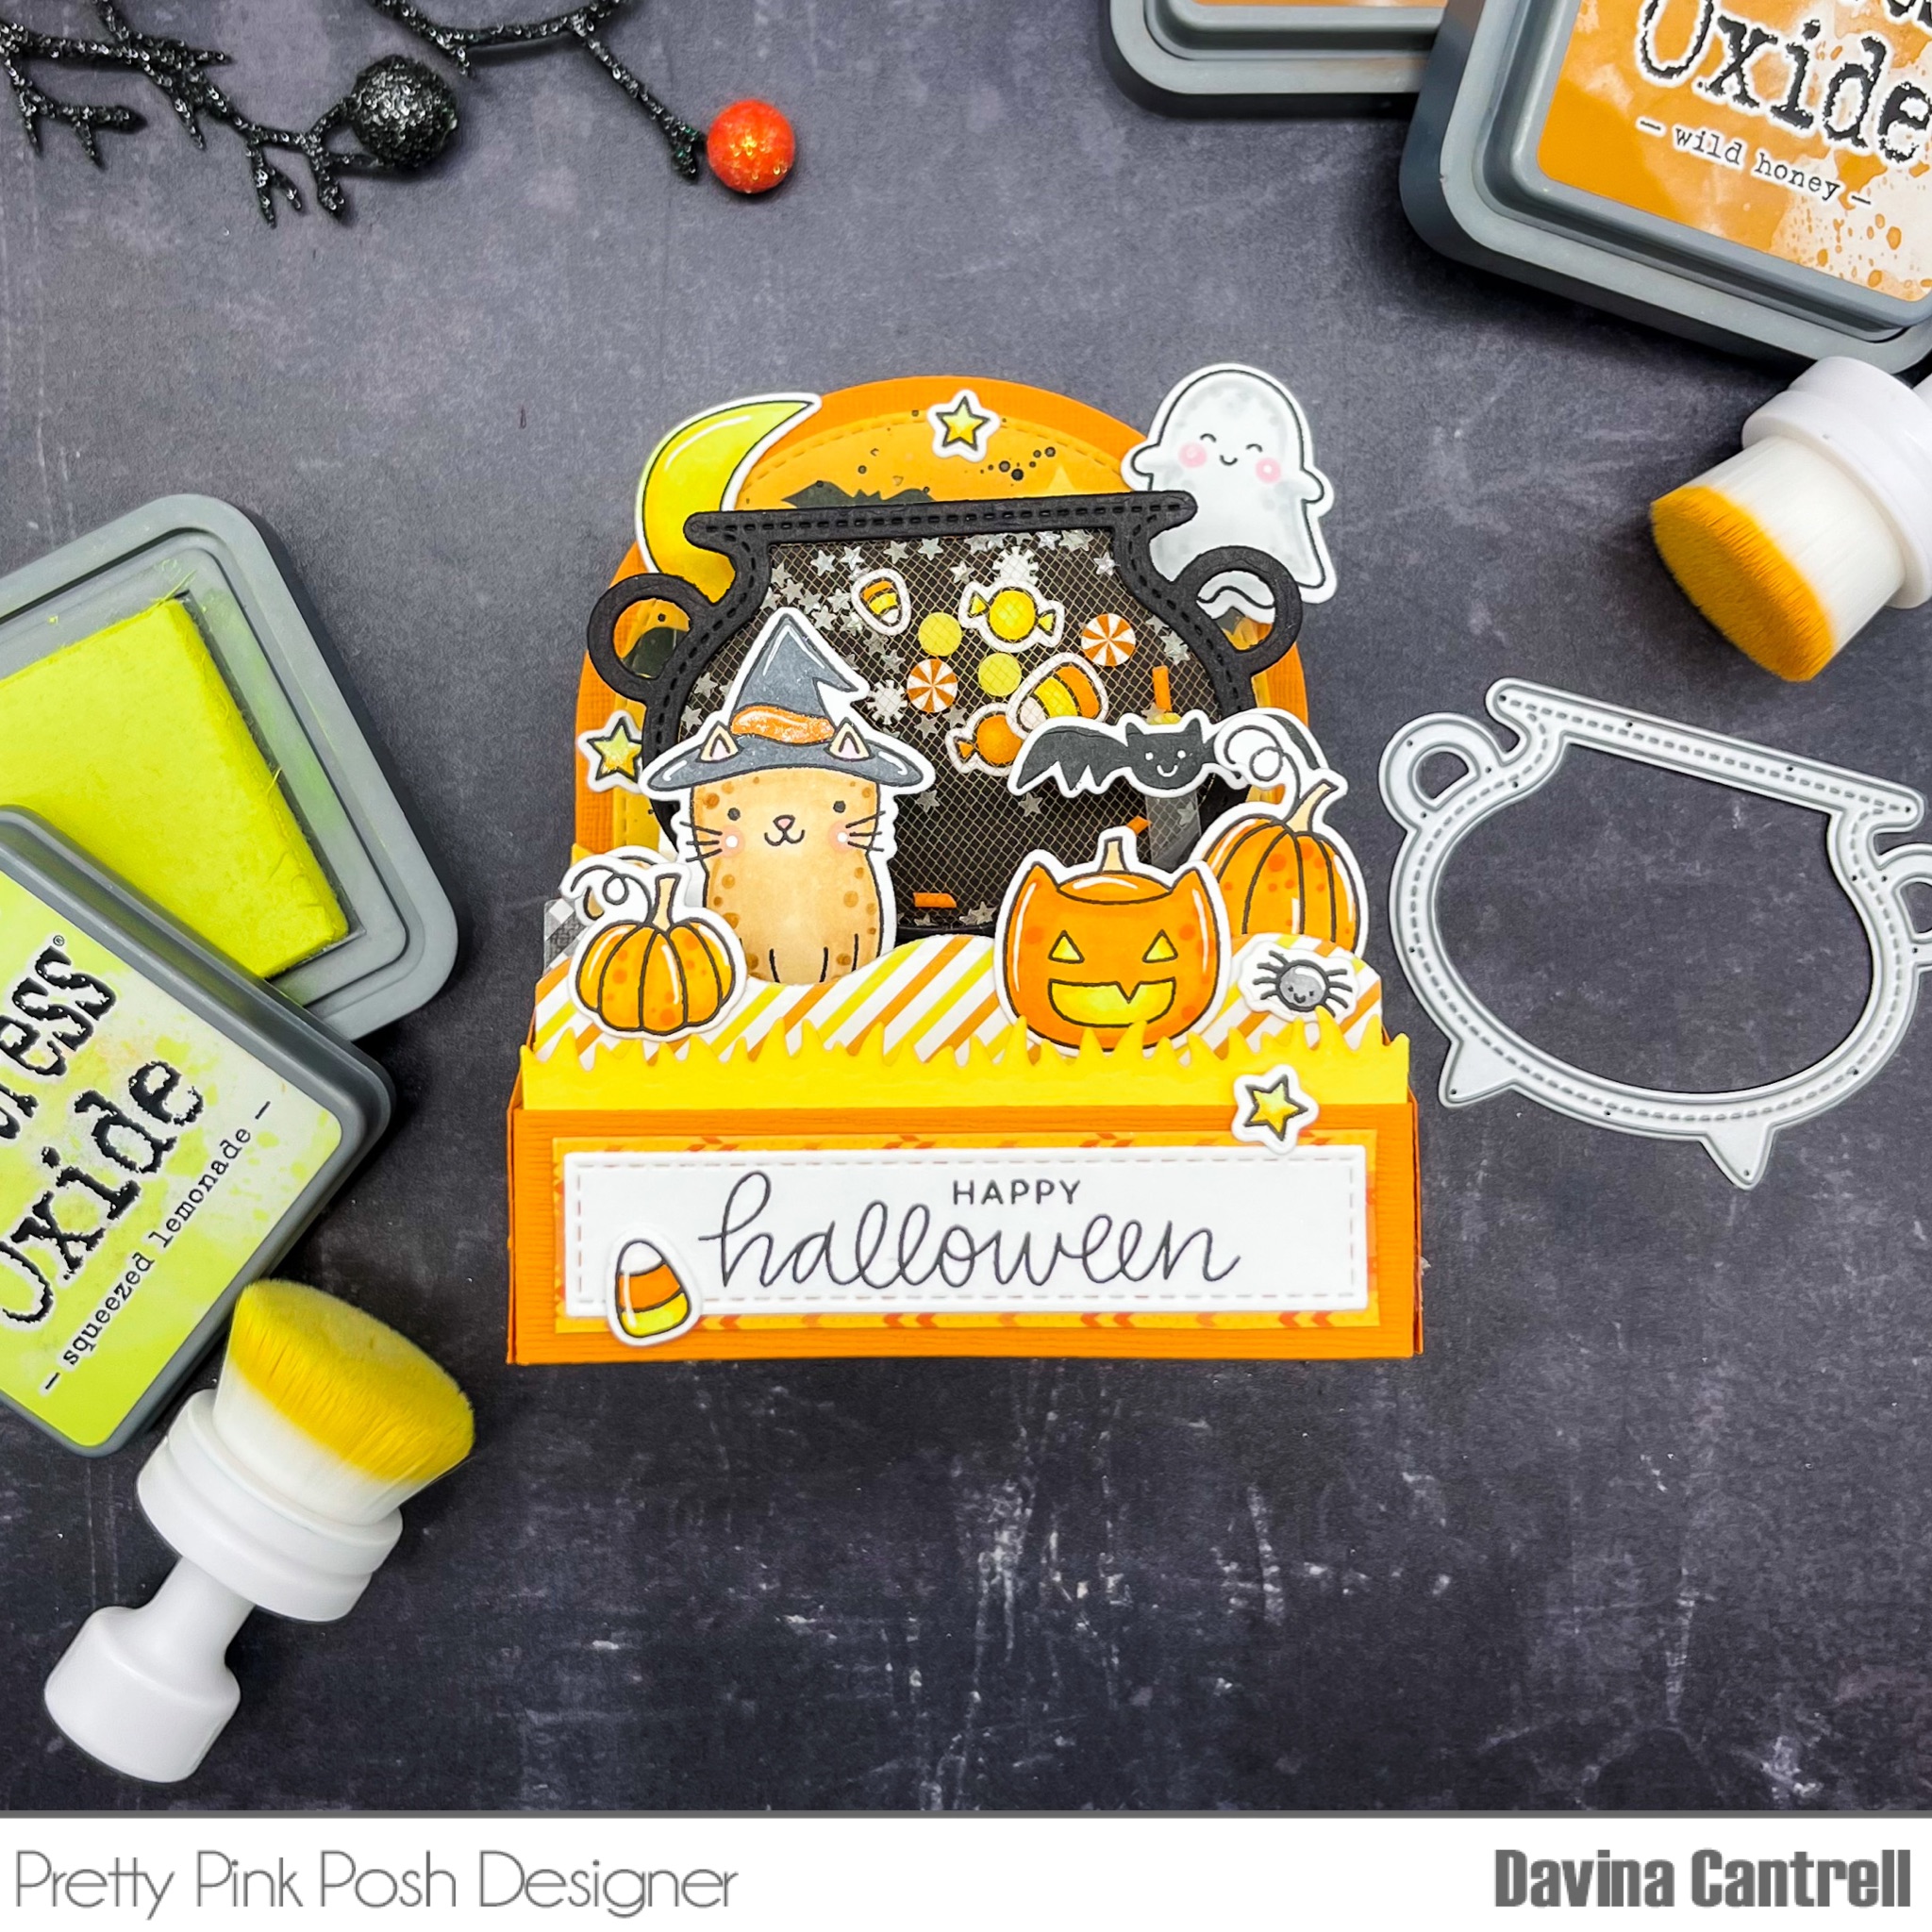
Hello Crafty Friends! I’m so excited to be participating in the Pretty Pink Posh Halloween Theme Week. All of their products are so wonderfully illustrated and designed, that it is a breeze to pull multiple stamp sets, stencils and dies together to make the cutest cards and decor. I did just that for this bright and bold shaker boxcard. 


I stamped images from newer and older sets to build this scene. Halloween PalsGhost FriendsHalloween friends, and Giving Thanks to name a few. I always use the coordinating dies to achieve a clean and polished look to my images. 


Before assembling this card, I created a flat mesh shaker using the new Cauldron Shaker Die. I cut the shaker twice, added a few stamped images along with some glow in the dark mini stars and some clay confetti pieces from the Halloween Party Mix. I sandwiched a small piece of orange tulle mesh to make a flat shaker using 1/8 double sided tape. 


For the background I inkblended an orange ombré sky and used the Spooky Sky Stencil to ink the bats and emboss the clouds onto my Bristol cardstock. I gently splattered with water and black ink to distress and “spookify” the sky. 


I was excited to use up several pieces of patterned paper remnants, that I had in my stash, for each of the layers and side panels of the box. I adhered my images and shaker through the layers and even made sure to have some floating pieces using acetate strips. I finished this up by stamping a sentiment on the back and adding a final pumpkin. 


I hope you love this fun and spooky card and appreciate you stopping by to see how I created it. Now is the perfect time for you to stock up on your Halloween supplies at Pretty Pink Posh, all of the Halloween items are on sale so don’t miss out! 
Davina 


Friday, September 23, 2022

Mama Elephant Stamp Highlights Joyful Greeting


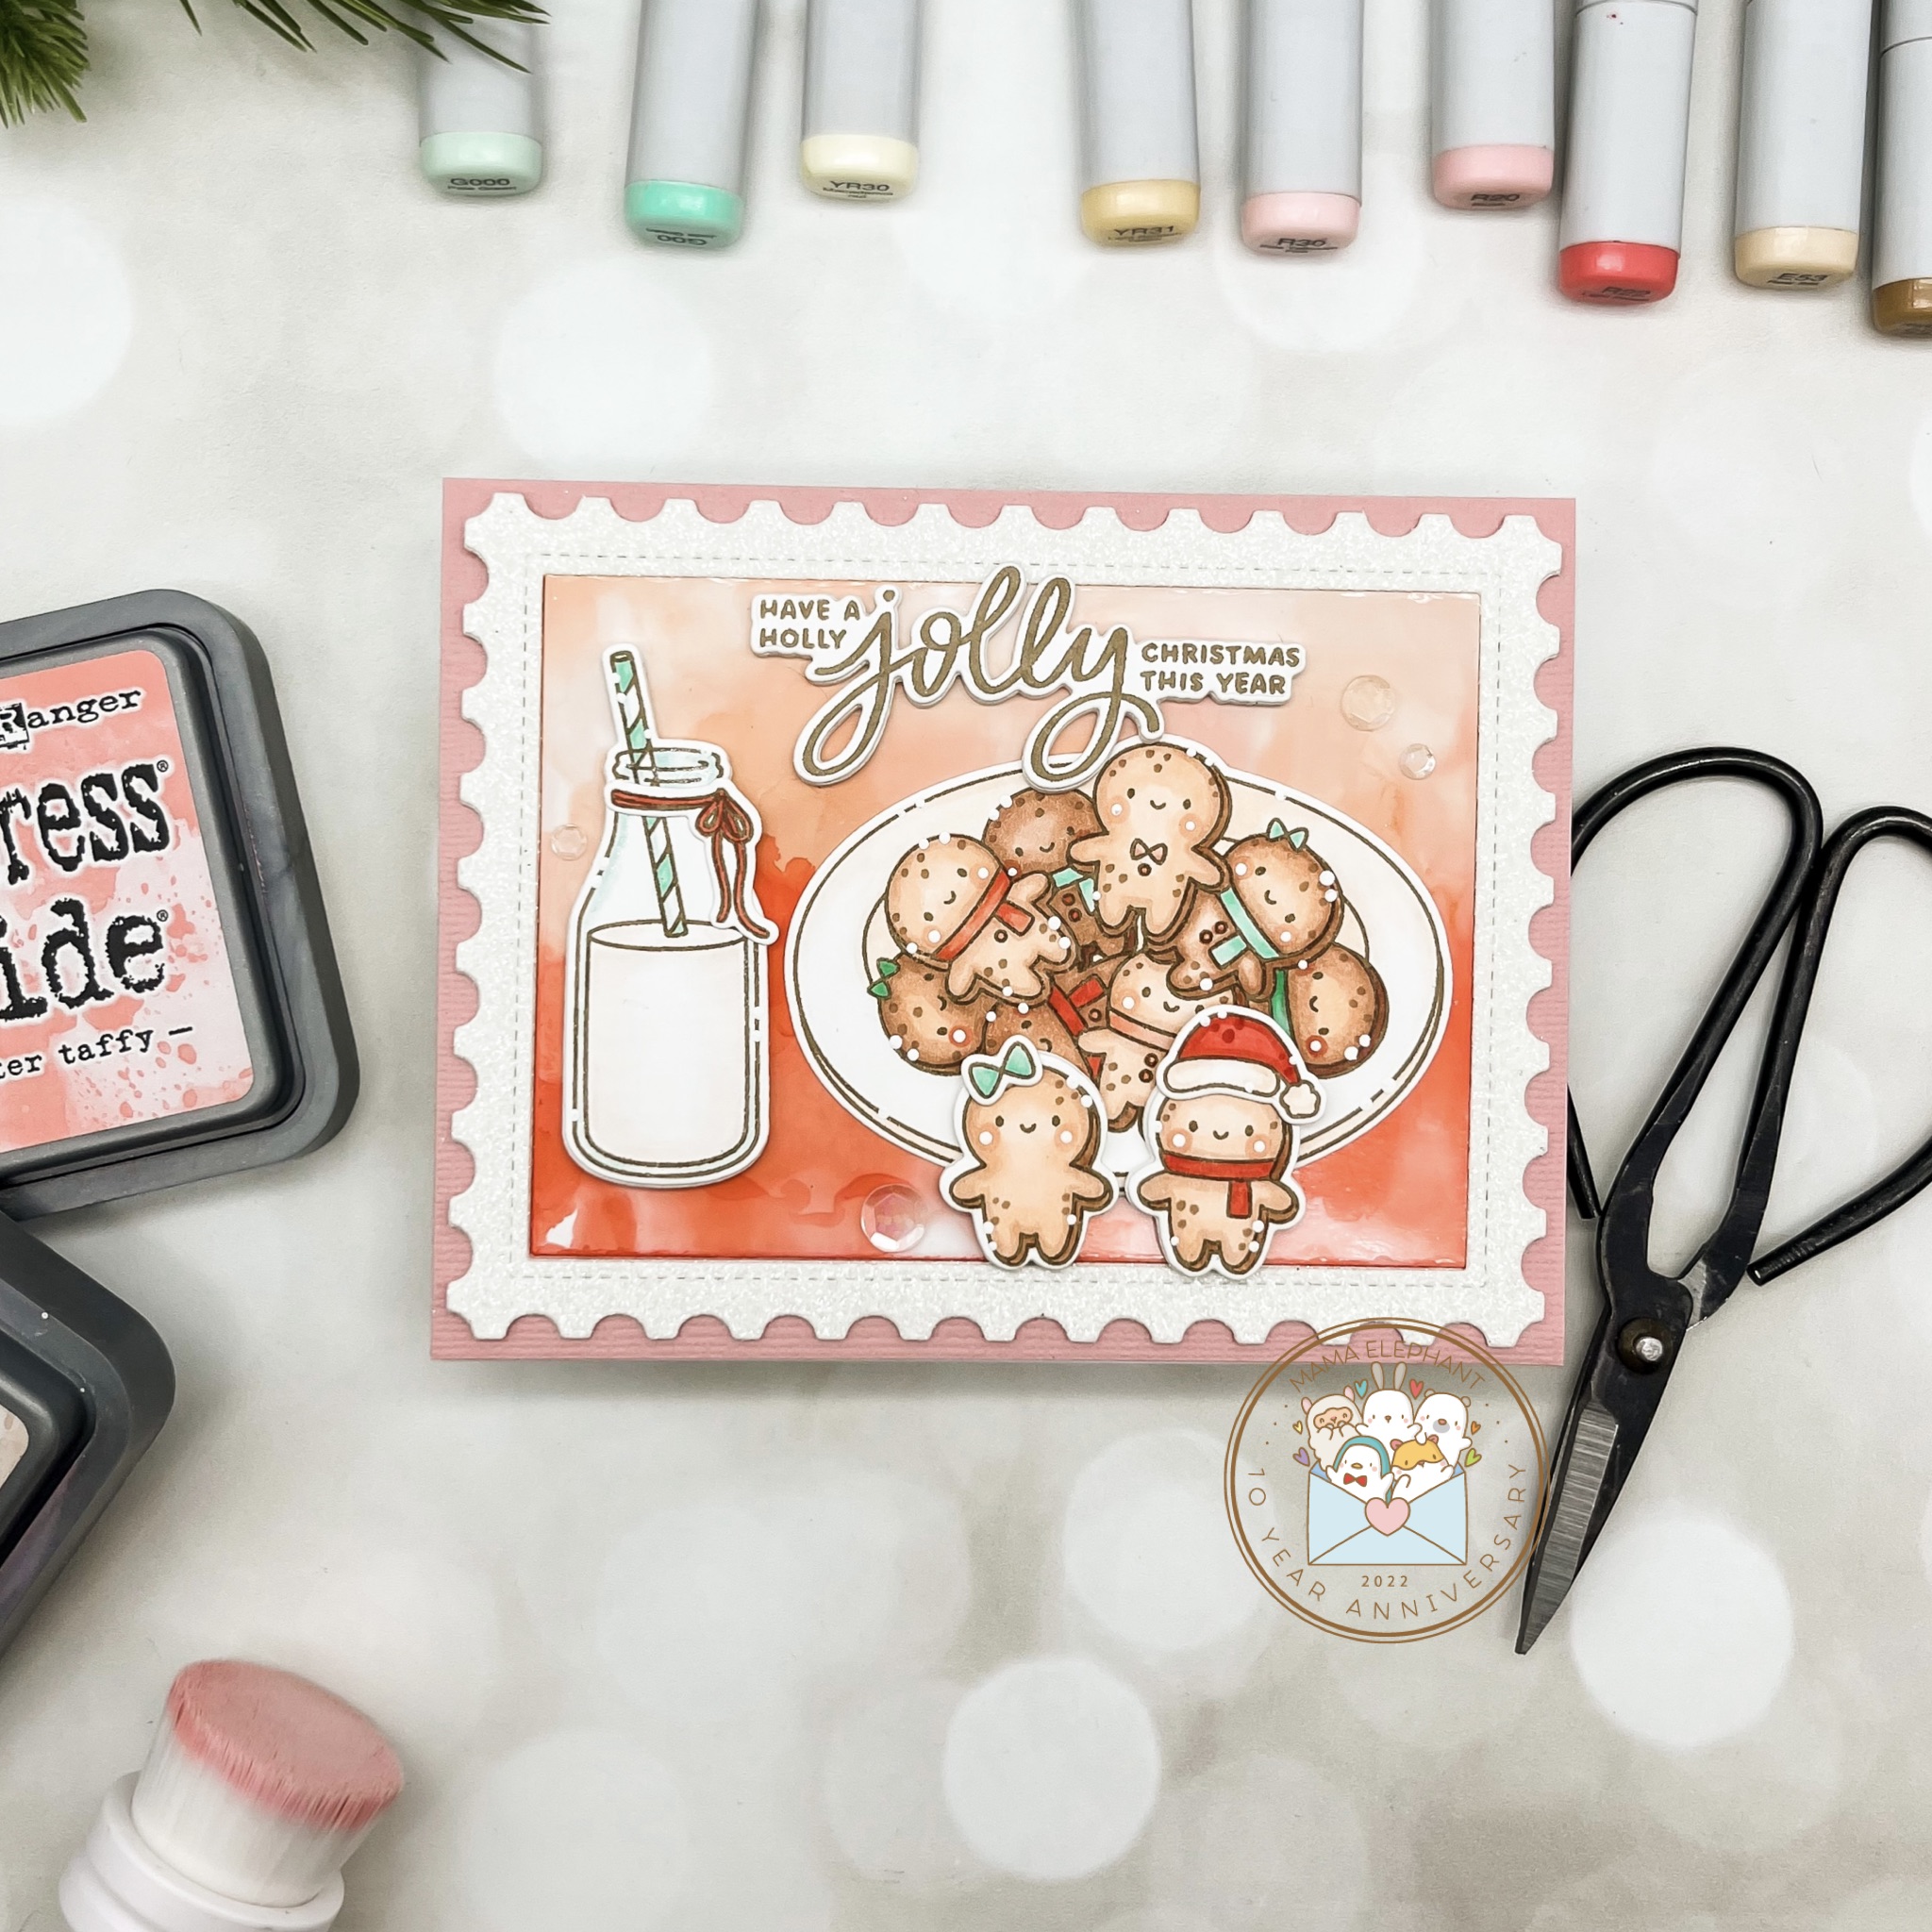
 Hello crafty friends! I’m so happy to be participating with the Mama Elephant team once again. Todays “Stamp Highlight” is the wonderful Holiday sentiment set called Joyful Greetings. This tasteful and pretty set is full of Christmas messages that would be perfect for the front of a card or even the inside message. Each sentiment has a coordinating die so you can place the sentiment over a busy background like I have with my “Jolly” card. 


I wanted a soft yet bold background for this gingerbread man filled card, so I used alcohol inks on white photo paper for a textured looking background. I created a postcard frame using the Postage Frame Creative Cuts and fit my inky background inside. I stamped and cut images from the Gingerbread Cookies Stamp set using brown ink soft pastel Christmas colors. 


I finished this card by stamping my “Joyful Greeting” with Taupe ink and centering in the top of my card. I really love the results and think that these sentiments will coordinate well with any holiday themed stamp set. 

Please make sure to head over to the Mama Elephant Blog to see the inspiration from the entire DT for all of the amazing new products. You won’t want to miss out on the sale and free item promotions!