Sunday, February 20, 2022

Mana Elephant Stamp Highlight: Yay A Party

 Today is the last day of the Mama Elephant Stamp Highlights, and we are showcasing the Yay A Party set. I created a large boxcard for all of these adorable bunnies. I started by using the Slim Scenescape Builder to die cut the boxcard and the decorative striped paper. I put the box together using double stick scor tape. I added the 3 rounded inserts and a whole row of die cut balloons from the Slim Scenescape Rainbow Add On set. I inked the edges with matching distress oxide ink and gave each balloon a glittery curly tail from themed on set. 


 Next, I stamped the images and colored them with copic markers before cutting out with the coordinating dies.  I highlighted with small white dots, then adhered each image to the inserts, making sure they were all visible. 


I finished this off by adding a sentiment across the front. I stamped a sentiment from wishes enclosed using yellow ink, the cut out with the coordinating die. I cut the word apart very carefully and glued it in a straight line. Then I stamped a sentiment from the  Yay A Party  set onto some white cardstock, along with a few images from the set, and applied it to the back. 


This turned out super cute, and didn’t take any longer than a regular card. I hope you enjoy this card, but make sure to head over to the Mama Elephant Blog to see all the great projects from The Whole team. Thank you for stopping by, Davina 

Saturday, February 19, 2022

Mama Elephant Stamp Highlight: Celebration Hamsters

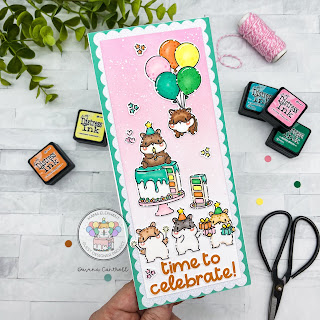
 Hello crafty friends! Today Mama Elephant  is highlighting the super cute stamps and creative cuts Celebration Hamsters. I really love the cute hamster and the all the little party poses! I can’t pick a favorite image, they are all so great. I really enjoy that they match the small images from Little Hamster Agenda too. I really wanted to make a large slimline card for these cuties, so I would have plenty of room for very image and a large sentiment. 


I started by cutting an aqua panel using the new B2B Slimline CC dies. I like that little bit of extra space these dies give you. They perfectly divide a standard 8.5 x 11 card into 3 equal sized pieces. That means I had plenty of room for these cute critters to fit on my scene. I made a glittery scalloped panel using the Slim Card Basics CC, and then a third panel from Bristol Smooth Cardstock using the the 2nd largest B2B slimline CC. I inked that panel with bright pink ink and gave a few splatters with glittery perfect pearls and white ink. 


I stamped and colored all of the images using copic markers before cutting out with the coordinating dies. I arranged all of my images onto the scene leaving a few inches in the white bottom space for my sentiment. I stamped a lovely sentiment from Wishes Enclosed and adhered it to the open area. I decided I wanted a few little extra embellishments, so I stamped and colored the stars that are included in the set and glued them down around my images. 

This entire release is amazing, and is so fun to create with. I hope you enjoy this card and get inspired to get crafty this weekend. Don’t forget to drop by the Mama Elephant Blog  to see all the wonderful cards from the entire team. Thank you for stopping by, Davina  

Friday, February 18, 2022

Mama Elephant Stamp Highlights: Wishes Enclosed

 Hello crafty friends! The Mama Elephant new release Stamp Highlights continue with Wishes Enclosed. This fun sentiment set is my favorite set of the release. Which is odd because I never love sentiments so much. It matches the super cute Christmas set Everything Nice, which I also fell in love with. I used these great sentiments on almost every card sample I created for this release. 


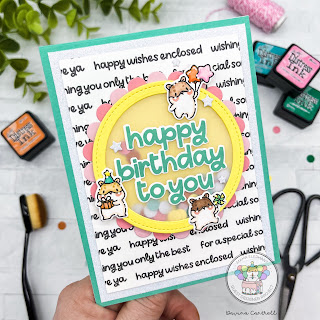
This bold shaker card uses all the small sentiments in addition to a large one. I created a patterned paper by lining up 3 sentiments, and stamping it every 3/4 of an inch down a piece of bright Neenah cardstock. Once I made it down the panel I alternated the sentiments and staggered them a little differently before repeating the process. Once it was done I pulled out some of the dies from the last release and got to work.

 Using the B2B rectangle CC dies, I used the 3 largest to cut an aqua, white glitter, and my printed panel. I adhered them all together and set aside. Using the Circle Combo CC dies, I cut two scallops from pink cardstock. I inked the edges of one a little darker, then adhered it to the unlinked one. Next I cut two yellow circles using the coordinating stitched die. I used the next size down to cut the center from one of those yellow circles. I backed it with vellum and skinny foam strips along the edge before layering it onto the first circle. I had made a little pile of paper confetti using the confetti die from the Party Scene Cover CC, then adhered it over the pink scalloped circle I made. 


I stamped HBTY using a Wishes Enclosed sentiment in Aqua ink, and die cut it with the coordinating die. I glued it to the center of the shaker and surrounded it with 3 adorable hamsters from the Little Hamster Agenda stamp set. I couldn’t love this more and will have a hard time giving it away haha. I hope you enjoyed this card as much as I do. Don’t forget to head over to the Mama Elephant Blog to see the inspiration from all the Design Team. Thank you for stopping by, 

Davina 

Thursday, February 17, 2022

Mama Elephant Stamp Highlight: Little Hamster Agenda

 Hello crafty friends! Mama Elephant is beginning  the stamp highlights for the February release, and today we get to focus on Little Hamster Agenda stamps and creative cuts. The Little Agenda series by Mama Elephant is one of my favorites. All the cute images in different poses, with so many wonderful accessories, make them perfect for any occasion. They are truly some of my favorite things to create with. This adorable Hamster addition does not disappoint. 


The mesh shaker card I made combines two new items. The amazing new Word Cover- HBTY  creative cuts and the  Little Hamster Agenda stamps and dies. I cut the Word Cover plate from bright white cardstock and backed the panel with white mesh (tulle) using double stick tape. On an A2 sized card base I alternated strips of colored cardstock to corner the entire front. I added many lose small glittery stars that I made using the small star confetti die included with the Party Scene Cover- Creative Cut and white glitter cardstock remnants. Then I carefully adhered the die cut panel on top. I put the reserved center pieces in their places and moved the stars around a little so I could see some in each letter. 


Finally, I stamped a few little hamsters that looked like they were celebrating, and colored them with copic markers. I die cut them, then added small white dot highlights. I arranged the images around the word panel, and voila! 

I think this little card was relatively simple and easy, but packs a huge punch with the stripes and shakeable stars! I hope you give one of these “mail friendly” mesh shakers a chance on day. Don’t forget to head over to the Mama Elephant Blog to see all the great inspiration. Thank you for stopping by, 

Davina 


Saturday, February 12, 2022

Mama Elephant February Stampede Blog Hop


Welcome to the Mama Elephant Design Team blog hop!

Our newest release is now live and available for purchase in the store!

www.mamaelephant.com

I’m very happy to be participating with the Mama Elephant Team as a guest designer for February. This month the the release is all birthday themed and I absolutely love it! I made an effort to make all of my projects with the same color scheme, and it looks so cute together. I can’t wait to share everything with you. Today, I have a card that uses quite a few of the new sets.  

I started by cutting some glittery white cardstock with the new Party Scene Cover- Creative Cuts. My favorite part of this die set is how detailed all the pieces are. I layered this scene over a piece of inkblended cardstock that I splattered with glittery perfect pearls and white ink. I stamped some adorable hamster images from two sets, the new Celebration Hamsters and the previously released Sweet Treats.

I adhered one of the new Hamster characters on-top of the pile of candy, covering the llama.  Then I built some balloons using the Party Scene dies, making sure to ink the edges for a little visual dimension.  Finally, I stamped the sentiment from my favorite new set, called Wishes Enclosed, with bright emerald green ink and added to the bottom. 

Check out the rest of the hop for amazing inspiration from our Design Team!


To celebrate the new release, Mama Elephant is picking 1 winner to win a prize pack! 


» 1. Leave a comment on the collective Design Team's Instagram Stampede post
» 2. Leave a comment on our Facebook Stampede post
» 3. Leave a comment on any of the Introduction videos on YouTube
 
Each action qualifies for one entry, max 3 entries per stampeder please and good luck!
Open to US entries only.
 
Check out the rest of the hop for amazing inspiration from our Design Team!


Thank you for stopping by! Have a great day from all of us!


Monday, February 7, 2022

Mama Elephant Designer Series- Everyday Monkeys & B2B Rectangles

 Hello crafty friends! Davina here with a sweet monkey filled easel card. I’ve made a few of these unique cards before and I really enjoy them. I like that they are like 3 little cards combined into one. I used images from 4 different stamp sets, and 3 stand alone die sets, to bring this card to life. 


The size of your image panels determines the size of your card. I wanted to use the new B2B Rectangles CC  to create my layers, so I selected the 4th die as my base size. I knew that I could fit 3 on a standard 8.5x 11 piece of colored card, with some room for a border. I selected some old patterned papers from my stash and a piece of coordinating colored cardstock to begin. 


Trim your colored cardstock to 4 3/4 X 10 5/8. Along the length score at 3.5, 6,  and 7.5, then fold the first and third score line in a Z formation. Use a bone folder to get those folds really well. Then fold the middle score line in the same direction as the one right underneath. This will create the easel, and allow the finished card to prop open. Cut some layered panels from decorative paper using the B2B Rectangles CC, and adhere to the first and third sections. You can decorate the center area directly onto the colored card, or add a single piece of patterned paper. If adding paper as I did here, score the bottom portion where it will line up, and only add adhesive to the top and bottom of the panel. It will need some fiddling to open and close properly, but it looks cute both ways.  


I stamped many cute monkeys, heart shaped boba pearls, and strawberries, with brown copic friendly ink, to fill this card. I used images from Everyday Monkeys , Boba Tea , Little Monkey Agenda , and Milkshake.  I colored everything with copic markers before cutting out with the coordinating dies. I made two little Boba Tea mesh shakers for the front top panel using the Boba Shaker Combo CC. The flat mesh shakers are a great way to add some excitement, without a ton of bulk. I simply outline the backside of the window with 1/8 inch scor tape, apply some mesh, then add another layer of 1/8 inch scor tape (trim away the extra mesh after securing with scor tape). After inking the base of the cups, I adhered the heart bobas and a strawberry in each cup and added a little pile of sequins, before closing up the mesh shaker and topping with more goodies. 


For the center area I used some Whimsy Alpha CC die cut letters to spell XOXO, and surrounded with more cute little images. It’s important to make sure that nothing extends over that score line. 


Finally, for the bottom panel I used a large Boba Tea image that also had a cute monkey, but I adhered the hearts on top of the pearls so it matched my shakers from above. I like to make a popped up sentiment to act as a stopper/place holder for the easel portion. I loved the sentiment from Boba Tea, but I stamped the word Cute-Tea,with the large Color Me Letters  stamps, on a white strip that I backed with glittery champagne cardstock and popped onto some foam tape. Now, when I want to display this card it holds itself into an upright position. 


I hope you like this card as much as I do, and that you follow the tutorial to make an easel card of your own! Thank you so much for popping by, Davina