Showing posts with label distress oxide inks. Show all posts

Thursday, January 5, 2023

Pretty Pink Posh January Release Blog Hop


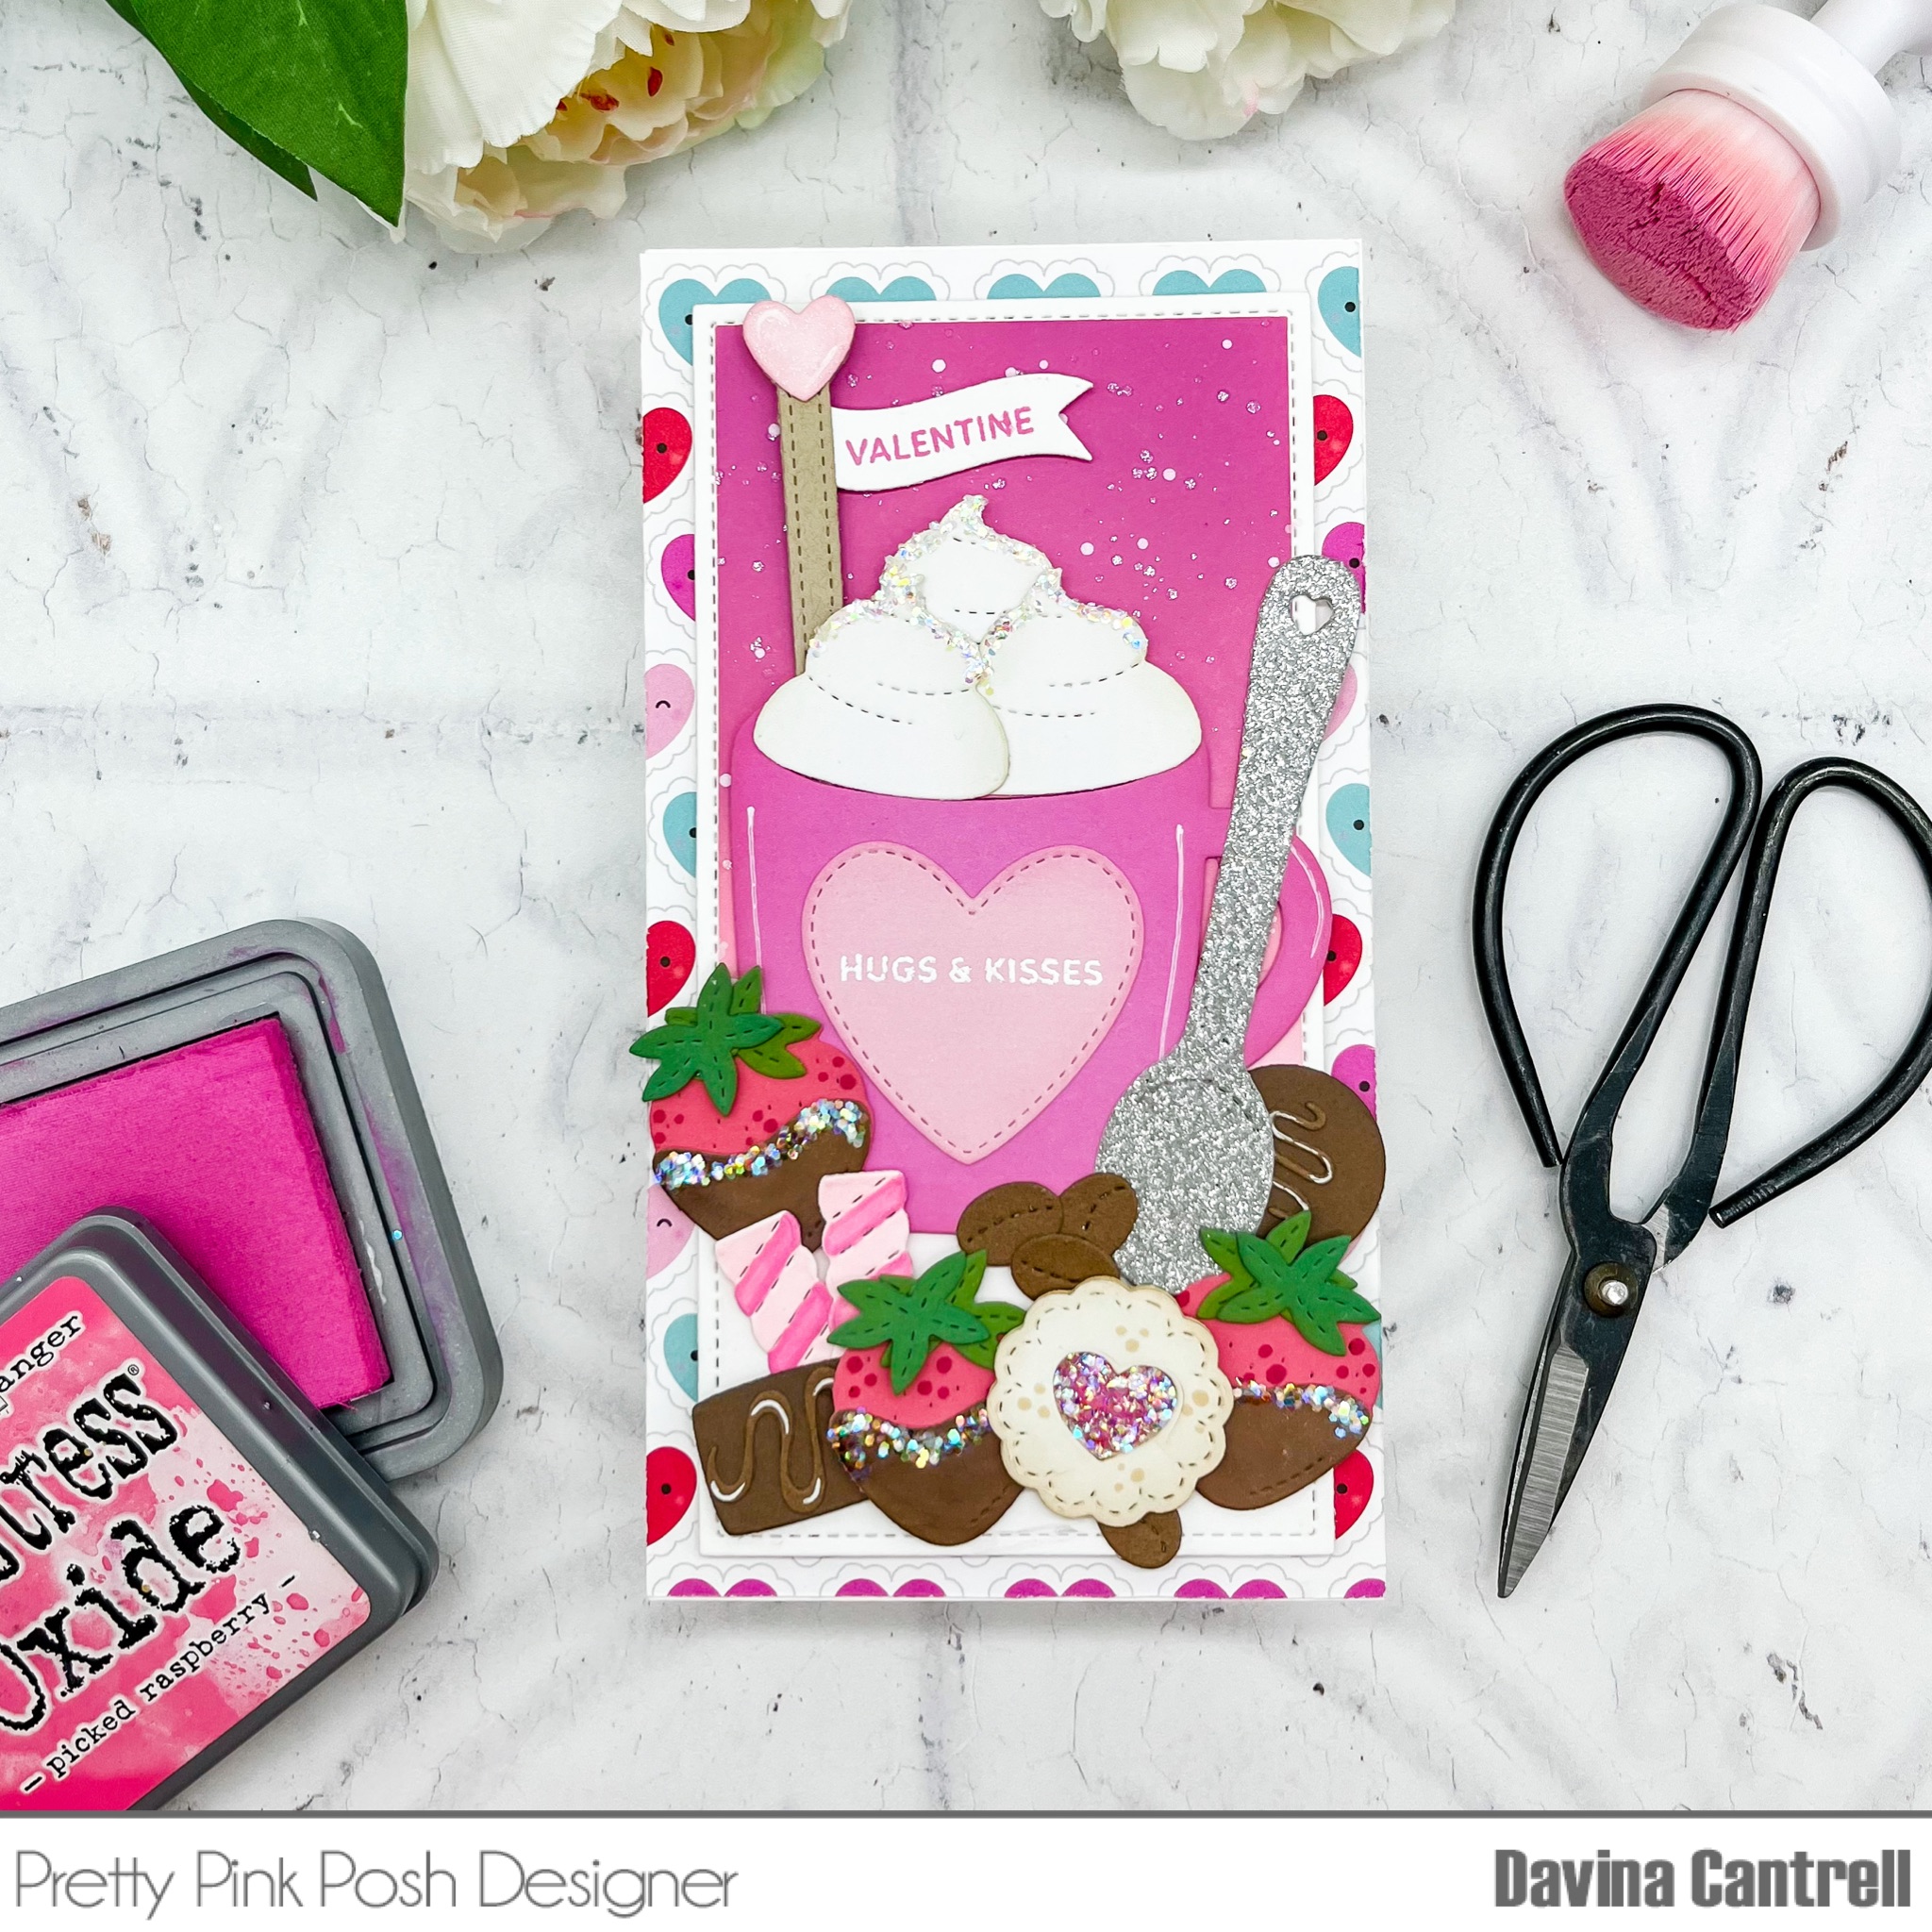
Hello Crafty Friends! Welcome to the first Blog Hop of 2023, I’m so excited for the January Pretty Pink Posh release. This release is huge and full of the most beautiful items. They have even added a new line to the brand, Hot Foil Dies! With so many cute Valentines themed products I chose to share an all die cut card today. 


One of the most fun companion die sets ever is available today, Valentine Mug Additions. This fantastic add on set is full of accessories for the popular Winter Mug Dies. I created a mini slimline sized card that I filled to the brim with goodies created with these dies. 


I cut multiple whipped creams to overflow the coffee mug and stashed a layered drink stirrer out of the top. Then I surrounded the mug with chocolates, dipped strawberries, and a spoon. There are a pair of candies and a sparkly cookie that I made using dies from Candy Treats Dies. I gently inked the edges of my die cut pieces before assembling, and added some chunky glitter to many of them. I love the full dimensional look of the final card. 

Hop along with the Pretty Pink Posh Team, all 3 days, to see all of the gorgeous inspiration. Leave a comment at each stop for your chance to win one of three $30 gift certificates. Here is todays line up,


Pretty Pink Posh blog
Caly Person
Raquel Arribas
Melissa Phillips
Davina Cantrell
Kristie Marcotte
Zsofia Molnar


Winners will be picked randomly along the blog hop. Comments must be left by 11:59 PM PST on 1/12/2023. Winners will be announced on the PPP blog.


Saturday, February 19, 2022

Mama Elephant Stamp Highlight: Celebration Hamsters

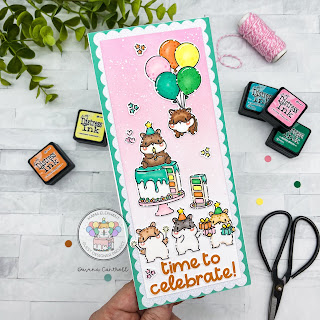
 Hello crafty friends! Today Mama Elephant  is highlighting the super cute stamps and creative cuts Celebration Hamsters. I really love the cute hamster and the all the little party poses! I can’t pick a favorite image, they are all so great. I really enjoy that they match the small images from Little Hamster Agenda too. I really wanted to make a large slimline card for these cuties, so I would have plenty of room for very image and a large sentiment. 


I started by cutting an aqua panel using the new B2B Slimline CC dies. I like that little bit of extra space these dies give you. They perfectly divide a standard 8.5 x 11 card into 3 equal sized pieces. That means I had plenty of room for these cute critters to fit on my scene. I made a glittery scalloped panel using the Slim Card Basics CC, and then a third panel from Bristol Smooth Cardstock using the the 2nd largest B2B slimline CC. I inked that panel with bright pink ink and gave a few splatters with glittery perfect pearls and white ink. 


I stamped and colored all of the images using copic markers before cutting out with the coordinating dies. I arranged all of my images onto the scene leaving a few inches in the white bottom space for my sentiment. I stamped a lovely sentiment from Wishes Enclosed and adhered it to the open area. I decided I wanted a few little extra embellishments, so I stamped and colored the stars that are included in the set and glued them down around my images. 

This entire release is amazing, and is so fun to create with. I hope you enjoy this card and get inspired to get crafty this weekend. Don’t forget to drop by the Mama Elephant Blog  to see all the wonderful cards from the entire team. Thank you for stopping by, Davina  

Monday, January 17, 2022

Mama Elephant Stamp Highlight- Everyday Monkeys

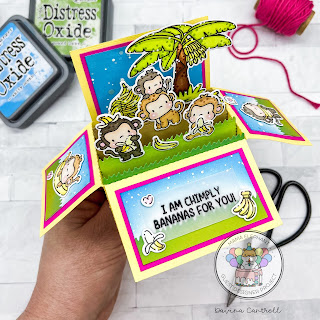
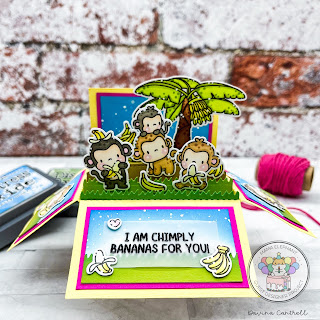
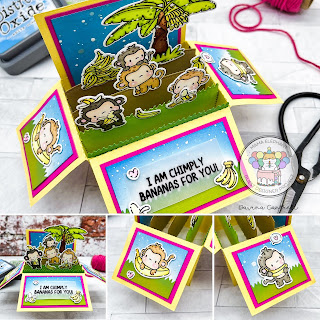
Hello Crafty friends! I’m back today with a card using the new Everyday Monkey Stamp Set and coordinating Creative Cuts from Mama Elephant. I love these cute monkeys so much that I decided to create box card so I would have room for every single stamp on one project. 


This box card was a snap to make using the Mama Elephant 3D Pop Up Card- Creative Cuts. I selected some pretty spring plaid patterned paper to adhere to the outside, and for my color inspiration, but I didn’t manage to get a photo with the paper visible. I assembled the box card with a soft yellow cardstock and added inkblended panels and inserts using the included panel dies.


Next I stamped all of the images onto bright white Neenah cardstock, and colored everything with copic markers before die cutting with the coordinating CC. I grabbed a sweet little word bubble from the Little Bear Agenda set, but other than that, all images are from the Everyday Monkeys. I heat embossed the sentiment onto some vellum for the front flap, and hid the glue under some small images. Then I arranged all the cuties onto my inserts making sure everyone was visible from the front. That banana tree is really beautiful and I wanted to make sure it was not covered up! 


These little monkeys are a wonderful size for all kinds of cute scenes and I can’t wait to share more with you. I will add the links of all products used to the Mama Elephant Shop and don’t forget to check out the Mama Elephant Blog  to see even more inspiration from the Design Team

Everyday Monkeys

Everyday Monkeys Creative Cuts

Little Bear Agenda

3D Pop Up Card- Creative Cuts

Thank you so much for stopping by,

Davina 


Friday, January 8, 2021

Special Delivery with Bri Moodboard

 Hello crafty friends! This is my first blog post of the year with Butterfly Reflections Ink, and of course I am using the gorgeous January BRI Moodboard. If you haven’t already drooled all over these elegant and glam colors, they are Icy Mint, Powder Pink, Rose Gold , and Deep Space Blue. 

I have so many different card ideas I want to create, but I still hadn’t used some of my Winter Lawn Fawn haul, as well as most of the brand new Lawn Fawn too. So I thought I’d better get to it! I used the new Special Delivery stamps and dies, along with the Add On set with the boxes and labels. I love that owl and his little mail man hat so much. I combined these images, with some bears from the winter release Den Sweet Den, set to create a lovely snowy book delivery. 

I stamped all of my images using the brown Crunchy Leaf in from Lawn Fawn, and copic colored my images using colors that fit the Moodboard. After die cutting the images using the coordinating dies, I added white dot highlights. I cut some paper panels using Lawn Fawn cross stitched layers, then inkblended a powder pink sky onto some Bristol smooth cardstock using Tattered Rose Distress Oxide Ink. I splattered it with white ink and metallic Rose Gold Shimmer Spray. I layered some glittery cardstock to create a snowy hillside 

Before attaching my images I cut a wavy sliding channel for my owl to fly across the scene. I used the Slide on Over Waves  channel dies, but I shortened the channel by partially die cutting the length to fit the smaller area. Then I adhered my remaining images across the snowy bottom. I decided to add some glittery snowflakes and discovered that the small assortment of snowflakes in the Magic Iris Snow Globe Add On has the most perfect assortment of snowflakes using only one die and pass through the machine. 

I mounted my image panel onto some mint and navy cardstock layers using adhesive foam tape, making sure to dust the areas around the slider with my powder tool, for easy movement. Once my card was all assembled I felt like my owl was spinning all over the place, so I weighted the bottom of the image with a small metal washer and now my mail man stays upright, and slides easily across the scene. 

Thank you so much for stopping by and reading how I made this card. Make sure to play along using the beautiful January Moodboard by sharing your cards on Instagram with the hashtag #brimoodboard and don’t forget to tag the Butterfly Reflections Ink challenge account @brimoodboardchallenge so we can share your projects. One winner will be randomly selected to win $20 to the shop. 

Thank you, Davina 

Tuesday, December 15, 2020

Heffy Doodle & Miss Ink Collaberation


Hello crafty friends. Today we are celebrating a fun collaboration between two of my favorite brands. Welcome to the Heffy Doodle and Miss Ink Stamps Collaboration Blog Hop! Design team members from both teams are sharing some crafty inspiration using products from both companies! Plus, both stores will be giving away prizes! 

I made a Candy Cane forest, complete with coffee sipping Gnomes, who look comfy cozy in their Christmas pajamas. I love how the bright bold colors look on top of the glittery snowy hillside. I began by choosing some patterned paper to pull my colors from. Then, I inkblended the mint and aqua sky in the upper half of a Bristol paper panel. I splattered with water and perfect pearls before using some gold glitter embossing paste with the Twinkle Twinkle Stencil from Heffy Doodle. 


While that dried, I stamped my gnomes from Miss Ink Stamps Coffee Gnomes, and the candy canes and trees from Heffy Doodles Elfish, Wanna Build a Snowman, and Santa’s Village. I used copic markers to color all of my images, and highlighted with small white dots after diecutting. Next, I trimmed two glittery cardstock hillsides using Slopey Joes  stitched dies from Heffy Doodle. I adhered the two layers together, then mounted them over the embossed background panel using foam tape. I tucked my trees and candy canes around the top leaving space for my Gnomes in the center. I heat embossed the sentiment from Miss Ink Stamps Season’s Greetings onto a red cardstock banner, then glued it at the bottom. I mounted this scene onto a small green layer before securing it to the patterned paper and cardbase. 

I really love how well these two brands blended and hope that you think outside of the box, and blend your crafty supplies at home. It is something I don’t do often enough but I think it’s well past time for me to get mixing! 

Make sure to comment along the way for your chance to win! Miss Ink Stamps will be giving away $25 and Heffy Doodle will be giving away £25 to their respective stores!

Each company will post their random winner on Sunday, December 20th at 10AM EST!  Make sure to check the Heffy Doodle Blog and Miss Ink Stamps Blog to see if you’re a winner!

You should have come from Cassie Trask, your next stop is Amanda Fitterer, so make sure to hop along and hit every post! 


LINEUP

Heffy Doodle Blog

Silvia Galloni 

Cassie Trask

Davina Cantrell (you are here) 

Amanda Fitterer

Yuliya Yavorskaya 

Ali Farmer

Emelie Hessler

Miss Ink Blog


Friday, November 13, 2020

November BRI Moodboard Color Challenge


 Hello Crafty Friends. Davina here with a little BRI Moodboard inspired card today. The November colors  Amanda chose are very easy to play with. Harvest Yellow, Clay Pink, BlackBerry, and Rich Teal make up the quartet of color this month.  

The project I’m sharing today is using a few sets from Paperie Ink. I’m very new to this brand and purchased a few seasonal sets last month. I didn’t have a chance to use them sooner, but I’m so loving how cute these characters are. I combined the stamp sets  Autumn is Calling and Happy Holi-yay, along with Lawn Fawns Meadow Backdrop Die. I stamped all of my images with Momento Rich Cocoa ink and copic colored everything using light and dark shades of this months colors. 


Since there are no coordinating dies for these stamp sets, I had to use the scan n cut. Which worked fine considering I’m never going to fussy cut this many images. I recommend always cutting out before you color you images. The Scan n cut is notorious for mis-reading an image, and therefore not cutting out properly. As for images like the trees, that have small gaps in the outline, use a pencil to fill in the space for a solid cut. It will read the pencil, along with the ink, and cut out the image cleanly. 

Once my images were cut and colored I cut the Meadow Backdrop from some yellow Cardstock and inked the grassy edges with Scattered Straw & Dried Marigold Distress Oxide Inks. Next, I inkblended a pink and purple sky using several colors of Oxide Ink onto white Bristol Smooth Cardstock, then splattered with water, and white and gold ink. Once dry I heat embossed my sentiment onto the sky using Lawn Fawn Gold Embossing Powder

I assembled my card by glueing the Meadow frame onto my inkblended panel, then adhering the trees and sunflowers behind the grassy layers. I popped my border image up with some narrow foam tape, and added the remainder of my images. I brushed some glittery Clear Wink of Stella onto my lights and pumpkins for a little “razzle dazzle”. I’m so happy with how cute these images are and already ordered a few more sets to build my collection of Paperie Ink stamps. 

I hope you like this card and take the time to use the November #BRIMoodboard this month. As always, we will be hosting a color challenge and choose an eligible entry to win $20 to the Butterfly Reflections Ink shop. Just add your November Moodboard Inspired project using the Inlinks button below, and use the hashtag #brimoodboard on social media. Most brands are welcome, as long as they are carried in the shop, and please make sure you are linking a new and original project made by you. Thank you for stopping by, 

Davina 

You are invited to the Inlinkz link party!

Click here to enter


Saturday, September 19, 2020

Pumpkin Patch with Lawn Fawn and Reverse Confetti

 Hello friends! Davina here, on the blog, with an exciting interactive card to share. My project is another fun example of the beautiful September Moodboard and a mashup between Lawn Fawn & Reverse Confetti products.  

I really love the way these beautiful colors come together. I’ve used them several times this month, in both soft and bold versions, and with stunning results each time. I wanted to use glittery gold cardstock for this camera die and love that I found a curry cardstock, is my stash, that was very similar in tone to pair up with it. 


As usual, all of the products used are available on the Butterfly Reflections Ink website. And I will provide links through this post for all of the products.  

I started by building my camera using the newer Lawn Fawn Magic Iris Camera Die Add On and the Camera Pull Tab Add On dies. I cut the camera 3 times from curry cardstock, glitter gold cardstock, and a Blush striped patterned paper in my stash, trimming off just the stitched strip. I used the circular lens die from the pull tab set to cut the glittery gold, blush pink, and adhesive backed fun foam. 

Next, I assembled the camera. I used LF Glue Tube to glue the gold paper to the curry cardstock.  Then I adhered the blush strip to the front after inkblending a little Tattered Rose Distress Oxide Ink to the edges. I insert the blush cardstock circle into the center of the camera lens and secured with Scotch tape from behind. I sandwiched an acetate circle between the foam stitched lens circle, and the gold circle to create a mini shaker element. Before adding the shaker components to the card, I used the short slot die on the top of the camera for the photo to pull out of. 


Then, I added some small flat sequins onto the pink circle before topping off with the foam circle, completing the small shaker element. I added a few other details to the camera face, like the push tab, and the flash with more liquid glue. 

Now for some coloring! I stamped my super cute images from the new Reverse Confetti set Pick of the Patch set using LF Crunchy Leaf brown ink, and copic colored in shades from the Moodboard. I die cut the images using the coordinating die set, and added small highlights to the images. For the Polaroid, I die cut the frame and tabs, then cut a smaller piece of cardstock that I masked and stamped a single layer scene onto. After coloring, I attached the frame over the top and assembled the pull tab as shown in the LF instructional video for the new camera pull tab. 


I mounted the interactive camera onto my blue and yellow card panel, then adhered my images all over to create the pumpkin patch. I really love how this turned out, and I’ve been playing with it non stop. The brown ink really works well with this color board. There’s still a couple weeks for you to use this color board and link your card into the color challenge on my blog, for your chance to win a $20 gift certificate to the Butterfly Reflections Ink shop. 

Thank you for stopping by,

Davina 


Saturday, September 5, 2020

September BRI color Challenge

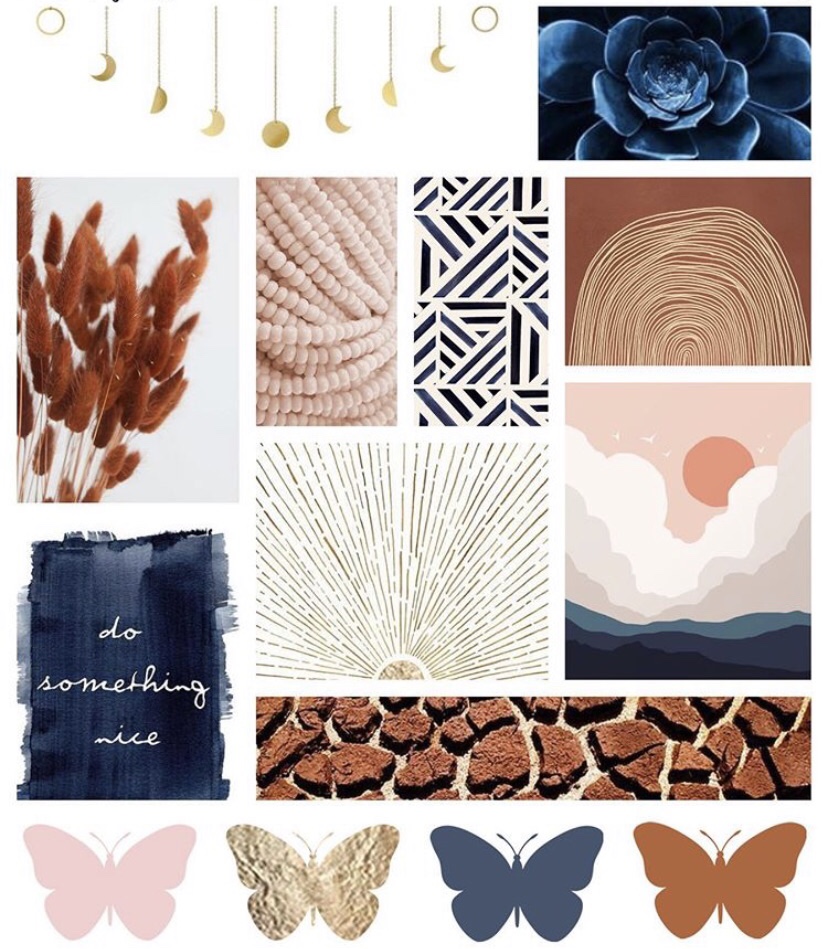
 Hello Inky friends. I hope you are doing well. I’m using the beautiful Sept Moodboard today. This blush, terra cotta, navy, and gold color board is so incredible and versatile. The colors are so trendy currently, and I truly believe that any stamp set will look wonderful with them. 

This large, 5x7 interactive card, uses mostly Avery Elle stamps, along with a Lawn Fawn Scripty die. I have recently hoarded most of the Peek-a-boo Pals stamp sets from Avery Elle, but haven’t used them yet,  so I decided to get busy. After deliberating between a Bumper car slider slimline, rollercoaster, or Ferris wheel I decided on the Ferris wheel. But I wanted a fully rotating one.  I’m so happy with the results,  but it took a lot of trial and error.

Let’s get started. First, because the Ferris wheel from Peek a Boo Fair  is only a partial image, I had to hand draw the wheel on my card. I stamped the Ferris wheel onto some copy paper, rotated the image and stamped it again. Then, I used those stamped images as a guide to draw the inner portion, with a metal ruler and multi liner. I cut the drawn image out with a nested circle die, and inked it with the blush hues Tattered Rose Distress Oxide Ink. I painted the outer rim with gold acrylic paint. 

Next, I stamped the image again, onto bright solar white Neenah Cardstock for my ride compartments (baskets). I used additional images/characters from Peek a Boo Coaster for my other cuties. I also stamped a word bubble from the Speech Bubbles set and heat embossed Woo Hoo! onto it. I used copic markers to color everything before using the coordinating dies to cut everything out. 

I assembled each basket with a character, and reinforced the bottom basket from behind with a second piece of die cut paper. No need to stamp, just the added reinforcement.  After highlighting with small white dots, it was time to create my individual swinging elements. If you just glue them down, they would remain in place (and upside down) when rotating the wheel.

1. I punched 3 office sized holes into the edge of the wheel.  

2. I glued down a small metal washer, to the center and bottom of each basket, to add a little extra weight so they would remain upright without my help.

3. I attached a small plastic sliding disc (MFT Spin & Slide) to the back of each image. Centered in the neck area.

4. Put the disc through the punched hole, and cap off with a small piece of circle punched cardstock

(Larger than hole punch) to hold in place.

5. Check to make sure everything wiggles properly before moving on. 

Next, I created the same type of inner mechanism as the Lawn Lawn reveal wheel.

6. I die cut a 2 1/2 inch circle, and poked a tiny hole into the center. 

7. I poked a tiny hole into the center of the Ferris wheel.

8. I used a brad, with the finished side facing forward, to connect both pieces. I did not open it completely flat against the paper because I wanted it to spin freely. I put the edge of my metal ruler under the brad fasteners to give it plenty of space.

9. Apply multiple foam squares to the backside of that smaller circle. That is how the entire thing will adhere to the card front. 

Even at this point, it was so fun to spin and play with. There is no imagination needed to see how it would work on a card. It turned out perfectly.  

I created some layers of gold, blush pink, and Bristol smooth cardstock to fit onto my Kraft cardbase. I used the old ink smooshing technique and the Tattered Rose Distress Ink (not oxide ink) to color the Bristol cardstock. Then, I splattered with white and gold ink. I die cut the word Smile, using  Lawn Fawns Scripty Smile word die, and inked it with Chipped Sapphire Distress Oxide Ink to match the coloring. 

Finally, I adhered my wheel to card base and surrounded it with die cut stars and the speech bubble. I adore how this looks on the Kraft cardbase and cannot stop playing with it. I even made a stop motion clip and I’m so proud. I hope you love this and try to make one for yourself .  

Don’t forget to play along with us using the #brimoodboard and to use this InLinkz button to link your project to the blog post for your chance to win $20 to theButterfly Reflections Ink shop! 

Thank you for dropping by,

Davina 

You are invited to the Inlinkz link party!

Click here to enter

Saturday, June 13, 2020

Oh Gnome #brimoodboard color challenge


Hello crafty friends. Davina here on the blog, with some color board inspiration for you today. I made a Slimline scene bursting full of Lawn Fawn goodness, that I hope you love. The June BRIMoodboard is a very zen/spa like color combination of wood grain, both bright and bold greens, and a lavender. At first one would think these colors difficult to use, but since green and purple are complimentary colors on the color wheel, they always look fabulous together. 

I pulled out about 7 different Lawn Fawn sets to create this bursting meadow scene, and the new Lawn Fawn Slimline dies both the Large And Small sets. I had a much different idea for this project when I first sat down. And about 5 hours later I had something very different than when I thought I was going to make. While flipping through my sets looking for images I wanted to use, I pulled out Oh Gnome, Gleeful Gardens, Frosty Fairy Friends, Fairy Friends, Jump for Joy, Butterfly Kisses, and A Bug Deal. I stamped about 30 images onto my Neenah classic crest cardstock using my stamp platform. I used the coordinating dies to cut out all of the images before coloring. That way I could create a scene like a puzzle, and only color the images I was going to use. 

I used the largest slimline die to cut a piece of Lawn Fawn Kraft Cardstock that I stamped some wood grain onto using Lawn Fawn Crunchy Leaf Brown ink. Then Using the next largest die, I cut a piece of Bristol Smooth Cardstock that I inkblended with Shaded Lilac & Dusty Concord. I splattered the panel with purple ink, white ink, and glittery perfect pearls. I cut some remnants of green cardstock with the same sized die and added a grassy border to each using the Lawn Fawn Grassy Hillside Borders To create a rolling hillside. I inked the edges of the grass using Mowed Lawn & Lucky Clover

Then I colored all of my images using my copic markers in color combinations that matched the mood board. I really enjoyed using all of the different shades of wood brown, green, and lavender on these images.then, using a variety of adhesives, I mounted all of the images onto the scene. I decided the little gnomes and the hummingbird needed a little bit of a boost, so I popped them up onto die cut fun foam. I really love the dimension it gives. I glued my layers together then added a little Lawn Fawn Chunky Glitter To the roof of the house do the center of my card can have a little Razzle Dazzle. 

I really love how this turned out and I hope you do too. If you are feeling inspired to use the Moodboard please make sure to use the #brimoodboard and link you card into my blog using the InLinkz button for your chance to win a $20 gift certificate to the shop! The link will be open until the end of the month on June 30th TIL 11:59 pm. We will use a random number Generator to select a winner from the eligible entries using the current colors from this months Mood Board. All brands the are carried by Butterfly Reflections Ink are welcome. 

Thank you for stopping by,
Davina

You are invited to the Inlinkz link party!

Click here to enter

Saturday, March 7, 2020

Countdown to Confetti Day #3


Hello my inky fingered friends. Today is Day 3 of the countdown to Reverse Confettis 50th Release! I have 3 cards to share with you today all featuring the incredible critter Illustrations by Dawn Machell.

I used the same color palette for all three cards,  it used variations of colors in each. For example, the pink is a different shade of pink in each card, giving each project a different feel, even though the same four colors are used. Pink, sunshine yellow, blue , and navy.

For the first card I inkblended a rosy pink onto my card panel and splattered it with water, white ink, and shimmer. I stamped my images from School Days  onto bright white Neenah Cardstock and copic colored. After cutting out with the School Days Confetti Cuts, inadded white dot highlights.

I adhered the images onto my inkblended panel then added a heat embossed banner strip. I finished it off with a sprinkling of clear iridescent sequins.

On my second card I used the new Chalk it Up stamp set and matching dies. I also used a new cover panel  die called Double Stitched Window, it reminded me of a decorative Polaroid photo, so I created a shaker card with it.

I trimmed 1/8th inch off of each of the four sides and adhered some clear acetate on the back. I framed it out with thick Tombow foam tape, and prepared my panel.

I inkblended my background in sky blues and green before splattering with the same combination as my first card. Then I stamped and copic colored all of my images. I gave a playful dotted texture to these images before highlighting and glueing down my images.

I added a generous pile of sequins to the center and mounted my “Polaroid” over top. Then I mounted the entire shaker upon some pink textured cardstock. I love that the glossy heat embossed texture is shiny right next to the reflective acetate.

On my third card, I used the new Spring Bunnies stamps and dies. I inked my sky onto the upper portion of the panel creating a crisp deep sky. I loved the sunny cloud from Chalk it Up so much, I used it here too.

I created a little butterfly catching scene and adhered it over a pink embossed banner. I used a trio of hearts from the Huggable stamp set, and used those instead of sequins. I really love this trio of cRds. I used so many of the same elements and colors and techniques. Yet achieved such different results in each card.

There will be a $15 Reverse Confetti gift certificate  for one lucky blog commenter, who hops along and comments on each Designers Countdown to Confetti Sneak Peeks. Comments will be closed on the 7th at noon with a winner announced at 5pm CST. There’s a second prize for those who comment on the Reverse Confetti FB so head on over Reverse Confetti Facebook 

Eileen Ong
Thank you for stopping by, Davina 

Thursday, March 5, 2020

Countdown to Confetti Day #1


Hello Crafty Friends! I’m very excited to be contributing as a Fetti Friend this month, and to participate with the March Release from Reverse Confetti. As you may know, they always countdown the days until their new Release, with fabulous sneak peeks from the whole team, and a grand Blog Hop on the 8th, which is Release Day!

Today is the first day of the Countdown to Confetti and I have two products to share with you. I made two different cards, both are full of bright inkblended colors. The first card uses a new sentiment stamp set perfect for encouragement cards, Easter cards, or anytime cards really, called Perfect Timing . It has a wonderfully cute script and I created an inky rainbow on some Bristol smooth cardstock for the perfect background. I also went into the craft closet and found some old embroidery floss, in a rainbow of colors, to braid into a tassel. I looped the tassel through the extra large tag hole in a fun new stand alone die called the Scallop Window Tag. It has a great stitched outline and plenty of space to add images or sentiments.

I layered the tag onto some bright white cardstock that I cut with the diagonal Stitches cover panel, then trimmed. I popped the kraft tag onto some foam tape before adhering, so the tassel would have plenty of space to move. Then I finished it off with a sprinkle of luxurious matte gold sequins.

For my second card, I used the new set called Choose Joy. This set has some cheerful bold sentiments, and solid image stamps for creating wreaths. I found some bright polka dotted red patterned paper from the Winter Solstice Paper Pad , and layered a piece of white textured cardstock over top, that I cut using the Scallop striped panel die and lightly inked with abandoned coral distress oxide inks.

With so much texture going on, I decided to use multiple stamped die cuts of the flower and leaves, and arrange them in a cluster, around the sentiment. I gold embossed the sentiment Strength & Love, and cut it out with a circle die. I cut a second circle out of fun foam and mounted them together. I used 3 different shades of red distress oxide inks to stamp my flowers. I found that I prefer using the Distress Oxide to stamp reds and pinks because they don’t the stain the stamps red. I cut everything out with the coordinating Dies, and adhered them in place. Then I added a few more of the fancy matte gold sequins.

I really love the versatility of both of these sets. I was also surprised at how quickly I was able to create these cards. I’m notorious for spending 5-6 hours on one card. But these two cuties came together in an afternoon! I hope you enjoy them as much as I do and stop back in tomorrow for the next peek!

There will be a $15 Reverse Confetti gift certificate  for one lucky blog commenter, who hops along and comments on each Designers Countdown to Confetti Sneak Peeks. Comments will be closed on the 7th at noon with a winner announced at 5pm CST. There’s a second prize for those who comment on the Reverse Confetti FB so head on over Reverse Confetti Facebook


Thank you for dropping by,
Davina