Showing posts with label die cuts. Show all posts

Saturday, October 1, 2022

Pretty Pink Posh Halloween Week


Hello Crafty Friends! I’m so excited to be participating in the Pretty Pink Posh Halloween Theme Week. All of their products are so wonderfully illustrated and designed, that it is a breeze to pull multiple stamp sets, stencils and dies together to make the cutest cards and decor. I did just that for this bright and bold shaker boxcard. 


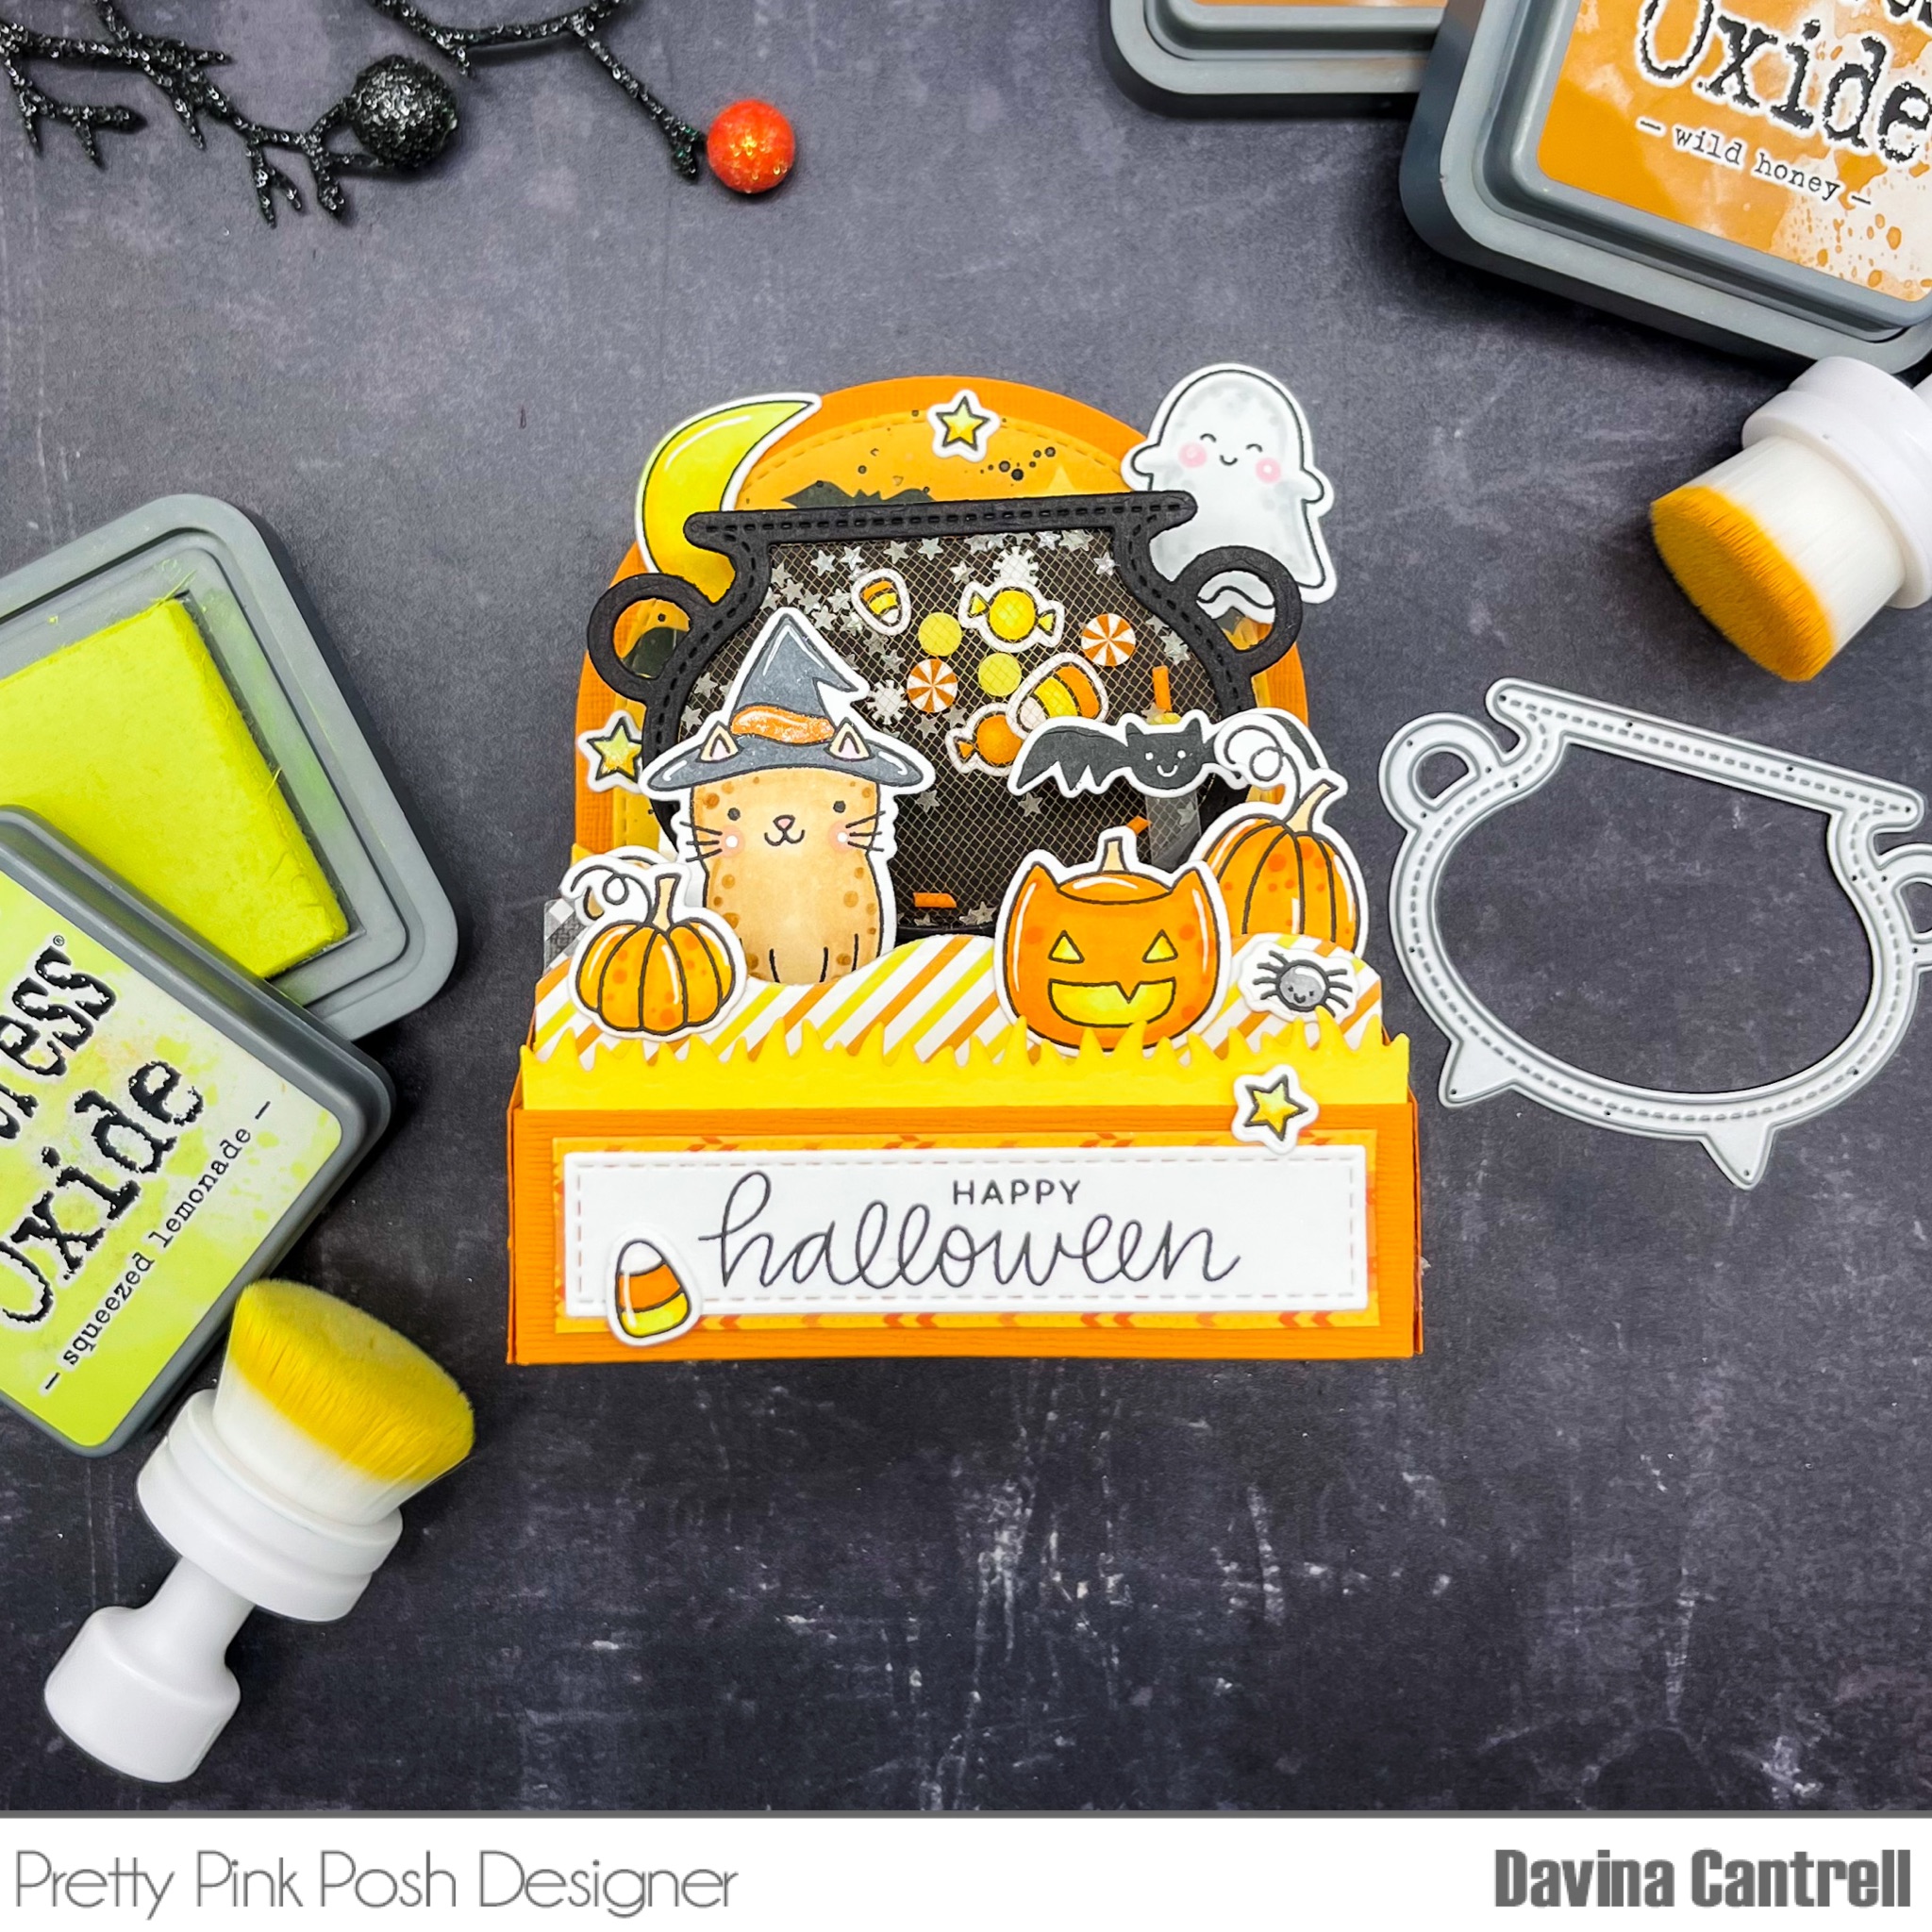
I stamped images from newer and older sets to build this scene. Halloween PalsGhost FriendsHalloween friends, and Giving Thanks to name a few. I always use the coordinating dies to achieve a clean and polished look to my images. 


Before assembling this card, I created a flat mesh shaker using the new Cauldron Shaker Die. I cut the shaker twice, added a few stamped images along with some glow in the dark mini stars and some clay confetti pieces from the Halloween Party Mix. I sandwiched a small piece of orange tulle mesh to make a flat shaker using 1/8 double sided tape. 


For the background I inkblended an orange ombré sky and used the Spooky Sky Stencil to ink the bats and emboss the clouds onto my Bristol cardstock. I gently splattered with water and black ink to distress and “spookify” the sky. 


I was excited to use up several pieces of patterned paper remnants, that I had in my stash, for each of the layers and side panels of the box. I adhered my images and shaker through the layers and even made sure to have some floating pieces using acetate strips. I finished this up by stamping a sentiment on the back and adding a final pumpkin. 


I hope you love this fun and spooky card and appreciate you stopping by to see how I created it. Now is the perfect time for you to stock up on your Halloween supplies at Pretty Pink Posh, all of the Halloween items are on sale so don’t miss out! 
Davina 


Saturday, February 19, 2022

Mama Elephant Stamp Highlight: Celebration Hamsters

 Hello crafty friends! Today Mama Elephant  is highlighting the super cute stamps and creative cuts Celebration Hamsters. I really love the cute hamster and the all the little party poses! I can’t pick a favorite image, they are all so great. I really enjoy that they match the small images from Little Hamster Agenda too. I really wanted to make a large slimline card for these cuties, so I would have plenty of room for very image and a large sentiment. 


I started by cutting an aqua panel using the new B2B Slimline CC dies. I like that little bit of extra space these dies give you. They perfectly divide a standard 8.5 x 11 card into 3 equal sized pieces. That means I had plenty of room for these cute critters to fit on my scene. I made a glittery scalloped panel using the Slim Card Basics CC, and then a third panel from Bristol Smooth Cardstock using the the 2nd largest B2B slimline CC. I inked that panel with bright pink ink and gave a few splatters with glittery perfect pearls and white ink. 


I stamped and colored all of the images using copic markers before cutting out with the coordinating dies. I arranged all of my images onto the scene leaving a few inches in the white bottom space for my sentiment. I stamped a lovely sentiment from Wishes Enclosed and adhered it to the open area. I decided I wanted a few little extra embellishments, so I stamped and colored the stars that are included in the set and glued them down around my images. 

This entire release is amazing, and is so fun to create with. I hope you enjoy this card and get inspired to get crafty this weekend. Don’t forget to drop by the Mama Elephant Blog  to see all the wonderful cards from the entire team. Thank you for stopping by, Davina  

Tuesday, January 18, 2022

Mama Elephant Stamp Highlight- To My Dearest

 Hello crafty friends! I’m so happy you stopped by, today we are highlighting the adorable new set called “To My Dearest”. I created a soft slimline card that also features a new die set, called “Combo Circles- Creative Cuts”. 


I started by cutting a scalloped panel for my base layer, from striped patterned paper. I used the “Slim Card Basics-Creative Cuts” set for the scallop and for the smaller stitched panel that is layered on top. Next, I cut 6 scalloped circles from a soft coral cardstock. I gently inked around the edges of 3 of them, then layered alternating pairs of scallops to make full scallop circles. I used the stitched circles in the appropriate size, to adhere to center after inking them a deep blue and gently splattering. 


I stamped and copic colored the cute envelope images, before cutting them out with the coordinating creative cuts. Then I added small white dot highlights before glueing them onto my inked scallop circles. I arranged the 3 scalloped images onto my slimline before adding two small little hearts from the set. 


Normally, I’d go overboard adding all kinds of images and sequins etc., but this sweet slimline felt complete, and I was really smitten with the simplicity. I hope you like my card as much as I do. I will add links to all of the Mama Elephant products used below. 

Slim Card Basics- Creative Cuts

To My Dearest

To My Dearest -Creative Cuts

Combo Circle - Creative Cuts

Thank you for stopping by, make sure you visit the Mama Elephant Blog to see all of the amazing inspiration from the design team,

Davina 


Saturday, January 15, 2022

Mama Elephant January Stampede


Welcome to the Mama Elephant Design Team blog hop!

Our newest release is now live and available for purchase in the store!

www.mamaelephant.com

I’m so I’m very excited to be participating as a guest designer for the Mama Elephant January release. I have created many fun projects to share with you all. Today, as we introduce the January Stampede, I’m sharing a die cut mesh shaker card showing off the new die set - Mod Hearts CC. There are so many wonderful large elements included in this die set, that can be used separately, or all together. 


I began by using the large A2 sized frame die to cut a piece of red plaid paper for my card base. Then, I selected several pieces of colored cardstock that matched my plaid paper. I used the wonky stitched frame to cut a watermelon hued panel that I inked around the edges, before running the panel a second time with the large striped heart die, to remove the center and leave a nice stitched heart outline. I cut the heart from the 3 other pieces of colored card and arranged the strips in an alternating pattern.


I adhered some white mesh to the backside of the heart panel with double sided tape making sure it doesn’t extend beyond the panel. Then, I centered my striped heart onto the plaid paper, poured a pile of dainty flat white sequins, then carefully adhered the heart panel over top. These flat mesh shakers do have some movement, but not anything close to the movement of traditional foam tape shakers. The best results are with small flat sequins. 

Once the base was complete I stamped one of the adorable new images from the “To My Dearest” stamp set, onto bright white Neenah cardstock, then colored with copic markers before using the coordinating creative cuts to die cut. I added small white dot highlights and glued it onto my card base. I surrounded the image with small hearts from the same set, stamped with red ink, all over the heart panel. 


While I had all of the supplies on my desk I also made a couple of small envelopes from white cardstock that I inked and added some Little Agenda images to. Then, I made some teeny notes from paper scraps stamped with sentiments from “To My Dearest”, and tucked them into the envelopes. 

Thank you for stopping by today, I will have another great projects to share with you using the new release on Monday January 17th. Below you will find links to all the products that I have used available now in the Mama Elephant Shop.

Mod Hearts Creative Cuts

To My Dearest 

To My Dearest Creative Cuts

Check out the rest of the hop for amazing inspiration from our Design Team!


To celebrate the new release, Mama Elephant is picking 1 winner to win a prize pack! 


» 1. Leave a comment on the collective Design Team's Instagram Stampede post
» 2. Leave a comment on our Facebook Stampede post
» 3. Leave a comment on any of the Introduction videos on YouTube
 
Each action qualifies for one entry, max 3 entries per stampeder please and good luck!
Open to US entries only.
 
Check out the rest of the hop for amazing inspiration from our Design Team!


Thank you for stopping by! Have a great day from all of us!