Showing posts with label heat embossing. Show all posts

Wednesday, January 19, 2022

Mama Elephant Stamp Highlight- Tag Size Greetings

 Hello Crafty friends! I’m back today to showcase Tag size Greetings by Mama Elephant. This sentiment filled stamp set has a greeting for almost any card, and they can be used together or on their own. I made a standard A2 sized card that has several different mini scenes. I created each of these layers and mini scenes using the new B2B Rectangles- Creative Cuts,  and of course, gold embossed Tag Sized Greetings. 


I wanted to create a fun jungle themed card so I chose to use the older The Wild Roar stamp set. I played with an arrangement of smaller rectangles and the center tag die, to find a set up that I felt could accommodate a couple of small scenes. I cut the rectangles out of my aqua layer, then carefully used a pencil to gently mark the openings onto a slightly larger white cardstock layer. 
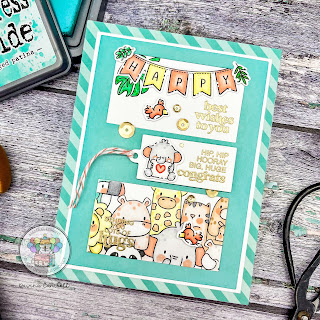

I masked the lower area and stamped a portion of The Wild Roar into the opening. Then in the upper region I stamped a large leaf from the same set. I colored everything with copic markers and set aside while I worked on my other images. I stamped a banner from Sentiments From A Yeti, and added the letters to spell “Happy” , and also colored a few other small images from The Wild Roar. 
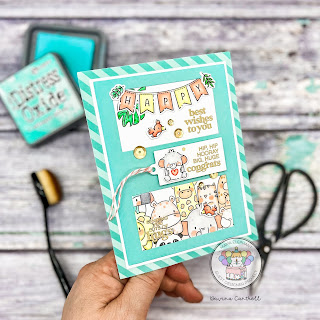

Next, I selected 3 sentiments from Tag Sized Greetings and heat embossed them in gold, onto my scenes and  mini tag. I assembled the layers and popped the tag on top with a twist of twine and a small elephant image that resembled the elephant from the lower area. Then I finished it all with a sprinkling of gold sequins. 

It’s not often that I make this type of card, and I really love how it turned out. It’s like each time you ok at it, you find a different little element to check out. I will add links to all of the products used below from the Mama Elephant Shop.

Tag Sized Greetings

B2B Rectangles- Creative Cuts

Sentiment From A Yeti Stamps

Yeti Banner

The Wild Roar Stamps

The Wild Roar- Creative Cuts

Thank you so much for stopping by, make sure to head over to the Mama Elephant Blog to see all the other great Design Team inspiration.

Davina 

Tuesday, December 15, 2020

Heffy Doodle & Miss Ink Collaberation


Hello crafty friends. Today we are celebrating a fun collaboration between two of my favorite brands. Welcome to the Heffy Doodle and Miss Ink Stamps Collaboration Blog Hop! Design team members from both teams are sharing some crafty inspiration using products from both companies! Plus, both stores will be giving away prizes! 

I made a Candy Cane forest, complete with coffee sipping Gnomes, who look comfy cozy in their Christmas pajamas. I love how the bright bold colors look on top of the glittery snowy hillside. I began by choosing some patterned paper to pull my colors from. Then, I inkblended the mint and aqua sky in the upper half of a Bristol paper panel. I splattered with water and perfect pearls before using some gold glitter embossing paste with the Twinkle Twinkle Stencil from Heffy Doodle. 


While that dried, I stamped my gnomes from Miss Ink Stamps Coffee Gnomes, and the candy canes and trees from Heffy Doodles Elfish, Wanna Build a Snowman, and Santa’s Village. I used copic markers to color all of my images, and highlighted with small white dots after diecutting. Next, I trimmed two glittery cardstock hillsides using Slopey Joes  stitched dies from Heffy Doodle. I adhered the two layers together, then mounted them over the embossed background panel using foam tape. I tucked my trees and candy canes around the top leaving space for my Gnomes in the center. I heat embossed the sentiment from Miss Ink Stamps Season’s Greetings onto a red cardstock banner, then glued it at the bottom. I mounted this scene onto a small green layer before securing it to the patterned paper and cardbase. 

I really love how well these two brands blended and hope that you think outside of the box, and blend your crafty supplies at home. It is something I don’t do often enough but I think it’s well past time for me to get mixing! 

Make sure to comment along the way for your chance to win! Miss Ink Stamps will be giving away $25 and Heffy Doodle will be giving away £25 to their respective stores!

Each company will post their random winner on Sunday, December 20th at 10AM EST!  Make sure to check the Heffy Doodle Blog and Miss Ink Stamps Blog to see if you’re a winner!

You should have come from Cassie Trask, your next stop is Amanda Fitterer, so make sure to hop along and hit every post! 


LINEUP

Heffy Doodle Blog

Silvia Galloni 

Cassie Trask

Davina Cantrell (you are here) 

Amanda Fitterer

Yuliya Yavorskaya 

Ali Farmer

Emelie Hessler

Miss Ink Blog


Friday, November 13, 2020

November BRI Moodboard Color Challenge


 Hello Crafty Friends. Davina here with a little BRI Moodboard inspired card today. The November colors  Amanda chose are very easy to play with. Harvest Yellow, Clay Pink, BlackBerry, and Rich Teal make up the quartet of color this month.  

The project I’m sharing today is using a few sets from Paperie Ink. I’m very new to this brand and purchased a few seasonal sets last month. I didn’t have a chance to use them sooner, but I’m so loving how cute these characters are. I combined the stamp sets  Autumn is Calling and Happy Holi-yay, along with Lawn Fawns Meadow Backdrop Die. I stamped all of my images with Momento Rich Cocoa ink and copic colored everything using light and dark shades of this months colors. 


Since there are no coordinating dies for these stamp sets, I had to use the scan n cut. Which worked fine considering I’m never going to fussy cut this many images. I recommend always cutting out before you color you images. The Scan n cut is notorious for mis-reading an image, and therefore not cutting out properly. As for images like the trees, that have small gaps in the outline, use a pencil to fill in the space for a solid cut. It will read the pencil, along with the ink, and cut out the image cleanly. 

Once my images were cut and colored I cut the Meadow Backdrop from some yellow Cardstock and inked the grassy edges with Scattered Straw & Dried Marigold Distress Oxide Inks. Next, I inkblended a pink and purple sky using several colors of Oxide Ink onto white Bristol Smooth Cardstock, then splattered with water, and white and gold ink. Once dry I heat embossed my sentiment onto the sky using Lawn Fawn Gold Embossing Powder. 

I assembled my card by glueing the Meadow frame onto my inkblended panel, then adhering the trees and sunflowers behind the grassy layers. I popped my border image up with some narrow foam tape, and added the remainder of my images. I brushed some glittery Clear Wink of Stella onto my lights and pumpkins for a little “razzle dazzle”. I’m so happy with how cute these images are and already ordered a few more sets to build my collection of Paperie Ink stamps. 

I hope you like this card and take the time to use the November #BRIMoodboard this month. As always, we will be hosting a color challenge and choose an eligible entry to win $20 to the Butterfly Reflections Ink shop. Just add your November Moodboard Inspired project using the Inlinks button below, and use the hashtag #brimoodboard on social media. Most brands are welcome, as long as they are carried in the shop, and please make sure you are linking a new and original project made by you. Thank you for stopping by, 

Davina 

You are invited to the Inlinkz link party!

Click here to enter


Thursday, March 5, 2020

Countdown to Confetti Day #1


Hello Crafty Friends! I’m very excited to be contributing as a Fetti Friend this month, and to participate with the March Release from Reverse Confetti. As you may know, they always countdown the days until their new Release, with fabulous sneak peeks from the whole team, and a grand Blog Hop on the 8th, which is Release Day!

Today is the first day of the Countdown to Confetti and I have two products to share with you. I made two different cards, both are full of bright inkblended colors. The first card uses a new sentiment stamp set perfect for encouragement cards, Easter cards, or anytime cards really, called Perfect Timing . It has a wonderfully cute script and I created an inky rainbow on some Bristol smooth cardstock for the perfect background. I also went into the craft closet and found some old embroidery floss, in a rainbow of colors, to braid into a tassel. I looped the tassel through the extra large tag hole in a fun new stand alone die called the Scallop Window Tag. It has a great stitched outline and plenty of space to add images or sentiments.

I layered the tag onto some bright white cardstock that I cut with the diagonal Stitches cover panel, then trimmed. I popped the kraft tag onto some foam tape before adhering, so the tassel would have plenty of space to move. Then I finished it off with a sprinkle of luxurious matte gold sequins.

For my second card, I used the new set called Choose Joy. This set has some cheerful bold sentiments, and solid image stamps for creating wreaths. I found some bright polka dotted red patterned paper from the Winter Solstice Paper Pad , and layered a piece of white textured cardstock over top, that I cut using the Scallop striped panel die and lightly inked with abandoned coral distress oxide inks.

With so much texture going on, I decided to use multiple stamped die cuts of the flower and leaves, and arrange them in a cluster, around the sentiment. I gold embossed the sentiment Strength & Love, and cut it out with a circle die. I cut a second circle out of fun foam and mounted them together. I used 3 different shades of red distress oxide inks to stamp my flowers. I found that I prefer using the Distress Oxide to stamp reds and pinks because they don’t the stain the stamps red. I cut everything out with the coordinating Dies, and adhered them in place. Then I added a few more of the fancy matte gold sequins.

I really love the versatility of both of these sets. I was also surprised at how quickly I was able to create these cards. I’m notorious for spending 5-6 hours on one card. But these two cuties came together in an afternoon! I hope you enjoy them as much as I do and stop back in tomorrow for the next peek!

There will be a $15 Reverse Confetti gift certificate  for one lucky blog commenter, who hops along and comments on each Designers Countdown to Confetti Sneak Peeks. Comments will be closed on the 7th at noon with a winner announced at 5pm CST. There’s a second prize for those who comment on the Reverse Confetti FB so head on over Reverse Confetti Facebook


Thank you for dropping by,
Davina