Showing posts with label inkblending. Show all posts

Monday, March 31, 2025

Mama Elephant March Designer Series

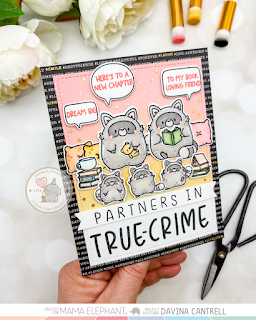
Hello crafty friends! Davina here, with a classic, yet still fun, scene using their recent March release. I know often I try hard to make super exciting and interactive cards. But sometimes I really crave a classic card, using pretty and fundamental skills, and lots of stamped images to create a heartfelt greeting. 


I wanted to use the adorably round raccoons from the latest release, and couldn’t decide between the two sizes. The ability to hold things in their hands make the larger ones a no brainer, but the teeny agenda ones are just full of too much cuteness to pass on. I think I spent more time trying to think of the perfect punny sentiment than I did coloring, but in the end I settled on the “Partners in Crime” theme. I wanted to make another “bookish” card so the “Partners in Crime” evolved into True-Crime. 


I began by stamping images from Playful Raccoons and Little Raccoon Agenda for the main focus. Next, I found books and pillow images in the Keep Cozy stamp set that were the perfect accessories. I colored in my images before using the coordinating dies to cut everything out. Next, I got out my brushes and inked up a sherbet inspired combination using colors like Saltwater Taffy and Scattered Straw. I intentionally blended to white leaving the bottom 1/3 portion white so i could stamp my sentiment. 


With the new Personal Letters alphabet stamps, I stamped True Crime directly onto the panel. Then using a smaller alphabet stamps I created a banner with the beginning of the sentiment. I mounted my ink blended panel onto some subtle text paper and then arranged and adhered my images using a variety of glue and foam dots. I stamped some small bookish sentiments into some speech bubbles using Storybook Sayings and Simple Friends Bubbles. I popped those up on foam dots so they would balance out the heavier bottom. 

As a finishing touch I added teeny gold stars onto the scene, loving how the gold highlighted the gold foil text on the patterned paper background. This ended up being very classy and perfect for an adult friend in my opinion. And I loved that it wouldn’t be too difficult for someone to replicate if they felt inspired to do so. 

Thank you so much for stopping by, and I hope you are inspired to be creative with your new stamps! Davina 

Friday, June 28, 2024

Trick or Treat with Mama Elephant

Hello crafty friends! Davina here, with a spooky cute pink Halloween card I made using the new Mama Elephant June release. I love that some not so spooky fall items were released so early in the year since Halloween cards are my favorite to make.


I wanted to make a neighborhood scene with ghost trick or treaters so I went into my stamp stash and pulled out the Little Agenda House set. I also stamped the ghosts, candy, and stars from the new Big Boo stamps, and the witchy ghost from Deliver Fall Fun. I colored the images using shades of pink, orange and charcoal then cut out with the coordinating dies. I felt like the houses needed a little Halloween decor which I found on the Little Witch Agenda stamp set. The teeny kitties and pumpkins were perfect. 


For the card base I die cut the Comic Cover Basics  cover plate from bristle smooth card stock and a dark charcoal textured card stock. I ink blended the white card in shades of pink, orange and black then gave a little splattering of black and iridescent ink. Then i cut some grassy layers from the remnants of the charcoal card stock and inked them even darker. I arranged the little scenes in the openings and mounted the heat embossed sentiments centered on top. The selection of Halloween sentiments from the new Be Scary sentiments are amazing as usual and never disappoint. 


I finished this card off with lots of tiny sparkly stars and some spiderwebbed pink patterned paper. I really love making pink Halloween cards and hope you enjoy this one. Thank you for stopping by, Davina  

Saturday, June 8, 2024

Pretty Pink Posh Sneak Peek Outer Space

Hello crafty friends! Davina here with some “out of this world”, sneak peeks, featuring the June Pretty Pink Posh release. This playful release is full of imaginative play themed sets like construction, first responders, and space. I made a pair of cards that feature some of the space theme products and hope that you are as excited as I was. 

Both cards were created using the Outer Space stamp sets with the coordinating dies, and they are both shaker cards, using the new Shaker Beads mix called Beach Day. I felt like this color combo would be perfect for my space scenes and love the fiery gold and orange with the shades of blue. 


For the first card, I started by die cutting my background using the Pierced Star Plate from Bristol Smooth Cardstock. I inkblended my panel with a blue gradient starting with a light aqua and finishing with a dark teal around the edges. After splattering with several inks, including gold, I put it aside to dry while i worked on the other components. 


I made the shaker element using the new Planet Shaker Die Set. I inkblended the center using the warm colors, and cut the ring from holographic cardstock. I filled the shaker about 1/3 of the way full for maximum effect. Next, I stamped and colored my images using copic markers and added white highlights and some glittery Wink of Stella accents. I backed my star panel with some starry patterned papers I had in my craft stash, and assembled the cards with the shaker in the center. I finished the card off with a sentiment from the stamps set, on a bold white banner. 


I loved the results so much I decided to make a second version of the card but with the new Rocket Shaker Die Set, and the other images from the Outer Space stamp set. I backed this card in a dark navy blue version of the same patterned paper and used the larger more decorative sentiment from the set. I think the reflective holographic paper was absolutely the way to go with these shaker die sets, as the colors pick up so much from the copic colored images, and really bring the scenes to life. 

I hope you like this pair of cards as much as I do, and are inspired to stock up on the new release for these “out of this world” collection of products! Thank you for stopping by, Davina 

Tuesday, May 28, 2024

Mama Elephant Designer Series featuring Celebrate You

Hello crafty friends! Davina here with a fun interactive card featuring Celebrate You from the latest Mama Elephant release. The May release had two fantastic sentiment sets and I really love them both, but today I wanted to use the more delicate text on the Celebrate You set. I adore the pretty script paired with the signature “kissie alpha” font. I also really wanted to use the beautiful whales from last months release called Me and My Whale, and I knew they would be a perfect combination. I pulled out an older interactive set called Wiper Surprise and got to work designing this fun, moving, under water scene. 


I’ve been using pattern papers and marker combos from the same paper pack all month and I’m so happy to be able to achieve such different looks on every card. I die cut the card base from a dotted patterned paper, and two from a piece of pistachio colored cardstock. I die cut a wavy pattern on each piece of colored cardstock, at different hieghts, then ink blended some gradient ocean blues onto them. Before folding anything, I used scor tape to  adhere the taller blue paper to my full piece background. Then, I used my bone folder to really reinforce the scored fold line before finally folding the panel. 


I heat embossed my sentiment in white, onto the shorter panel, before gluing it in place for the front piece and making sure to apply the little tab on the inside first. Once assembled, I trimmed off a small amount of the tab that was extending beyond the bottom when closed. I watched an older YouTube video on the mechanics of the tabs before getting started. Just to make it easier since it had been so long since I used it. Sometimes you just need that refresher. 


I stamped my beautiful whales and some slightly larger mermaids from the Little Mermaiden Agenda stamp set, and colored them with copic and ohuhu markers. There was also some similar clouds in the Me and My Legend stamp set, and I used the double cloud image on my card. After die cutting and adhering the images to my scene, I added some water splashes using an acetate strip for a little extra oomph. Once it was all assembled I applied a sturdy piece of cardstock to the back so it wouldn’t bend or get warped.


I really love how this turned out, and hope it inspires you to get out some of your older die sets and use them with new stamps and accessories. It’s just much fun to blend all of your supplies together. Thank you for stopping by, Davina 

Monday, April 15, 2024

Mama Elephant April Stampede


Welcome to the Mama Elephant Design Team blog hop!

Our newest release is now live and available for purchase in the store!

www.mamaelephant.com


The new Mama Elephant release is here and it’s full of the cutest sets that make you feel like summer is just around the corner. I especially love the new Me and My Whale stamp set. There are 3 large whales that are so unique and beautiful. There are also several small mermaids that perfectly match the older Little Mermaiden Agenda set. I created a deep blue inky ocean that I filled with whales, mermaids and a cute sentiment using the new Typed Thank Yous. 


Check out the rest of the hop for amazing inspiration from our Design Team!


To celebrate the new release, Mama Elephant is picking 1 winner to win a prize pack (winner will be notified in their comment on Instagram, Facebook or YouTube)! Open to Domestic & International (winner pays for shipping)


» 1. Leave a comment on the collective Design Team's Instagram Stampede post
» 2. Leave a comment on our Facebook Stampede post
» 3. Leave a comment on any of the Introduction videos on YouTube
 
Each action qualifies for one entry, max 3 entries per stampeder please and good luck!
 
Check out the rest of the hop for amazing inspiration from our Design Team!
 
 
Thank you for stopping by! Have a great day from all of us!
 

Tuesday, March 19, 2024

Mama Elephant Stamp Highlight: It’s Poppin

Hello crafty friends! Today Mama Elephant is featuring the stamp set called It’s Poppin on Day 2 of the Stamp Highlight week. This 4x6 set has 3 tall images with a cuter cat and a great big round balloon. I love the additional images provided, of confetti, to fill the balloons. 


I made a full sized slimline card using the Slim Card Basics CC dies, and arranged some gently inkblended balloons in the upper half, using the Balloon Bunch CC die set. I cut each balloon individually and inked the edges using a small amount of distress oxide ink in pink, yellow, and aqua. I adhered the individual balloons onto the base and arranged over the stitched die cut strings on my sky panel. I added two layers of puffy clouds before adding two of the chunky kitties onto the scene. 


I filled each of the balloons with some sparkly golden stars and added a few to the background. I finished this card off with a colorful stamped sentiment from the Way to Go stamp set and a bold striped background.

Make sure to head over to the Mama Elephant Blog to see inspiration from the entire design team. Thanks for stopping by, Davina 


Monday, March 18, 2024

Mama Elephant Stamp Highlight: Capybara Party


Hello Crafty friends! Today starts the week of Stamp Highlights for the March Release, and today we are featuring Capybara Party. This set is full of cute little round capybaras and goes perfectly with the previously released Capybara Christmas and Little Capybara Agenda stamp sets. 


I love all of the birthday accessories like the cute cake and birthday gifts that are included in this set. I wanted to use as many as possible in my card so I decided to make a segmented card using the Comic Cover Basic cover plate die. I put a small strip of inky grass on the bottom portion of each little window, then backed the entire piece with a subtle cloudy paper. 


I stamped and colored the images from the Capybara Party set, and also stamped two banners from the Sentiments from a Yeti stamp set. I added my images to the little widows and stamped a sentiment for the center using the Wishes Enclosed sentiment set. I finished this off with a rainbow striped pattern paper and some teeny bows from Little Agenda Frames, that I added to the banners.

I hope you like this little scene and head over to the Mama Elephant blog to see inspiration from the entire DT. Thank you for stopping by,

Davina 

Friday, March 15, 2024


Welcome to the Mama Elephant Design Team blog hop!

Our newest release is now live and available for purchase in the store!

www.mamaelephant.com


Hello crafty friends! I’m so happy to be participating in the March Mama Elephant Blog Hop. This rerelease is simply adorable with so many different styles of stamp sets but all from a “celebration” theme. The project I’m sharing is using the new Little Agenda Ice Cream stamp and CC set. The LItlle Agenda series is my favorite series of all time. I love putting tons of images onto little mini scenes and these are perfect for creating my favorite types of projects. I also love that they all play together perfectly because they are all illustrated in the same style. 


I made a Slimline sized card using the Slim Card Basics CC die set, and all of the images from the Little Agenda Ice Cream stamp set. I cut 3 grassy layers from colored cardstock, and gently inked the grass tops in a darker Mowed Lawn green. I also tucked an inked wavy brown layer in between for my ice cream truck to park on. I colored all of my images in colors found ion the plaid patterned background paper, and die cut with the coordinating Creative Cuts. 


I added a sun and cloud into the sky from the Beary Good Day stamp set and the cutest popsicle hamster ever from an exclusive collaboration with Ellen Hutson. That set is no longer available, but that is why it is so important to always grab those limited edition sets, because over a year later, TaDaaaaaa! Essential images hahaha. I finished this card off with a great little sentiment from the new Way To Go sentiment set. These sentiment sets are also my favorites with their fun font and great size.


I really love this littler masterpiece and I hope you do too. Now go hop along for your chance to win and see all the amazing inspiration from the Design Team, Davina.

Check out the rest of the hop for amazing inspiration from our Design Team!


To celebrate the new release, Mama Elephant is picking 1 winner to win a prize pack (winner will be notified in their comment on Instagram, Facebook or YouTube)! Open to Domestic & International (winner pays for shipping)


» 1. Leave a comment on the collective Design Team's Instagram Stampede post
» 2. Leave a comment on our Facebook Stampede post
» 3. Leave a comment on any of the Introduction videos on YouTube
 
Each action qualifies for one entry, max 3 entries per stampeder please and good luck!
 
Check out the rest of the hop for amazing inspiration from our Design Team!
 
 
Thank you for stopping by! Have a great day from all of us!
 

Wednesday, March 6, 2024

Pretty Pink Posh Spring Release Blog Hop


Hello crafty friends! Davina here to share Spring Joy with the new Pretty Pink Posh release Blog Hop. This beautiful release is full of Easter and Spring products sure to make you fall in love. As always there is a diverse amount of products from stencils and stamps to many new die sets and so many gorgeous butterflies! There are also add ons to our favorite lines, like the super cute themed cupcakes and playful train sets. Make sure to “Hop Along” and leave a comment at each stop for your chance to win one of 3 $30 gifts.


I made a Spring shaker card using a combination of several new items. I started by cutting a background using the Butterfly Cover Plate from heavy cardstock. I made it a shaker by mounting it with foam tape over a pretty pastel plaid backgroundand and filling it with the new assortment of shaker beads called Pastel Party. I’ve been adding an extra 1/4 inch to my cards recently, so that my pattered papers can extend beyond the A2 cover plates. So I’ve been cutting larger card bases from my extensive stash of 12x12 cardstock. 


I stamped and colored two of the spring themed cupcakes from Easter Cupcake Set, and die cut using the now de-tabbed coordinating dies! They are incredible. I also die cut several butterflies from the new Stitched Butterflies Dies that are so perfect and detailed for year around projects. I arranged my images onto my card and topped the cupcakes with a glittery “Spring” that I cut from the new Spring Script Die.

I finished off this card with an embossed sentiment from Ester Sentiments Strips Stamps Set on a layered Sentiment Strips Banner, and a few sparkling sequins. I hope you love this new release as much as I do and take a few minutes to participate in the blog hop. Make sure you leave a comment at each blog for your chance to win one of 3 $30 prizes. 

Pretty Pink Posh blog 
Nichol Spohr
Amy Rysavy
Marine Simon
Barbara Tarayao
Lindsey Larsen
Kristie Marcotte
Lea Lawson
Carly Minner
Davina Cantrell  you are here 


Saturday, February 17, 2024

Mama Elephant Stamp Highlight: Painting Piggies

Hello crafty friends! Today Mama Elephant is kicking off the stamp Highlights for February and we are featuring the adorable and artsy Painting Piggies . This set is so great because it has so many wonderful art supplies and accessories. I especially love the paintbrushes and cans of dripping paint. The coordinating dies have a perfect little seam in them at the top of those paint cans to allow you to tuck a brush or something into the paint cans. 


I created a little scene that I built up on an inblended background that I made using the Combo Rectangle Creative Cuts. I adore the scalloped background it makes, and how easy it is to achieve that two tone look by simply cutting two layered from colored cardstock, and inkblending your desired darker tone onto one of the layers. This way everything matches beautifully, but has just enough contrast to be noticeable. 


I combined the images from the Painting Piggies set with two smaller piglets from the new Little Pig Agenda stamp and CC sets. I love that those small piggies fit into the canvas & frame stamp images. I surrounded a stamped in die cut sentiment from the new Lucky Friend stamp set, with some art supplies and added some tangerine colored sequins onto the scene. 

This new release is so fun to create with and I hope you take the time to check out all of the inspiration from the entire Design Team. Thank you for stopping by,

Davina 


Monday, January 22, 2024

Designer Series: “Herd” It’s Your Birthday

Hello crafty friends! Davina here, to share my Mama Elephant Designer Series project. I am calling this slimline shaker card ‘Herd’ It’s Your Birthday, and I love the hot pink farm theme. The January Mama Elephant release is so adorable, with all of the farm themed products, and I combined quite a few on this landscape card. 


I used the Slim Card Basics CC die set to cut the card base from hot pink cardstock, the pink gingham top layer with windows, and the white scalloped frame. I’ve been on a mission to put a dent into the sequin collection I have amassed, so don’t be shocked when I make a million shakers. I inked a bright blue sky onto a back panel the same size as the gingham layer, and framed it in with foam tape after placing a little red farm house in the top left corner. I filled it in with lots of bright clay confetti and added a grassy strip over the acetate, but under the gingham.


I stamped the farm house, flowers, and hay bales from the Little Agenda House stamp set. I know the hay images were intended to be bushes, but they worked perfectly for my farm scene hay piles. Then, I added a white picket fence that I cut using the Farm House CC die set. I cut two and covered the seam up with a little cow image. Next, I stamped a bunch of adorable teeny cows from the Little Cow Agenda stamps, and colored each differently. I arranged them across the bottom of my scene and got to work on my sentiment. I made a custom punny banner using the smaller Little Signage Agenda stamp set. The letter size was perfect. Once adhered, I glued some tiny iridescent stars all around the top. 


Mixing and combining stamp sets is my favorite technique for making unique cards and scenes. I hope that you enjoy this scene, and thank you for stopping by,

Davina 

Thursday, January 18, 2024

Mama Elephant Stamp Highlights: Simple Friends Bubbles

Hello crafty friends! Today Mama Elephant is featuring the Simple Friends Bubbles stamp set and Creative Cuts. This is such a great little combo for adding colorful sentiments to your projects. The coordinating dies make it a snap to cut out all of the bubbles in one pass of the machine. Each sentiment is a friendship themed sentiment but even better are the outline stamps that make it possible to create your own bubbles using sentiment stamps. 


My project today uses the Simple Friends Bubbles set paired with the new Surprise Boxes stamps. I stamped the sentiment bubbles with different pastel shades of Distress Oxide Inks, to match the copic colors I used on the critters from the Surprise Boxes set. I created a square shaped scene for the upper half of my card, to make a Polaroid type scene. I put the word bubbles into the cloudy upper area and layered my images onto the grassy inkblended background. 


I used the Lucky Alpha Creative Cuts to create a layered sentiment across the bottom. And shaded it to match my lavender sky. I finished of these letters with a glittery finish from my Wink of Stella brush, and a sprinkling of teeny iridescent stars across the sky. 

Make sure you head over to the Mama Elephant blog to see more of the release and lost of inspiration from the Design Team. Thank you for stopping by,

Davina 


Wednesday, January 17, 2024

Mama Elephant Stamp Highlight: Little Cow Agenda

Hello crafty friends! Today Mama Elephant is featuring the Little Cow Agenda Stamps & Creative Cuts. I am such a huge fan of all of the Agenda stamp sets. They are just the cutest, and make it so easy and fun to fill up a scene. These little cows are no exception. I combined these adorable little cows with the new Farm House CC to make a whole farm scene, and just love how this card turned out. 


First I made the barn out of bright red card stock with crisp white trim. I gently inked the edges of the barn for some added depth, and popped it up on foam tape. I layered it over ink blended sky and grassy lawn with the smallest hint of the white fence showing on each side. 


I added my Little Agenda Cows around the barn door and a few stacks of hay into the upper window. I finished the scene with a speech bubble from the new Simple Friends Bubble CC and a sentiment from the Boxed Drinks Stamp set. I added a clean white mat layer and a nice bright striped layer to really make the farm scene pop.


Thank you so much for stopping by, make sure to check out the Mama Elephant Blog to see all of the new products and great inspiration. 

Monday, December 4, 2023

Mama Elephant Designer Series Jar of Hearts

Hello crafty friends! Davina here, to share a sweet slimline card I made using lots of beautiful Mama Elephant products. my Designer Series project I couldn’t resist using the wonderful new Jar of Hearts stamps and Creative Cuts. I especially love the delicate bow and detailed lid, and how the dies cut them so perfectly and remove the little parts in the loops. 


I decided to try and create a little gingerbread village across a slimline scene, and I only wish it had enough room for a sentiment on the front. Even though I couldn’t fit a sentiment on the cover, I really love how this candy cane lane. 


I started by stamping out the jar, bow and lid 3 times. I heat embossed the lid on a shimmery cream paper that I gently inked the edges after die cutting. I also die cut 3 snow drifts using the jar die, and gently inking those with a very light blue. 


I stamped and heat embossed some little houses and trees from Little Agenda Houses and a few cute cutie gingerbread men from Little Agenda Gingerbread onto Kraft cardstock. Then built my little jar scenes. After lining them up on the Slim Film City scallop layers I added some candy cane and gumdrop images that I stamped from Holiday Huggers and again the Little Agenda Gingerbread sets. I colored everything in shades of pink and added some sparkle from a Wink of Stella glitter pen. 

I really love combining lots of sets and using them in unique ways. And if these little gingerbread jars don’t convince you to grab your Jar of Hearts stamp set and fill them to your hearts content, then I don’t know what will. I hope I’ve inspired you, just a little bit, with this card and that you make some gingerbread homes of your own. Thank you for stopping by,

Davina 


Monday, October 23, 2023

October Mama Elephant Designer Series

Hello crafty friends! Davina here to share my Designer Series project using the incredible October release from Mama Elephant Stamps. This release is so fun and festive, with all of the holiday themed sets. I especially love the little bundles of goodies from the Deliver Winter Joy set, and how you can shop your stash to find stamps that go along with each image. 


First, I stamped the amazing vintage truck from the Deliver by Truck stamp set. Next, I stamped the bundle of toys and the Christmas tree from Deliver Winter Joy . I found that the adorable elves and toys from Busy Elves and Oh Merry Tree coordinated perfectly for my scene. I couldn’t leave out Santa, and the perfect one was from the Secret Santa set. 


After everything was colored, die cut, and highlighted, I created my base layers. I used the Magic Snow Cover Creative Cuts layered over some patterned and colored cardstock for my foundation. I gave it some gentle inkblending and a few splashes of ink. I wanted this card to be full of dimension, so I popped the images up with foam tape making sure to leave room for my bold sentiment. I used the Everything Nice sentiment set and stamped with red ink for a cheery look. I die cut the sentiment and a piece of foam tape to pop up my word strip instead of glueing many together. 


I finished this off with a sprinkling of snowflakes that I adhered with glue dots to keep them lifted off of the background. I think Santa delivering toys in his pick-up is just as cute as any sleigh, and I hope that you enjoy this little joy filled card. Thank you for stopping by, 

Davina

Saturday, October 21, 2023

Pretty Pink Posh Christmas Cupcakes

Hello crafty friends. The beautiful October release from Pretty Pink Posh is available now and you will love it! This is the largest release ever and full of so much good stuff, like so many fantastic products to bring your winter and holiday projects to life. I created a tiered cupcake stand using the incredibly cute Christmas Cupcakes stamps and dies. I combined serial other new products and previously released items to being this fun card to life. 


I started by using the pretty Pierced Snowflake Plate on Bristol Smooth Cardstock, and inkblending an ombré citrus green background. Once it was completely dry, I trimmed it down 1/4 inch, to  make room for a striped patterned paper background layer. I stamped the cute cupcakes and colored them in before cutting them out with the coordinating dies. I used the cake stand from last summers Fancy Cake Dies to pile on my cupcakes, then I added a bow from the new Holiday Mug Additions


I wanted to add some small stamped details and I found all of the images, and a sentiment, that I needed from one older stamp set. The Holiday Envelopes stamp set from last year had all of the great snowflakes, pine boughs, and the holly with berries images that I used. I stamped some of these in colored ink, including the sentiment, and added them to my treats. Finally, I adhered my images to the inky background, using foam tape behind the cupcake stand, and added my sentiment to a cute scalloped banner from the Sentiment Strips Dies


There are so many wonderful new products to play with and so much inspiration to see, so make sure you hop along with both the New Release Blog Hop and then the Instagram Hop, to see how magically the Design Team used the products and for your chance to win! Thank you for stopping by,

Davina