Saturday, February 22, 2020

You’re Sweet for the BRI mood board

Hello crafty friends. Davina here on the blog, and today I’m sharing another fun card using the fabulous February Moodboard. It is bright and full of cheery images and lots of cherries too! There is still plenty of time for you to head over to my earlier Color Challenge  Blog Post,  and enter your card using the inlinkz button, for your chance to win a $20 gift certificate to the Butterfly Reflections Ink online store. 


I’ve  been on a mission to use all the adorable mice sets from Waffle Flower Crafts that I purchased this fall and these ice cream eating cuties from the Sweet Ice Cream  set have been calling my name! I also find myself wanting to try different styles of cards lately, and I always love the mini scenes that story board dies create, and since I have rarely used mine, I thought it was time to get it out.

I started by cutting some rich red card stock with my Lawn Fawn Peekaboo Backdrop and cutting it again from some Bristol Smooth Cardstock. I used some bright lime green scraps of cardstock to cut some little grassy hills using the Grassy Hillside Borders Lawn Cuts. I trimmed them to be the same size as the little squares. Next, I inkblended spun sugar and picked raspberry distress oxide inks onto each square of Bristol Smooth cardstock. I splattered with clean water, white ink, and silver ink, then glued down the little grass strips on the squares.

Next, I stamped all of my images using grey River Rock Ink from Lawn Fawn, then colored them in using shads of pink, raspberry, red, and gray. After die cutting the images I highlighted them with tiny small white dots. I placed the die cut squares back into the white frame and secured from behind wit washi tape. Then I carefully glued the red frame over the top, using liquid glue. I adhered my images into the spaces then decided to add a few more images from the Waffle Flower Grow Happiness stamp set. I used a couple of small flowers and the cutie holding some tulips to fill in some of the empty spaces. I heat embossed you’re sweet into a gray cardstock word bubble and added a heart.

Once everything was in place, I finished off the design by adding a sprinkling of silver sequins and tiny stars. I had originally cit the letters fro the word sweet from silver cardstock for the front, but it was difficult to see, so I decided to add them into the card, along with the sentiment from the stamp set, “You’re as sweet as Ice Cream”.

Make sure you head over to my earlier post and link your card using the inlinkz button to enter my color challenge. Thank you for dropping in,
Davina

Tuesday, February 18, 2020

Hello Friend with Penguin Palace

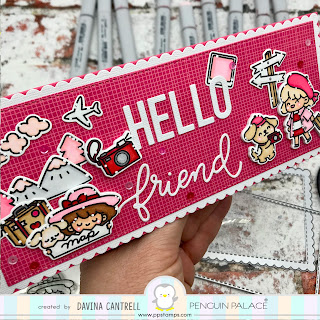
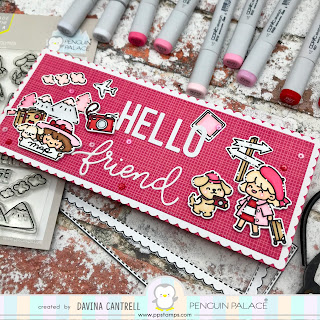
Hello friend! Today I have a long slimline card to share using products from several of my favorite companies.  My favorite Slimline Series dies from Trinity Stamps and the cutest stamps from Penguin Palace Stamps. I also have some fun word dies from Hello Bluebird to finish off this fun card.

I’m still using the vibrant color palette from the Feb BRI Moodboard and although these are typically Valentines colors, I would feel confident using these colors all year long. I created this long slimline card by choosing a small pattern paper and matching cardstock in a rich deep strawberry pink. I trimmed and folded my cardbase to the size of 8.5 x 3.5 which is my preferred size for slimline cards. Then I used the largest scalloped slimline die with textured white cardstock. I diecut my patterned paper with the middle stitched slimline die to nestle above the white scallop layer.

Next I stamped all of the images from Penguin Palaces Fun Adventure, and colored them with Copic markers that reflect the color board I am using. After coloring, I die cut with the coordinating Penguin Cuts, then highlighted the images using small white dots. I also die cut a few of the shapes from fun foam and used liquid glue to attach the matching images and create a sort of thick 3D image.

I adhered my word dies that I cut from the same textured white cardstock is the middle area before creating small image clusters on each side of the card. I adhered my 3D shapes onto the top to create some dimension. I also tucked a small Polaroid image behind a letter in the center area knowing I wanted to layer a 3D camera off the the side. I really like this layout that was inspired by my sweet friend Silvia.

I finished this off by adding a few clusters of matching small sequins sprinkled about, and then mounting my layers onto my strawberry cardbase. I love the barely visage deep pink that shows behind the bright white textured scallops.

Thank you for stopping by and I hope you like this,
Davina

Heffy Doodle and Catherine Pooler Collaberation Blog Hop


Hello everyone and welcome to the Heffy Doodle and Catherine Pooler Designs Collaboration Blog Hop! Our design teams  have come together to share some inspiration with the new Heffy Doodle and Catherine Pooler releases, and there is a prize up for grabs too!

 I made two bright and exciting projects using a combination of products from both Heffy Doodle and Catherine Pooler.  The first card is a retro themed “Happy” card featuring a bright geometric background using the GeoCurves  Background Builder from Catherine Poohler designs. It also uses the layered Happy X three  dies and cute fairy images from the Heffy Doodle Absotoothly Awesome
Stamp set.

I created a grid-like background by using a pencil and ruler, and lightly making a grid, the width of the ruler. I stamped a variety of of the images using 5 different colors of ink from the gorgeous Party Collection. Once dry I carefully erased the pencil lines, then cut out the panel. I layered this background over a glittery silver cardstock, and matching bold aqua. I cut the largest Happy die from the same aqua paper, the middle from the silver, and the fine detailed Happy from Bristol smooth cardstock. I inkblended the word die with the same purple “Flirty Fushia” that I used for stamping, for a perfect match. I stamped and Copic colored the fairies I coordinating colors and mounted themon fun foam for a nice 3D effect. I finished it off with a sprinkling of silver sequins.

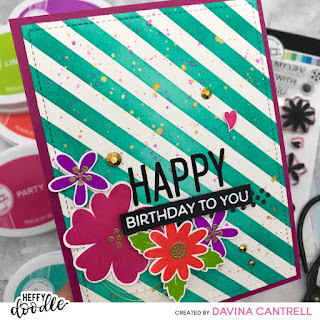
On my second card I used the same beautiful inks along with the floral set called So Happy, and a striped stencil from Heffy Doodle called The Candy Store. I inked the stencil using “Aquatini” and my blending brushes making sure to use heavy ink around the edges for gradient. Then I splattered with watery “Flirty Fuscia” and metallic gold ink.

While that died I stamped the flower images and heat embossed the gold centers before cutting out the images. Then I stamped the large word “Happy” and a row of dots underneath in black ink. I layered the flowers with glue dots and foam dots to get a dimensional cluster, and added a sentiment black banner, with white heat embossed letters. I finished it off with gold metallic jewels before mounting it all on a deep pink cardbase that closely matched the “Party Dress” ink.

There are so many creative and inspiring projects for you to see along this hop. Make sure you follow along for your chance to get ahold of some prizes from both Heffy Doodle and Catherine Pooler.  Both generous companies will he respectively awarding a $25 and a 25£ gift certificate to their stores! Winner will be chosen randomly and announced on Tuesday February 25th on the Heffy Doodle and Catherine Pooler Blogs.

Thank you for stopping by. You should have come from Karen Baker , and the next stop is Nannette Tracy. The entire line up is listed below. Make sure you leave a comment at each stop to be eligible.


Saturday, February 8, 2020

February BRI Moodboard Color Challenge


Hello Crafty Friends, I have a fun new project and an incredible new #brimoodboard to share with you today, along with a brand new February Color Challenge!  This months Color Board is perfectly curated for Valentines themed projects whether you want winter themed scenes like mine, or candy and flower filled scenes. The colors this month are Metallic Silver, Carnation Pink, French Rose, and Poppy Red.

The card that I’m sharing is an interactive Double Slider card that I made using Lawn Fawn Double Slider Surprise Dies and Waffle Flower Cold Hands stamps and dies. I also used the Waffle Flower Cutaway Alphabet dies. All the details on how I made this card and products are linked up on the Butterfly Reflections Ink Blog today.

This month I will be hosting another Color Challenge here on my blog! Starting today and lasting til the end of the month, use the Inlinkz button to add your projects to this blog post. I will pull a random winner on the 1st of March to receive a $20 gift card to Butterfly Reflections Ink online store.

There are a few simple guidelines to my color challenge. Use the hashtag #brimoodboard when you post your project on social media. Using the current color board, please upload new and original cards, scrapbook pages, journal entries created by you (up to 4 entries per person). Any brand that Butterfly Reflections Ink carries is welcomeand any medium. Please be kind, this is no place for judging or rude comments.

I will be sharing entries in my stories on Instagram and please tag me @popsiclesticks ! Let’s spread the word and make this challenge huge!

Thank you for dropping by,
Davina
You are invited to the Inlinkz link party!
Click here to enter


Tuesday, February 4, 2020

Happy Anniversary with Penguin Palace

Hello! Today I’m sharing a sweet and simple Anniversary card that I made for my husband. Now, some of you might think why simple, it should be extravagant if it’s your your husband. But the answer is simple, you have to know the person you are making cards for. When I receive a card, store bought or handmade, I read it, I love it, I place it on the mantle and I see it for a month or so. Children don’t cherish cards, they are concerned about gifts, but the parents sometimes do. And I’ve found that men usually don’t, and that’s ok.  So I will not spend 5-6 hours making a crazy complicated card for my husband, who will quickly glance at it, say “Thanks babe”, put it back into the envelope, and toss it in a pile to be forever lost in his stuff.

This cute little slimline card is made using stamps from Penguin Palace Stamps, a versatile stamp set called An Amazing Friend and the coordinating die. Originally, this stamp set is intended for a Birthday with the cute unicorns and cake. But I wanted them to be celebrating my anniversary so I chose a sentiment from another set called Hedgehogs in Love, and heat embossed it onto a die cut banner.

I wanted a shorter slimline card so I created a card base that is sized at 6.5 x 3.5 and I cut two layers to fit on the front. A smaller one from colorful heart patterned paper, and a smaller one from bright pink cardstock that matches the patterned paper. I also cut two heart shaped dies to pop up on top from vellum and bright white Neenah Solar cardstock. I combined two colors of Distress Oxide Ink to create a color that matches the pink cardstock. I do so much inkblending I’ve gotten pretty good at combining them to look seemless. I used Picked Raspberry and Seedless Preserves. Then I splattered with water, then both black and white ink. While that dries fully, I stamped the unicorns, and a pair of music notes from Fun Night Out onto bright white cardstock. I colored them with Copic markers using colors from the paper design, then cut out using the coordinating dies. Next I highlighted with white paint and an embossing stylus. I cut a banner from the same pink cardstock as the larger mat layer, and heat embossed the sentiment onto it. I adhered my images onto the smaller heart, then used foam tape to adhere it to the vellum heart. I attached the whole piece directly to the patterned paper and used some more foam tape for the banner.

I glued the card onto the base using Scor Tape and finished it off white a sprinkling of shiny black jewels. It’s simple and cute,

but looks more glamorous than it really is thanks to the great patterned paper and bright layers. Maybe one day I’ll make him a masculine card but this year, he gets hot pink unicorns haha.

Thanks for dropping by,
Davina

Monday, February 3, 2020

Happily Ever After with Heffy Doodle

Hello Crafty Friends, Davina here with Heffy Doodle and another interactive card to share. A simple slider card was all I needed when it comes to this incredibly cute Heffy Doodle Stamp set called Happily Ever Crafter.
My father is getting married, so I wanted to make him a wedding card, but I hope he doesn’t mind that I made his hair silver. I really love the carriage and it’s size, it glides across the little scene as my happy couple waits to get in. 
I stamped my images onto bright white Neenah Solar paper using my Stamp Platform, then colored them in with a simple Copic color pallet. I used cool grays, a little coral, and some yellow for the gold. Once everything was colored I used the Happily Ever Crafter Dies and my Big Shot Express to cut everything out, before highlighting my images with small white dots.
Next, I cut a white panel from Bristol Smooth cardstock, and two pieces from a bright green cardstock using a stitched die. I used Grassy Lass Border Dies to cut a sloped hill, and a rounder hill, from the green card pieces. I made sure the sloped hill was a little shorter than the rounded hill for layering purposes. I used a slider die to cut a channel in my taller hill, then temporarily secured it from behind with a piece of washi tape.
I used my blending brushes to ink Mowed Lawn Distress Oxide Ink onto the edges of my green cardstock hills. Then I created a coral sunset sky on my white card panel using Scattered Straw, Dried Marigold, and Worn Lipstick.  I splattered them all with clean water, white ink, and gold ink and dried with my heat tool.
I glued a plastic sliding disc to the back of my carriage, and had a penny ready to attach to the other side of the slider disc. I flipped my hill over, removed the washi tape from the back and put on the front, then squeezed a thin line of glue onto the slider channel. I want to glue that green piece exactly where the slide will be so that it is visably green from the front once assembled. So I carefully turned it over and lined it up at the bottom, and gently rubbed the slide channel to secure the piece to the white paper. Then I removed the temporary washi tape and removed the hill.  I framed out the back with foam tape, then placed the groove over the carriage disc, before glueing the penny to create a weighted carriage.
I realigned the hill and attached it with the foam adhesive. Then I tucked the castle behind the hill after I trimmed off any part that would be visable through the groove. Next, I adhered the second hill using more foam tape. I stamped, and heat embossed, a scripted “congrats” and carefully added some glue to the back. I held it down with an acrylic block so that it would be nice and flat. 

Finally, I secured my Bride and Groom to the left, and added a sprinkling of Lucy Abrams sequins to the card. I mounted the cardface onto some gold foiled striped paper, and again onto a coral cardbase. I dusted my little sliding channel with my powder tool to keep my carriage gliding smoothly and I love it. I will add a short video to my @popsiclesticks Instagram if you want to see it in action.

Thank you for stopping by, Davina