Tuesday, December 11, 2018

Farm Fresh Christmas-CTD523


Happy Wednesday everybody. I’m back for with my second card as the guest designer for the Color Throwdown Challenge and so excited to share my “ Farm Fresh” project with you.


The colors to use this week are Red, Green, and Tan. These are generic color names and you can utilize any colors and/or mediums you have in your stash along with any neutrals. 

I used CTD colors along with the Hay There stamp set and many other small supporting images all from Lawn Fawn. First I stamped out all of my images onto Neenah solar white card stock and colored them with copic markers, then added a few white gel highlights.  I altered the barn from the Hay There set with accessory images from the Frosty Fairy Friends (I used the light bulbs and the little snow patches). After playing around with the pieces and trying to add the lightbulbs on top of the barn, I decided to die cut a second barn and trim the roof off. I colored and adhered the bulbs, then layered the second roof on top, then finished it up with the snow drift and chunky Lawn Fawn glitter.

For the background sky I lightly blended a soft morning sunrise with distress oxide inks using my Blendability Brushes. The colors I used are Tumbled Glass, Tattered Rose and Scattered Straw. Then I cut the mountains with Lawn Fawns Stitched Mountain Border dies out of gray card stock, and the Forest Border hillside out of their glitter cardstock. I mounted the glitter layer on with foam tape to create depth and dimension. 


The first Lawn Fawn stamp set I ever purchased many years ago was the Snow Days set. And the trees in that set are still some of my favorites and much used. I stamped 5 trees and adhered them in a cluster with the barn before building the fence to go across the cardface. I glued some tiny stockings from the Christmas Dreams set on each fence panel then added my grass layer after stamping the greeting across the bottom and blending some Mowed Lawn distress ink on the grass blades. 

Finally, I added my Christmas clad characters (Christmas accessories are from the Happy Howlidays set) and brushed on a little bling with Wink of Stella on the mountain tops and Santa hats, then mounted it on a red card base.  I’m so happy with how much dimension my layers created and how much glimmer and sparkle this card has in the light  

Thank you so much for for checking out my post I hope you enjoyed reading about how I created this barnyard scene. For more inspiration please head over to the design teams blogs or directly over to the Color Throwdown blog for more details and how to play along by adding your creation to the in link challenge.
Thank you so much for stopping by, Davina 


Wednesday, December 5, 2018

Winter Botanicals - CTD522


Hello everyone and Happy Wednesday. This month I’m excited to say that I am guest designing over at the Color Throwdown Challenge and there are some fantastic Christmas color combos that will be perfect for your December projects.

The colors to use this week are salmon (coral), red, green, and grey. Always remember that we use generic colors (so any brand or type you have in your stash will work) and of course always feel free to add in neutrals. 

I used CTD colors and a new floral set from Trinity Stamps called Winter Botanicals and their matching dies to create this ink blended and water colored layered card. First I gathered the corals that I wanted to use from my collection of Distress Oxides. I decided on Abandoned Coral, Dried Marigold, and Tattered Rose. I used my Bledibilites brushes from Trinity Stamps to apply and flawlessly blend my inks onto Bristol smooth paper. When I achieved the color I wanted I flicked some watery white ink across the top and put aside to dry.  Then I used Ranger Archival ink to stamp a bunch of the floral images on Canson watercolor paper. I love to get the most out of my colored ink pads, and use the inky lids to watercolor with a water brush. I will wait til my images are barely dry, then take a small amount of even more saturated color to get into the crevices to create shadow and 
dimension. 

I used stitched border dies from Lawn Fawn to cut my panel out of the inked background. And my coordinating Trinity dies for the images. I played around with the images and created three clusters that I found eye catching. Using a combination of matte medium, glue dots, and foam dots I adhered my clusters onto the panel. I went back and tucked a candy cane into the right bottom cluster and loved it! For my sentiment I heat embossed Noel in silver Wow embossing powder on grey cardstock. I cut out the word 3 times with the matching die and layered to create a chipboard thick word. After applying my sentiment I finished up with small iridescent sequins and tiny stars. Then decided I wanted even more bling and added matching sequins to the centers of my poinsettias. Finally I adhered my panel onto a card base using the same grey card stock using double sided tape. There is so much dimension on this layered beauty and I really hope you like it. 


For more inspiration, please head over to the design team blogs that are linked below, or directly over to Color Throwdown blog for more details and To see how to play along and add your projects using this color challenge. 


Thank you so much for stopping by! Davina 

Saturday, November 3, 2018

Trinity Stamps Release Hop


Welcome to day two of the Trinity Stamps winter release blog hop! 

If you followed the hop on Friday, Thank you! I hope you found it as inspiring as I did.

 If you haven't seen all the posts from Friday yet, I encourage you to go to the Trinity Stamps blog. What crafter wouldn't love more inspirations and more chances to win prizes, Right?  
(I will have a direct link HERE as well as at the bottom of my post today)

Speaking of Prizes, Be sure to comment on all of the posts in the blog hop event. Trinity Stamps will be giving away FIVE PRIZE PACKS worth at least $25.00! Winners will be announced HERE on November 10th.

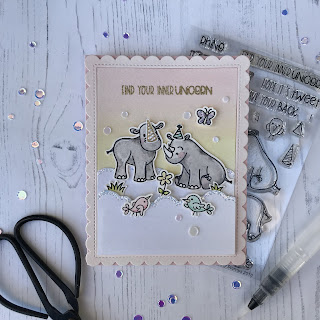
Can you believe that it's November already? Where has the year gone. As Fall hurriedly races onward, Trinity Stamps has been working hard to produce their second release (which you can see all of right HERE). This Magical release offers several stamps and dies from cute animals to holiday sets and a series of Wizard themed items that are to die for. I am especially excited because I illustrated many of the new designs in this new release.  I will be working with one of those sets in my project today called "Rhino Bird Day"!


The entire time I was illustrating this particular stamp set, I thought and referred to it as the “chubby unicorn” set. I had this dreamlike watercolored scene in my head the whole time. Well, of course I just had to make my first project based on that vision!


I selected the images I wanted to use and got my supplies together. Using my Tonic stamp platform, watercolor paper, and archival ink. I wanted the lines to be thick and dark. Since watercolor paper is so thick and porous and I didn’t want to have my lines appear gray or uneven, I stamped the images several times over. Having a stamping tool like this can make that really easy, but you can of course use any acrylic stamping block too. 


I love to watercolor using very diluted ink that is smooshed on the lids of my stamp pads. I just pick up that ink with my water brush. This gets me more use out of all those pretty colored ink pads than just stamping. I refer to the style as “water ploppy”. After the images are mostly dry, I go over the edges and shadowy areas with a small amount of the same color ink, just a more concentrated amount. This second layer of ink tends to sit on top rather than blend in. After all of the ink dries completely, I will sometimes go in with matching ink color marker and do little "dot-doodling" to assist in blending the different shades. I use a white gel pen to add any highlights I feel the image needs. 


After all of my images are colored, I run them through my scan n cut with the blade set deep to 7. There is matching dies to this set as well which makes this project come together even faster. (Note to self: get the matching dies, you will use this set often!).

I decided I wanted the unicorn horn to be golden and glittery. So I used super fine metallic gold embossing powder from Wow! to add a glimmer to my white cardstock (which I also used on the clouds). I added glitter to a number of the images to give added shimmer.


I painted a very pale dreamy sunset-like background and once dry, I diecut that paper for my base. After, I heat embossed the sentiment "Find your inner unicorn" and then started to add my layers. My taller clouds were adhered directly to the panel but my shorter layer was popped up with foam tape so I could tuck my tufts of grass and “unicorns” to look like they are daydreaming in the clouds. 


After getting everyone in their place, I added a party hat to the sitting rhino. I decided it was time to mount the panel to a soft pink card base. I used the lighter pink sequins from the “Glistening Snow” confetti mix to add some fun sparkle and finish up this scene. Aren't they adorable. I think this is a unique change to the unicorn trend, dont you?


I hope you’ve enjoyed my project today and found it inspiring. There is lot's more inspiration coming your way! Continue on the Trinity blog hop to see more of this amazing new release in action and comment along the way for the chance to win some amazing prizes as well! 
Don't forget to hop through the Friday posts too!


 Click HERE to start at the beginning of Friday's Blog Hop.

Click HERE to start at the beginning of today's blog hop.

Here is the complete list of the Blog Hop today 


Davina Cantrell (you are here)

Up next is:
Taniesa Vlasak

Thank you so much for stopping by!


Monday, August 27, 2018

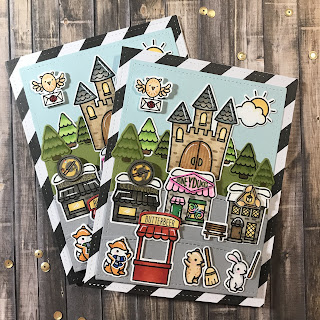
Hello everyone. I know I said the other day I would share a little about how I made my lawn Fawn village stamp sets into Hogsmeade. It only takes a little imagination and a lot of patience to execute most ideas. This is something I had wanted to do for a while and just kept saying next time. But once I did it I fell in love.

This is an A2 sized version of the larger shadow box card I shared last week. And once again I used all LawnFawn products to create it. I created a short cut for myself though, and I made some tiny digital images of my magic Harry Potter elements so that I don’t have to hand draw them each time I remake this idea.

So I sized these to fit on top of the village shops and homes. And in the future I know I will play around with additional storefronts. I put a whole bunch on one layout so I could print out 12 of each design on one piece of Neena Solar White. I ran it through my scan and cut, which I don’t use very often, but I had put a new blade and I was fairly happy with the results. Now I will have a whole bunch of card candy, and it will only need minimal trimming and cleaning up. 

I colored my little images and then it was time for real life crafting. After stamping, coloring, and die cutting the rest of my images I was ready to begin assembling the shops. 

You can see here how I attached the snowdrift first ( which glimmers with wink of Stella) before putting on my signage. I did leave it popped up for some dimension. But that’s just how I roll. 


And a whole lot of tiny pieces later this is what I have. 

I knew I would need at least 3 layers, to fit all the “streets”. So I made my sky layer and trimmed a hillside to ground my castle and trees. Then I made a 2nd hillside layer to be my center street. I attached a third layer, the least rounded of the stitched hillsides, to the 2nd layer panel first, before attaching them with foam tape. Then I placed my shops on the taller of the two streets. Since perspective is everything, the butterbeer cart had to be upfront with the critters. The are larger after all and will appear closer. I also popped my little owl with the Letter from Hogwarts up in the sky so he looks like he’s making a delivery. 
                                     
I was able to take some nicer pics the following morning. And I can’t wait to see what the recipients have to say 


Thursday, August 23, 2018

After all this time? Always


I love Harry Potter. And when I say that I really mean it haha. And I like to take every opportunity to try and combine all things HP, with my passion for papercraft. I made a very large and dimensional shadow box the other day to enter into LawnFawns awesome lawnfawnatics challenge. And the theme was Favorite place. So of course I had to roll with The Wizarding World of Harry Potter. I used all Lawn Fawn stamps and dies for this project.

                                          
I had to make a custom housing for this big guy. So I cut two panels for my base from cardstock at 5 x 7.25 inches. I scored and folded the cardstock at 4 and 7 inches. Using the little 1/4 inch tab to attach them together with that red sticky double sided tape. (I can’t remember what it’s called.) I used a stitched frame to cut out the opening panel and I trimmed and scored a piece of striped paper to line the inside.
    

I then hand drew the little signs to fit over the village shops to make my street magical. I had so much fun customizing all these little images. I knew it would have to have layers to fit all the buildings and to give the illusion of dimension since all of the stamps are not the same size. And I’m so happy with how it came out. 
All of my coloring was done with copic markers and Wink of Stella glitter pens. I heat embossed the roller coaster on the very back panel to show the amusement park. And made a little aged banner to pop on front. That’s always my mini version of the Marauders Map.  I loved dressing up these little critters in their HP gear. 

I waited until the last day to enter my card, oops,  and was so excited when it was chosen to be featured. It’s always such an honor. Thank you for stopping by and hopefully I will have a flat version of this project to share soon. 


Tuesday, August 7, 2018

Mama Elephant GDCall

Good morning. Today I’d like to share a card I made using Mama Elephant stamps and dies. I’m planning on entering it into their Guet Design Team challenge. There are so many amazing and talented card makers out there but I though I’d throw my name into the hat also and keep my finger crossed.
I used the absolutely adorable set call Sun and Moon. I purchased this set as soon as it was available. I just loved the faces on the sun and moon, and the cute little mountain trio. I colored my images using copic markers and created the sunrise/twilight background using a photo I found on Pinterest as color inspiration, and distress oxide inks. 

I used the scalloped frame to make my boarder and created a grassy hillside with mountain range (it reminds me of the Grand Tetons) I also used some cloud dies and popped it all up on foam tape crest dimension and give the background a 3D effect. 
My little girl and her forest friends are popped on foam tape as well, I wanted them to look like they were posing for a photo at sunrise. I then finished it off with a few little gems and tiny stars form Lucy’s Little Things. I’m so happy with how this card came together and I hope you enjoy it as well. Thanks for stopping by 


Monday, August 6, 2018

Wow! This is the first one

Hello, if you are reading this... thank you. This is my first post and something that has given me much anxiety over the past couple months. I love being on IG but have never been a fan of keeping up with social media. But as a papercrafter, there are so many opportunities I am missing out on by not having a blog or being on Facebook. So here it is. No more excuses.
My first project I’d like to share is a mermaid scene I created using Honey Bee stamps. I watercolored the images using the smoosh technique with my ink pads and a water brush on cannon watercolor paper.

I used Lawn Fawn dies to create the background. The waves dies for the base and the new scalloped frames for the boarder.

I dusted off my Scan n Cut for this project and also fussy cut a few sections. I set the blade very deep at 7.5 to cut through the thick paper. I then used an xacto blade to carefully cut around her hands to place the gem.


I finished this up with some simple layering using foam tape and a sprinkling of Studio Katia Honey Gold sequins.
                                      
Thank you so much for visiting and I hope to see you back. Davina