Tuesday, January 28, 2020

Penguin Palace Love

Hello friends, I’m sharing a “Love” filled Card today featuring one of my favorite Penguin Agenda stamp sets from Penguin Palace Stamps, that I can never stay away from for too long. They always seem perfect for any occasion. 

I created a colorful Distress Oxide watercolored sky using a color combination hugely inspired by the very talented Samantha Mann. Her backgrounds always give me so much Joy, and I really loved the crisp white hillside in front of her ink smooshed raspberry sky. I tried to recreate it here with scattered straw, picked raspberry, seedless preserve, and wilted violet.  I splattered the dries sky with some white ink before using white embossing paste and starry stencil.

Because I used bristol Smooth cardstock instead of the watercolor paper I normally would use, it warped a lot more than I expected it too. So I used a ton of Scor Tape on the back to try and hold it flat. I cut a textured cardstock mat for the panel and mounted it on that, then mounted the mat onto a heavy cardstock base. It straighten out pretty well, so I decided to keep on going with it.

I stamped my images onto Neenah Solar Bright White cardstock using black Lawn Fawn ink and my stamp platform. Next I colored my little images using Copic markers that I felt matched the sky. I also use some mountain and clouds from the Fun Adventureset and colored those with some warmer greys then I used on my penguins. I cut my images out with the coordinating Penguin Cuts then dotted my white highlights onto the images.

I cut a white snowy hillside and stamped a sentiment onto the bottom from Let’s Catch Up , then mounted the hillside onto the sky layer using foam tape. I tucked my mountains behind the hill, and adhered the clouds above. I cute 3 words from the same same textured pink cardstock that I used for the mat, and attached them together to create a chipboard style word, before glueing it down on top of the sentiment. I arranged my penguins in the remaining space then added a few little hearts to their hands.

I really love the final results and the versatility of these stamps! Thanks for dropping by and have a great day,
Davina

Saturday, January 25, 2020

Hello for Butterfly Reflections Ink

Hello Friends, Davina here on the Butterfly Reflections Ink Blog today sharing a fun slimline card I made using stamps and dies by Pretty Pink Posh and Slimline Series Stitched Card Panels by Trinity Stamps.  I’m also still loving the January BRI Moodboard colors and have made so many projects using variations of the great colors.

This tall slimline card is bright and full of so many cute images. I stamped all of the images from the newly released Pond Friends and the Coordinating Dies using my stamp platform and black ink. I colored everything in with Copic markers using a variety of each of the colors from the color board. Once I die cut all of the images, I used a dotting tool and white ink to add little dot highlights onto my images. I played with the arrangement a little, and decided to stamp a few images from an older PPP set called Woodland Critters, like the mushrooms and tree stump.

I cut a panel from aqua striped patterned paper using the largest stitched rectangle slimline die.  Then using the smallest die I cut 3 panels; one from Bristol Smooth cardstock, one from aqua cardstock, and one from a citron green. I used a wave Stitched die to cut the water edge about two inches from the top the aqua panel, and the Grassy stitched die from Slimline Series Scenic Border set. I cut about an inch from one end of the green paper, the turned the panel over and cut the top off again to get both grass layers from one piece of paper.

I used Distress Oxide Inks to ink the edges of my colored cardstock panels. For the aqua I blended Peacock Feathers, and on the grass I used Mowed Lawn. For the sky I inked Milled Lavender and Dusty Concord onto the Bristol Smooth cardstock. I splattered with iridescent perfect pearls, then White ink, then glued the different layers together using Lawn Fawn Glue Tube. I used a strip of foam tape to attach the bottom grassy layer.

I went to work attaching all of my die cut images using a variety of glues. Often letting images hang off of the sides, I trimmed the lily pad even with the panel. Once everything was in place I added some sparkly iridescent PPP Jewels. Once all of my sparkles were in place I found a scripted PPP die, and cut the “Hello” from Hello Friends from glittery white cardstock. I glued it down to the bottom of  my scene and then attached the layers onto the striped paper before mounting it onto my 3.5 x 8.5 slimline cardbase.


I really love the final results and I hope that you get inspired to make a colorful slimline card today!
Thank you for stopping by,
Davina

Friday, January 24, 2020

Trinity Stamps New Release Blog Hop

Hello crafty friends! I’m happy to be here today participating in the Trinity Stamps January New Release Blog Hop. There will be several prizes and giveaways so please be sure to comment at the end and follow along the Hop lineup for your chance to win some of the new Merch!

I have an incredibly fun pivoting pop-up card I made using several of the new release items. This Mini Card was a breeze to size up using the newest addition to the Slimline Series die sets called Frame and Fold. This die set has so many great dies that will have you turning to it over again and again. The frame is perfect for making slimline panels and shaker cards and the inner die cuts and scores a great mini card.  There are beautiful layered word dies “Love You” and multiple smaller frames and stitched frames and layering hearts.

I illustrated this fun stamp set called Monster Love and it is perfect for year around crafting and cardmaking. The coordinating Monster Love Dies are perfect for cutting out the little arms to tuck items under, or hang over a frame or banner, and you’ll notice that once again the there is a new small sentiment set called Love & Stuff, which has some great phrases for anyone!

This mini card packs a punch, and when you open it up, I added an intereactive element to pop out and hold this monster filled hug. The die cut “Hug” is part of a great stand alone die set called Sending Hugs and not only can yourself it alone or pair it with a monster themed set, but I also pairs with the 3x4 Set called Folded Hugs.

I made the “Conversation Hearts” easily by die cutting the hearts from pastel hued cardstock and layering over glittery gold cardstock. Then I stamped the messages with Picked Raspberry Distress Oxide Ink and my Stamp Platform for perfect results.

Please follow through the Hop line up and you won’t be disappointed. There are so many fabulous items in this new release and so much inspiration from the great Design Team. Make sure to leave a comment on each post for your chance to win.

You should have reached my post from the fabulous Christine , and follow my post to Dana  ! The entire line up is at the bottom with all of the links.
Thank you for stopping by, Davina


Tuesday, January 21, 2020

Yay! with Penguin Palace

Hello Friends, thanks for stopping in today. I have a really fun interactive card that I made using two  different stamp sets from Penguin Palace Stamps. When you pull the little tab, the 7’s line up at the bottom for a winning jackpot!

The adorable slot machine is from the Lucky Break stamp set and the fantastic Lucky Break Penguin Cuts die cut the slot machine perfectly, with the little window for the sign and and the little windows for the icons. I wanted a pair of same sized friends for the bottom, so I used some characters from Fun Night Out.

I stamped all of the images with Copic friendly black ink and my stamp platform. Then using colors from the current January Mood Board and my Color Challenge, I Copic colored all of my images in shades of aqua, pink, peach, and violet. I made a cardbase out of matching light aqua cardstock and layered some gold polka dotted paper on top. Then I cut a smaller layer for an image panel and a slightly larger piece of glittery gold cardstock.

I inkblended my top panel with Worn Lipstick and Picked Raspberry Distress Oxide Ink, then splattered with clean water, white ink, and metallic gold ink, before drying it with my heat tool.  I centered the slot machine die on my panel and ran it through my Big Shot Express to cut out the holes for the icons. Then I used clear scotch tape to resecure the piece from behind, and mounted the die cut stamped image on top with liquid glue.

I carefully stamped the icons onto some white paper in 4 rows making sure the bottom row was all 7’s, then colored them added some glitter to the 7’s. I trimmed the paper to 1 1/2x 2 inches and created a pull tab out of a long strip of white paper that I glued to the back of the icon panel. I used a pull tab die from my stash to make the aqua topper, and the rounded scoop on the panel. I carefully lined up my icons in the window and temporarily secured it with a piece of washi tape. I used a 1/4 inch piece of foam tape across the back to provide a stopping point for the strip. Then I framed it along both sides with foam tape as well. I shifted the tab to the extended winning position, and created a stopper on the top as well, forming a pocket. So there is really only about one inch of moveable space inside the card behind the slot machine. I mounted this pocket on top of the glittery gold cardstock, and secured that to the polka dotted paper.

I adhered my celebrating cuties to the front and added a stamped scripty “yay” to the top, along with some bouncing coins. I finished it up by adding a sprinkling of pink sequins for some bling. I really love how this turned out and even got my adult son to play with it a bit haha. I hope you like this card and play around with this idea on your own.

Thank you, Davina


Monday, January 20, 2020

Celebrate with Heffy Doodle

Hello Inky Friends! I have a super fun interactive card to share with you, using the adorable Quill You be Mine from Heffy Doodle. Last week I made a slider surprise card that I shared on my @popsiclesticks Instagram, and I loved it so much I wanted to make another for today’s post. Although I have a new die set that will cut the shape of the slider card, one is not needed. The card I’m sharing with you is made without a slider die, but with two regular layer dies.
I was better about taking pictures during the process, so hopefully you find it easy to make your own slider surprise card. First, I got out several pieces of Bristol Smooth cardstock, of which I keep a supply of 4.5 x 6 panels trimmed down from large 9 x 12 sheets. I used the largest rectangle die, and a smaller die that is 1 inch smaller (knowing it would give me a 1/2 inch frame all the way around).  Using Heffy Memo Tape to keep them aligned, I centered the smaller die inside the larger and cut two panels, making sure to selectively stop cutting before the top of the center die.
After the second panel, I carefully removed the inner die, and ran through my big shot again, to cut the top of the largest die. The first panel is not cut all the way through and that’s ok, since I only need the bottom portion for the grassy layer.
I cut two more panels from the largest die. One will be the visible image layer under the slide  and the second I trimmed 1/2 from one side and the top. This will be the pull tab. I used an old corner rounder punch to round the top corners
Before inking the panels, I scored the slider. At the top of the inner slider, 1/2 inch from the bottom of the slider, and in the center of the slider.  I will not reinforce the folds until after my inking is complete. I cut a grassy hillside from my partial cut panel, and another to fit on my bottom panel.  I used Spun Sugar and Worn Lipstick Distress Oxide Inks for the sky, and Mown Lawn and Lucky Clover for the grass. I tried to ink the panels similarly but it’s not super necessary for them to be perfect. Then I splattered with clean water, white ink and metallic gold ink.
While those dried I stamped my images using my stamp platform and black Copic friendly ink. I colored the images using light shades of Pink, Peach, Aqua, and Violet and highlighted with white gel pen. I used a variety of light browns for all of the cute hedgehogs. After cutting out all of the images with the coordinating Quill you be Mine Cuts, I decided I wanted a few foliage images. I stamped some leaves and mushrooms from Big Bug Hugs and got to work adhering my images.
I reinforced my score lines using a bone folder before I glued the grassy layers onto the inked panels, and attached the stamped images. The images that will appear to fly need to be applied over the center score line, but only the bottom portion can be glued or the mechanism will not work properly. So the flower balloons are only glued to the hands of the hedgehog, and the lower body portion of the hedgehog are carefully glued below the score line. The other hedgehogs are adhered above the lower  score line, making sure it slides easily. I tucked the clovers into the grass and added a glittery gold Celebrate  across the top making sure there is not glue on the parts that overhang.
Using a large circle punch, I cut a little round scoop from the top so the pull tab will be visible and accessible.  From behind, I centered the pull tab on the back of the panel with the top level with the card front, and applied glue to the very bottom 1/2 inch portion of the slider. That is the only adhesive holding the pull tab. I applied a 1/4 inch strip of foam tape along each side and across the bottom, then carefully layered the top panel over the bottom. The foam creates a drawer slide for the pull tab and keeps it in place while allowing it to move freely. I applied a few more small images before mounting it onto a colored cardstock base with Scor Tape. I really love how it all turned out, although it does take a few hours from start to finish, it really has a huge impact once complete. I hope you enjoyed this and try your hand at a slider surprise card.
Thanks for stopping by, Davina


Tuesday, January 14, 2020

Hey There Brew-tiful with Penguin Palace Stamps

Hey There Brew-tifuls! Today I have a punny mermaid/coffee mash up that I hope you enjoy. One of my goals this year is to practice creating flatter, more easily mailable cards, and to let a few stamps be the focus of my cards instead of the visual overload I usually generate. It’s hard. I see these gorgeous clean and simple cards that people make and I swoon over the simplicity of letting the illustrations shine. Then when I make an attempt, I feel as though the card looks unfinished. I know it’s in my head, and it’s something I have to work on. So lately I’ve been trying to “meet in the middle” and really focus on not over doing it.

I wanted to send a card to my cousin, and add a gift card in it, so I needed a light & flat card, that wouldn't get ruined in the post. The adorable mermaids from Penguin Palace are my favorite mermaid stamps, and the cuties from Take a Break are the best. The two with the pizza and coffee are my absolute favorites.

I gathered up the last few pieces of an adorable and colorful Birthday paper pack I had in my stash, and decided to cut the sentiment from the colorful print. Normally I would mount them on fun foam for dimension, but since I am trying to keep this flatter, I also cut each letter from a thin glittery champagne colored paper. I doubled up each letter with liquid glue allowing the glitter to peak out from the top right. I placed all of these under an acrylic block while they dried so no edges would lift. Next I cut my layers, and used more of the glitter paper directly underneath my top panel to unify the colors.

I used my older little mini cubes of Distress Inks to create a small watercolor palette that matched the paper print, and splattered across the white top panel, for a rainbow of splashes. Then, I adhered my double layered letters across the middle to form the sentiment. Next, I stamped “Brew-tiful” from the Rabbit Cafe set underneath in black ink. I stamped some images from Take a Break, Summer Sunshine, and Rabbit Cafe using black ink and my stamp platform. Then, I colored everything in with a few Copic markers in coordinating colors.

Finally, I adhered my images around the sentiment and added a few iridescent sequins before mounting all of my layers together with Scor Tape, and attaching it all onto my card base. I felt so accomplished at not overdoing it. I love that the adorable mermaid girl is the star of the show and not lost in a ton of images, and that this will easily mail with no added postage or damage. Yay! I did it.

Thanks for stopping by,
Davina

Saturday, January 11, 2020

Big Hugs for Butterfly Reflections Ink

Hello Crafty Friends, I’m sharing some Big Hugs today with another Valentine themed card using the beautiful Butterfly Reflections Ink January Moodboard. The adorable stamp sets and dies are all available on the Butterfly Reflections Ink online store and are a mash up from Lawn Fawn and Reverse Confetti , two companies I adore.

I did something a little different for today’s card, I did not inkblend. I wanted to use the new XOXO Backdrop die and try a paper piecing technique I saw Megan Quinn use during Lawn Fawn’s sneak week reveals.

Using my Big Shot Express, I ran 3 different colored pieces of cardstock (separately) through using the XOXO Backdrop die, pale pink, a darker pink, and a light purple. I poked out all of the little hearts and Xo’s, I will admit it was a little more tedious than I expected and I’m usually too impatient for stuff like this haha. Then I poked out some dark pink and purple X’s and O’s I stuck them in the negative spaces, securing them with strips of trimmed clear scotch tape from behind.

Next, I mounted it on some textured white cardstock leaving a small border around, then cut a larger cardbase than normal to accommodate the enlarged panel. The finished card is 4.5 x 5.75, so an extra 1/4 inch all around.

I stamped my images using my Stamp Platform onto Neenah Solar Bright White cardstock.  I used two stamp sets with their coordinating dies from Reverse Confetti, Huggable and Mouse Mail. I colored all the images with Copic markers using colors inspired from the current January Moodboard. So lots of pink, rose, purple and aqua. I highlighted the images with tiny dots after die cutting the images. I popped the mice and mail onto fun foam for some depth and demension, and mounted everything onto the background panel. I decided I need a larger statement for the sentiment so I used Big Scripty Words from Lawn Fawn and the coordinating die, which I also used to cut from fun foam. I applied some tone on tone stamping with a remnant of the aqua cardbase, and stamped a sentiment from the Huggable set, that I mounted below the scripty words die.

Once everything was assembled I finished it off with a few iridescent jewels... and voila! I really love the look of this finished card and the color board. I’m planning on using this colorboard all month long and love the different variations I’ve been achieving with the color palette. I hope you get the chace to play along and make sure to use the hashtag #brimoodboard so I can find you. Don’t forget I am hosting a Color Challenge on my personal blog, PopsiclesticksCreates , all month long, and you can link in your projects for a chance to win a gift certificate to the Butterfly Reflections Ink store.

Thank you for stopping by,
Davina

Tuesday, January 7, 2020

XOXO with Penguin Palace Stamps

Hello crafty friends. Today I’m sharing a super sweet Valentine using an adorable Penguin Palace Stamps set called Hedgehogs in Love. I really wanted the main focus of this card to be on this cute little pair so I tried to keep it as clean and simple as I am able to.

I started this card by selecting a Pretty pink floral paper and running it through the Big Shot with the largest die from the Cross Stitch and Dots rectangle frames. These dies are really fantastic and give a great cross stitched edge with a unique dot pattern. Next I cut a smaller layer from bright white cardstock. I very gently used Distress Oxide Ink in Spun Sugar and a blender brush to ink in some gradient pink hearts using the Rain of Hearts stencil. I’m always very heavy handed with inking and coloring, so I had to be extra careful not to over do it.

I stamped this pair of Hedgies and colored them simply with Copic markers. No crazy blending or layering of colors was needed to achieve a great look. I colored the bow and flower to match the pinks from the pattern paper and used a piece of matching scrap cardstock to cut the XOXO from. I adhered my couple and word die cut using liquid glue, and then carefully stamped the sentiment underneath using my stamp platform. This stamp set has multiple lovely sentiments and a few other illustrations as well.

I mounted the card panel to the patterned paper, then onto my cardbase, using Scor Tape. I debated adding sequins or jewels, but then thought it didn’t need them, and it would take away from the rare flat mailable card I created. So I stamped a heart overhead and colored it in. I really love how delicate and sweet this turned out. It would be the perfect design to mass produce if you need multiple valentine greetings.

Thank you for stopping by,
Davina

Sunday, January 5, 2020

January Color Challenge with Butterfly Reflections Ink

Hello Everyone and Happy New Year! Now that the hustle and bustle of the holidays is winding down, it’s time to settle down and catch up on projects and make decisions about my limited time. I’m very grateful and happy to be continuing on the Butterfly Reflection Ink DT and trying to bring focus to the very beautiful Mood Boards that they feature every month. Although I only tried it twice last year, I want to carry on offering the fun BRIMoodboard Color Challenge here on my personal blog. I really enjoyed seeing the projects that you linked into my “party” and I loved sharing them on my Insta stories. So hopefully you want like to play along also. I will be offering a $20 gift certificate to the Butterfly Reflections Ink online store to a randomly selected entry at the end of the month. Yay! Who doesn’t love free stuff!

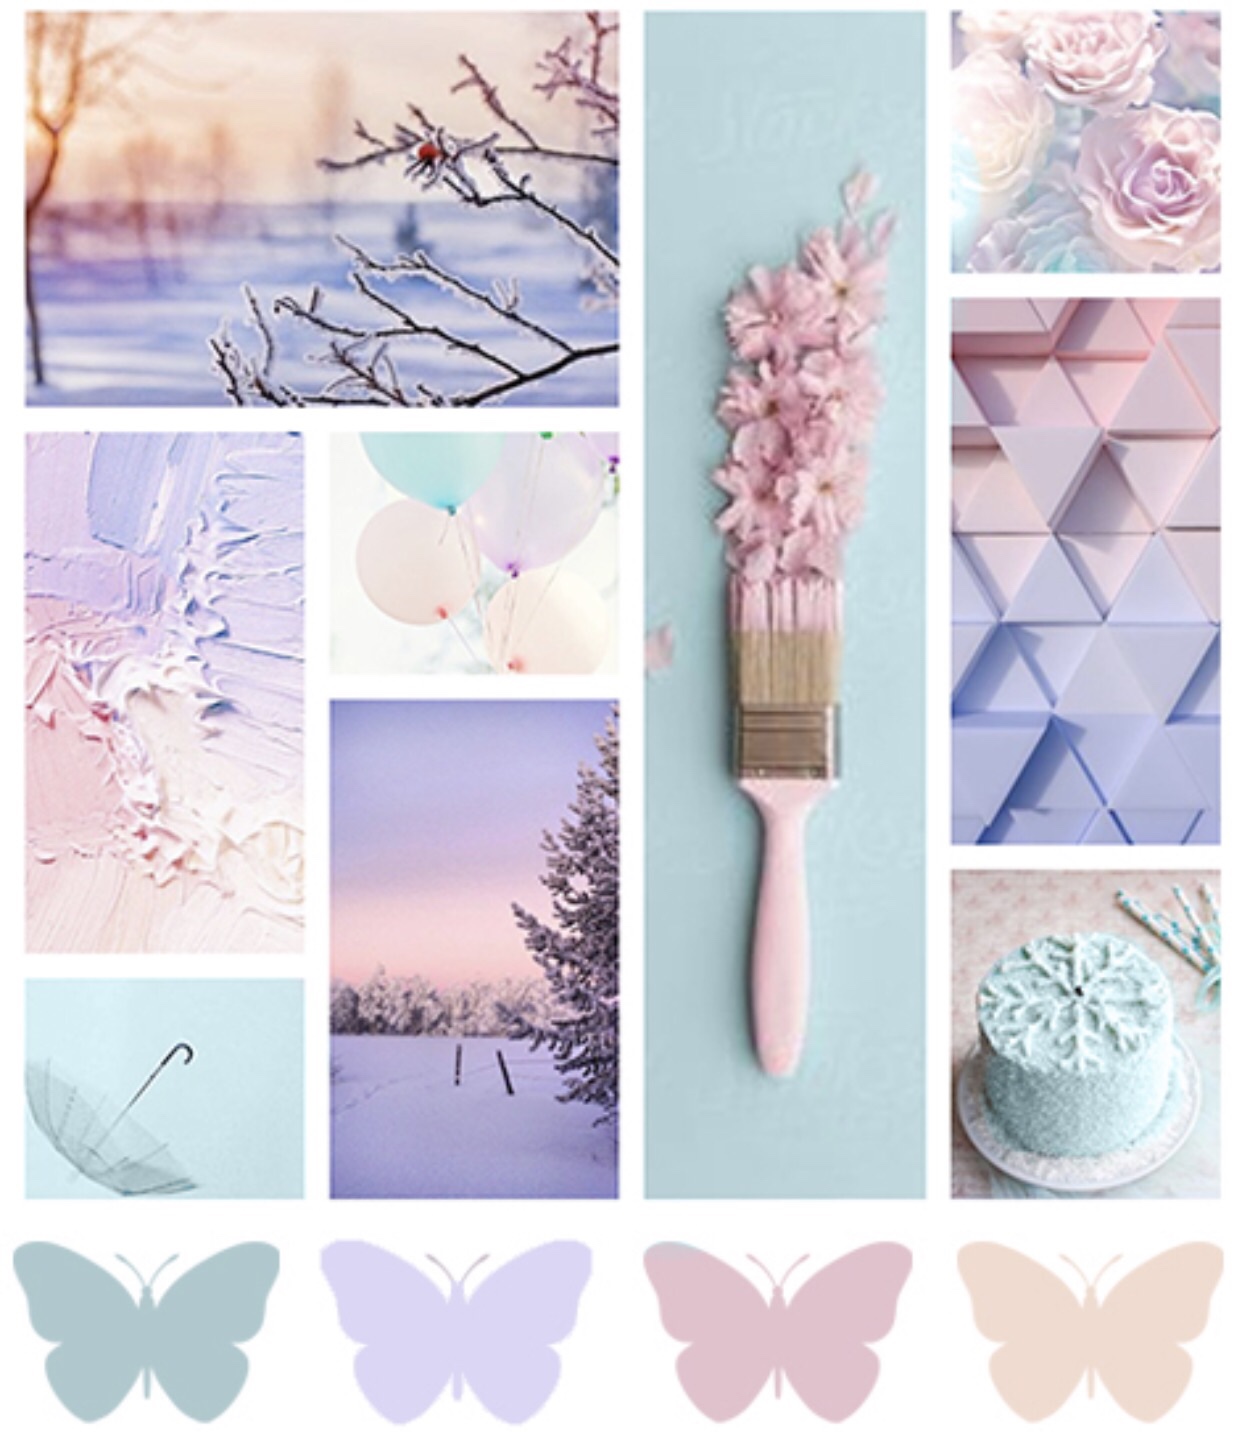
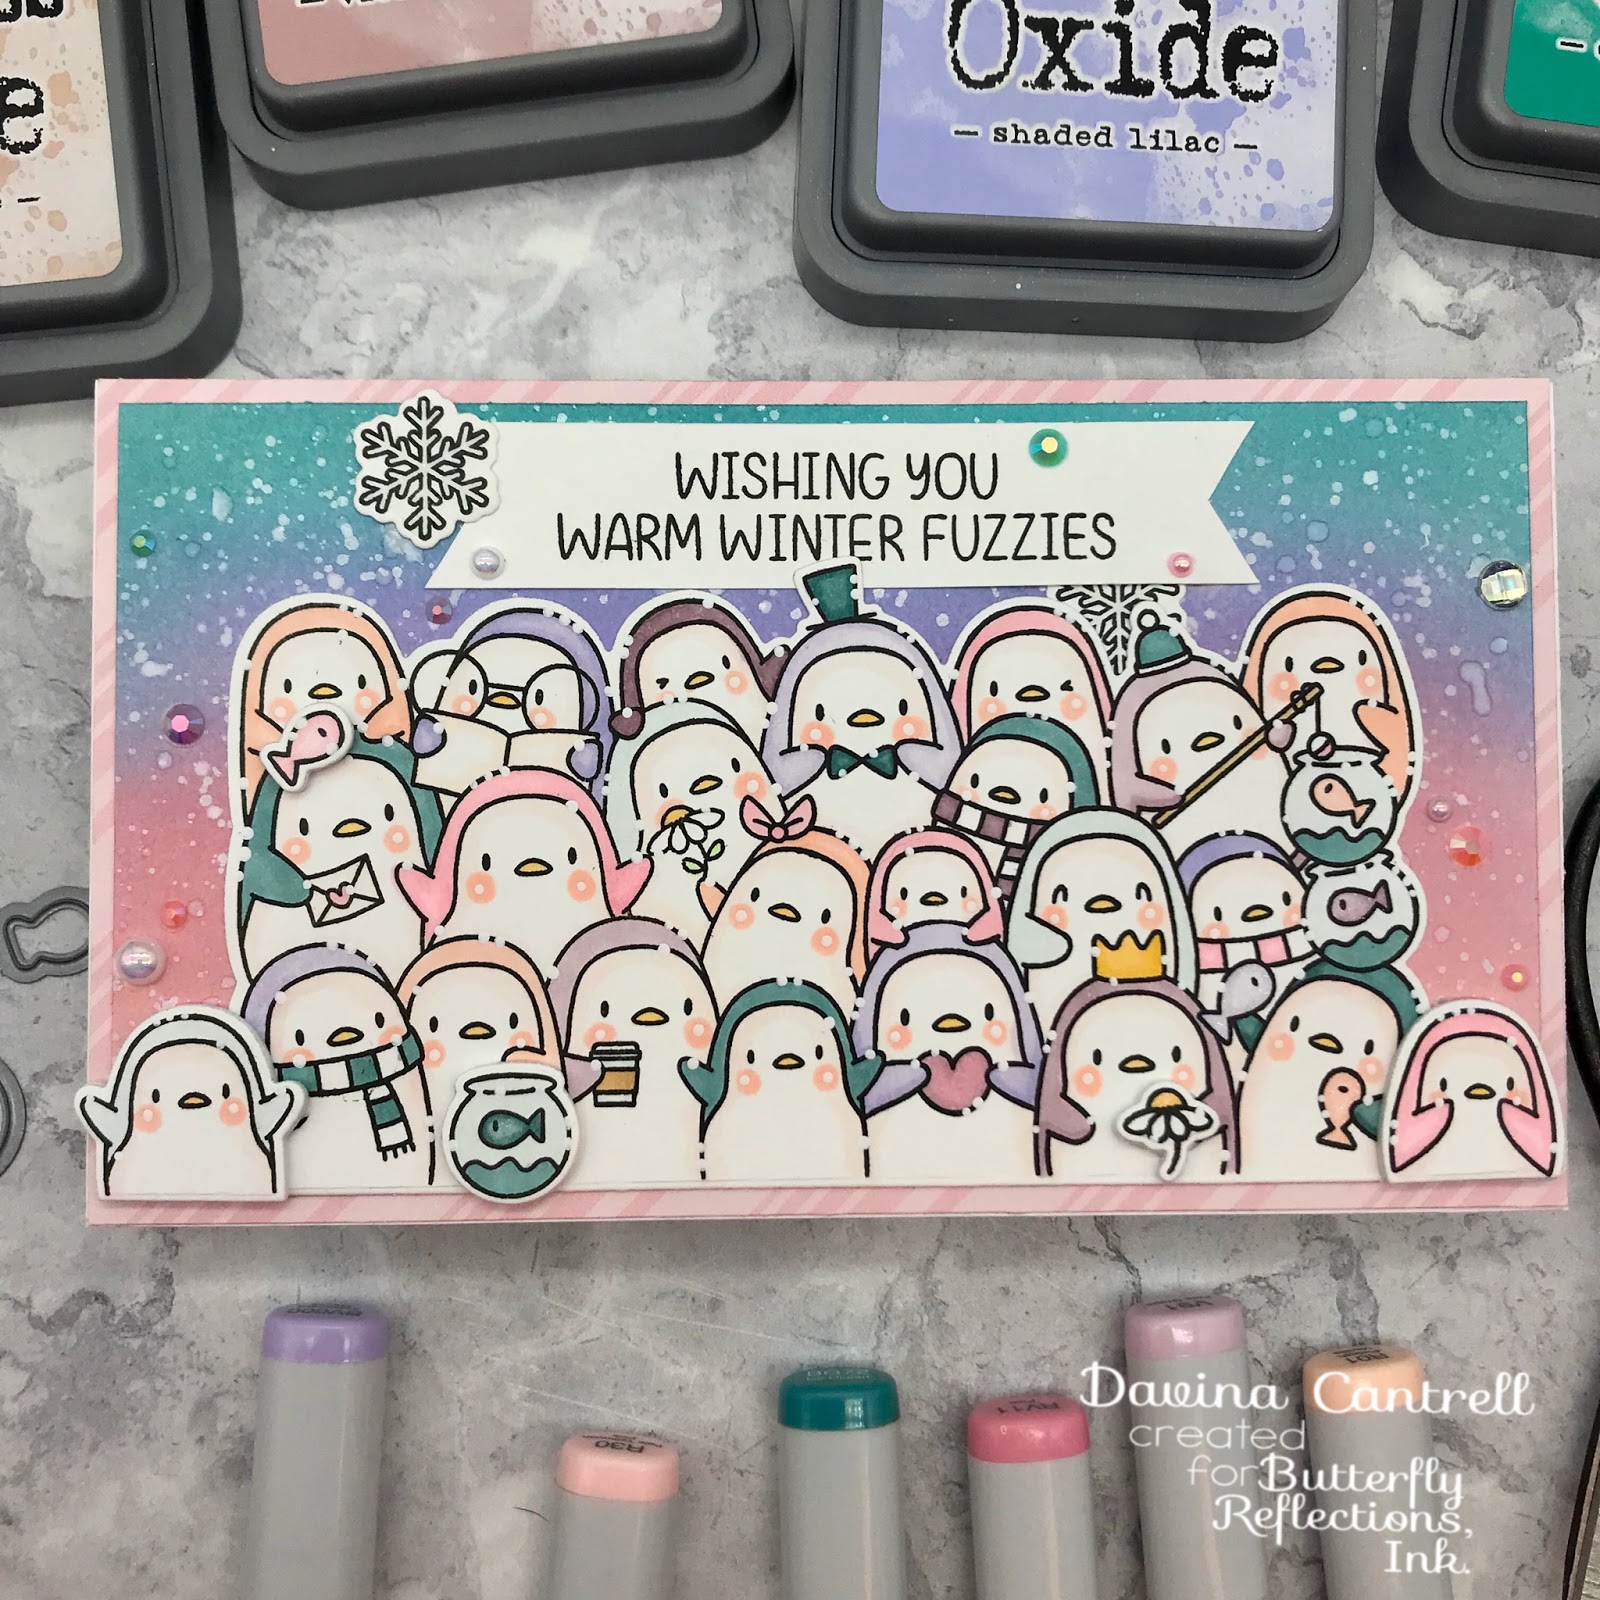
This month we are starting off the year with a gorgeous dusky pastel winter palette. The colors are so beautiful that I know you won’t have any problem getting inspired. The card I whipped up this morning uses all the shades of cotton candy and winter wonderlands, with a touch of Mama Elephant whimsy. I used the super fun Penguins Waddle stamp set and coordinating Creative Cuts to stamp and die cute this large image. It was very fun to color and highlight with little white dots and a few splashes of glittery wink of Stella. I also popped up some of the additional images on Fun foam for a little extra oomph.

Once I had my images all colored up, I created an odd sized card base that fit into some random envelopes I had in my stash. The card base is 4 x 7 inches. I cut a piece of pink striped pattern paper at the same size and trimmed a piece of Bristol smooth cardstock to 3.75 x 6.75. I used Distress Oxide Inks  in Tattered Rose, Victorian Velvet, Shaded Lilac, and Evergreen Bough and blended them into an ombré transition across the length of my panel. Then I splattered with clean water, white ink, and metallic Silver ink to create the glittery fun background.

Once dry I adhered my images with my Lawn Fawn Glue Tube and sprinkled about some perfectly hued rhinestones from a Lucy Abrams collection called Tinkerbell. I really love how this whole thing turned out and I hope that you make the time to craft your heart out and create something with this incredible Mood Board.

Please use the hashtag #brimoodboard when you share your card online so I can find it, and tag me @popsiclesticks so I can share your project. But most importantly, PLEASE enter my Color Challenge here on this blog post using the following link and enter for your chance to win a $20 gift certificate to Butterfly Reflections Ink.

All brands sold at Butterfly Reflections Ink are welcome, and all mediums are encouraged. Please submit a new and original card, journal page, or scrapbook layout here in the link below.  This challenge will be open until January 31st at 11:59 and I will announce a randomly selected winner within a couple days.

Always remember to play nice, this is a safe place for everyone and ingnorance won’t be tolerated. This challenge is open to everyone and all levels are gratefully accepted.  It is unfortunate that I have to add this disclaimer but I am just a regular crafty person and not a professional or business
with a legal team and advisors. I just want to be able to get crafty with all of you wonderful people :)
You are invited to the Inlinkz link party!
Click here to enter

Friday, January 3, 2020

Heffy Doodle Release week Blog Hop!


 Hello Heffy Doodlers, and welcome to the Heffy Doodle Release Blog Hop! The new release is now available for purchase from Heffy Doodle and official retailers, and we are celebrating with lots of inspiration and a giveaway, too!


There are so many wonderful products to share in this new release, and so much incredible inspiration from the entire design team, that I have no doubt that you will “need it all”. So make sure you follow along the hop list that I will share at the end of this post so that you don’t miss a thing, and for your chance to win some pretty amazing prizes. 


Today I’m sharing a bright sherbet colored design using a combination of several of the new release items and a few previously released goodies. I love to combine products and really fill the page to create my scenes and it wasn’t hard to achieve gorgeous results with these new Heffy Doodle products.


The first thing I started with was my background layer, I used the new Stitched Hearts Background Die to cut a 4.25 x 5.5 panel from soft pink cardstock. I lightly inked the edges of the panel with Spun Sugar Distress Oxide Ink to give a little dept, and splattering with glittery Perfect Pearls and a metallic blush pink ink. Next, I used a same sized stitched rectangle die to cut two panels from bright white Neenah Solar cardstock and vellum. I used the stitched Silver Lining Cloud Borders to trim those panels, to make layered clouds, before gently inking the edges of the shorter white cloud with Spun Sugar Distress Oxide Ink.


Next I stamped my images from the My Little Angel stamp set and colored them with fun sherbet hues, before using the My Little Angel Dies to cut out the characters. I love that the dies cut out the hands so they can hold the accessories. After my die cutting was complete I used acrylic paint and a dotting tool to add tiny white dot highlights to my images, then I used a glittery Spectrum Noir Sparkle brush to add shimmer to the halos and harps. 


I die cut the script To My , with the new word dies, from the remainder of the pink cardstock. Then I used a small banner die from the previously released Tag Along Die Set  to stamp my sentiment from the My Little Angel stamp set. Using a verity of glues and adhesive tapes I built my scene. I secured the vellum in the lower portion where I knew it wouldn’t be visible, then my inked white cloud layer over top. Next my “guardian angel” banner centered on the bottom, with the “To my” overlapping on top. The green haired angel appeared smallest to me so I added her to the top portion of the sky so the perspective seemed correct, then I staggered my remaining angels in the center. I added the music notes across the scene and a few clear sequins to finish it all up. 


To celebrate the new release Heffy Doodle will be giving away a £50 voucher to the Heffy Doodle Store!! Make sure to comment on each stop in the hop to be entered for your chance to win. The winner will be selected randomly and announced on the Heffy Doodle blog on January 10th.

I hope you like this little tutorial and I hope that visit everyone in the link. You should have arrived here from Amanda Fitterer, and the next stop is Mindy Baxter. Thank you, Davina