Tuesday, March 31, 2020

Penguin Palace New Release day 2

Hello friends! I’m back with a few more projects to share using the newly revealed Spring Release from Penguin Palace Stamps. Today we are sharing inspiration from 2 of the 5 stamp sets.

The first is a punny emoji set featuring coffee, teas, and cola called  There’s No One Like You. A fun and playful way to let someone know you love them. I created a pair of sweet and simple  4 Bar cards that were a snap to put together, and the smaller size of these, are perfect with the scale of the stamps. I trimmed some patterned paper to 3.5 x 4 7/8, then die cut 2 three inch circles.

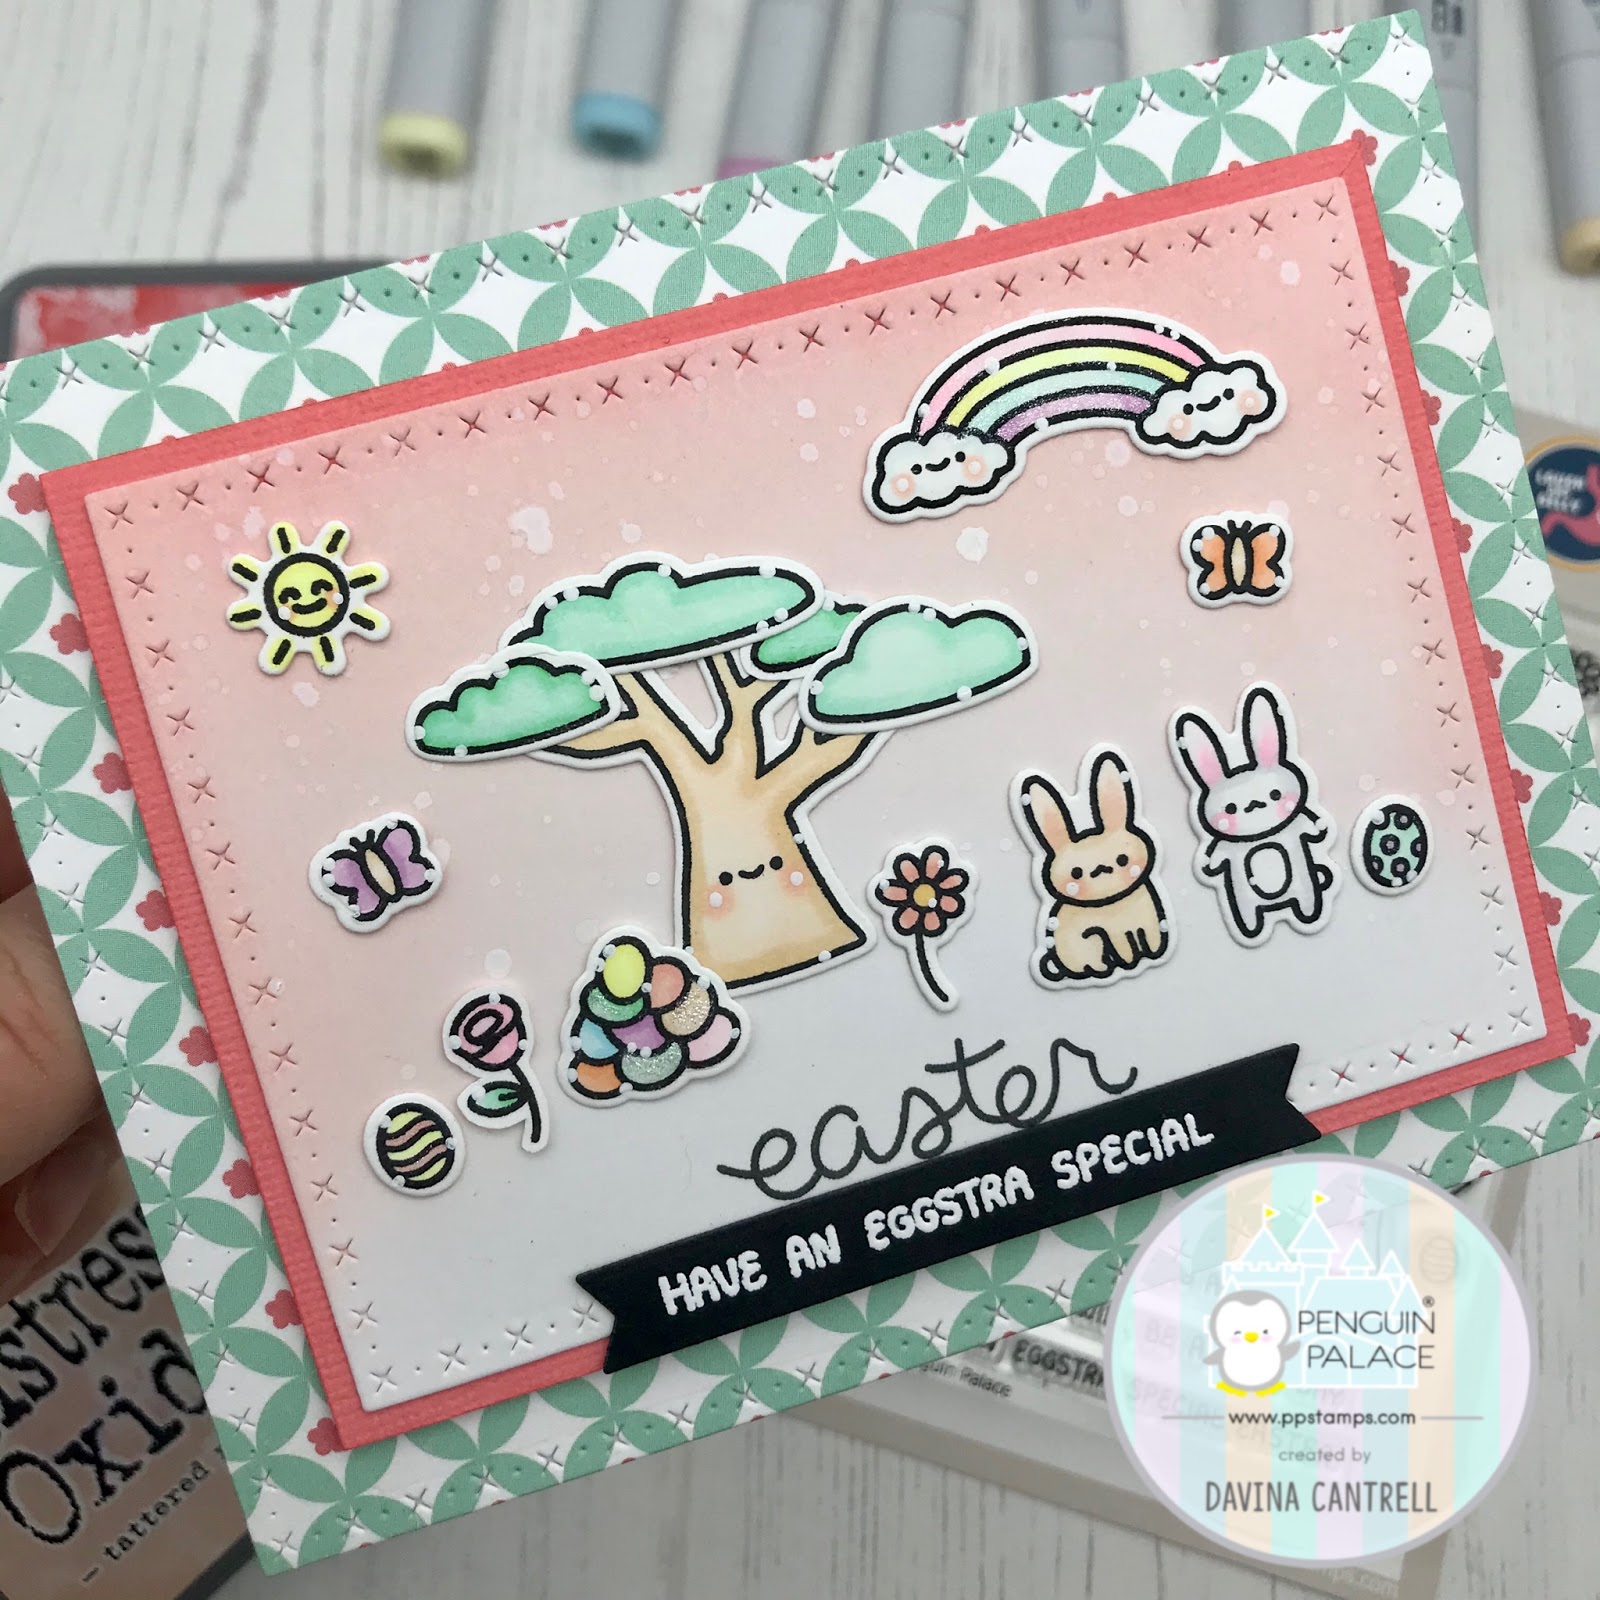
Using Distress Oxide inks in matching colors, I inked an ombré background onto each. Next, I splattered with white and Glimmery  Perfect Pearls. I stamped and Copic colored my images before cutting out with the coordinating Penguin Perfect Cuts. I brushed some glittery Wink of Stella onto the images and adhered the images onto the circles. I stamped the sentiments using colored ink, and mounted everything onto some foam tape.

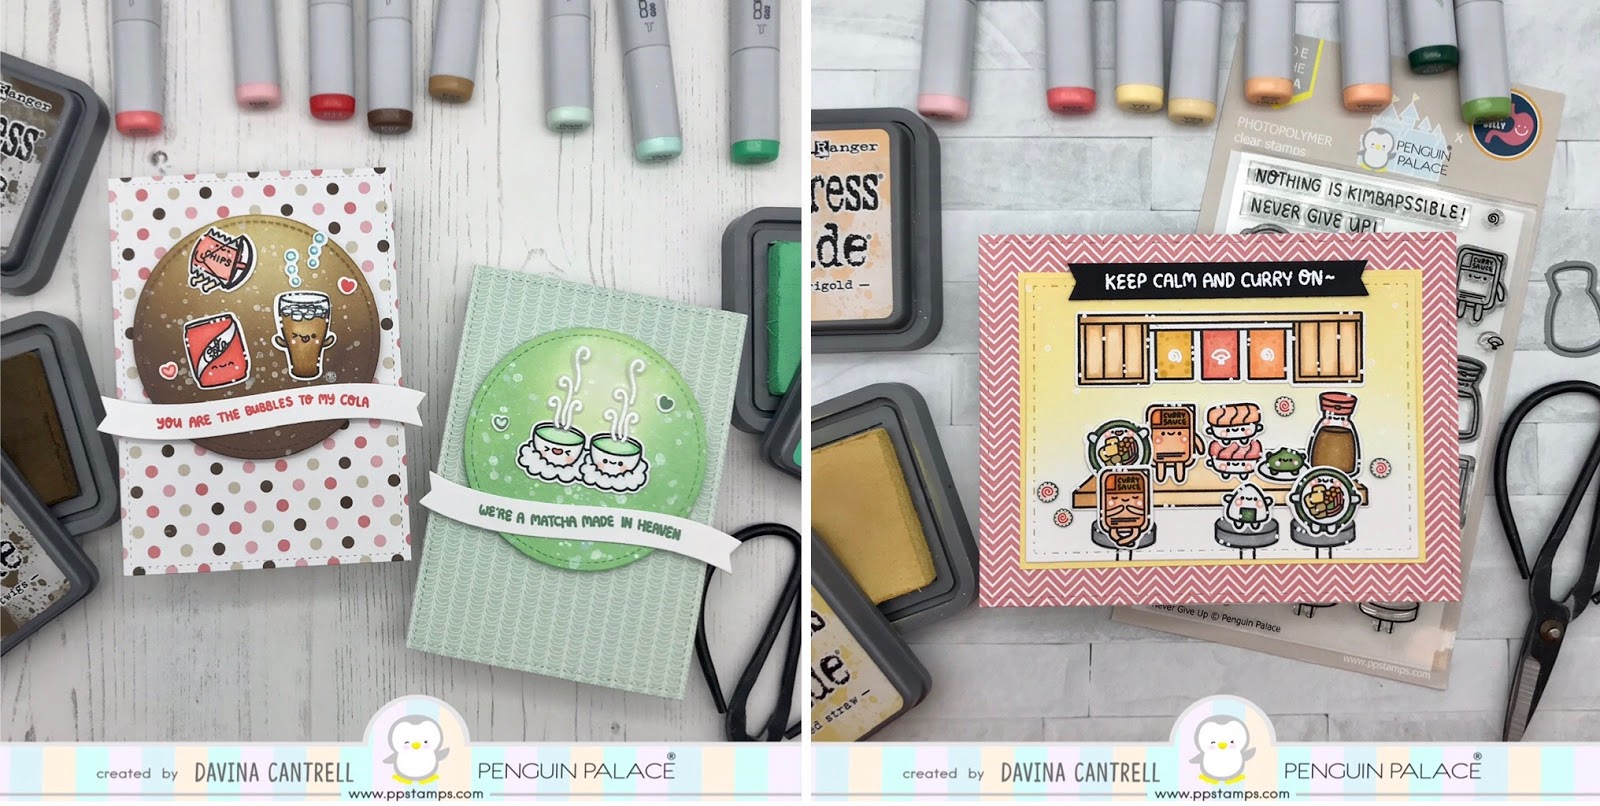
For the second card I used the super adorable Sushi Themed set called Never Give Up, and a lot of the same techniques from my previous cards. I love the upper shelf stamp that is included along with the table top. It makes it perfect to recreate a Sushi Bar. I used every single stamp in the set to create this card and love the Keep Calm and Curry On sentiment that goes along with the little curry sauce packets. All of these smiling kawaii style images are so sweet. I added planty of glittery Wink of Stella to the seaweed and sashimi. I love that I thought ahead to make a pink ahi and coral salmon! Did you notice the incredible Dots meet Dash frame dies, those are also some of the new stand alone dies. Such amazing detail! I heat embossed the sentiment onto a black banner and mounted on top to balance everything out.

I hope you enjoy these glittery cards and and thank you for stopping by. Check back tomorrow for another great preview,
Davina

Monday, March 30, 2020

Penguin Palace Stamps New Release

Hello Crafty Friends! It’s release time over at Penguin Palace Stamps, and I have some fun projects to share with you over the next few days. There are also some giveaways, of all 5 stamp sets and stand alone dies, going on over on the Penguin Palace Blog so make sure you head over and get entered.

Today I’m featuring a new stamp set called My BFF. It’s full of great springtime images, like little kitties, some Easter images, a buildable tree, and plenty of Punny sentiments.I created some paper layers using the Cross stitched and dots Layer dies, from patterned paper and Bristol smooth cardstock. I also free hand trimmed a textured cardstock layer to place in between the two. I very gently inked some Tattered Rose and Abandoned Coral Distress Oxide Ink onto the Bristol paper and splattered with water and white ink.

I stamped my images onto bright white cardstock, then colored with copic markers. After die cutting with the coordinating Penguin Perfect Cuts, I highlighted my images and adhered them to my panels. Once everything was glued down, I added some glittery sparkle with a Wink of Stella glitter brush pen.

To finish up my card I heat embossed the sentiment onto a black banner strip that I adhered toward the bottom of the scene. I love the details that the stitched dies give my layers, and how the little tree reminds me of a Bonsai tree.

Thank you for dropping by and make sure you head over to the Penguin Palace Blog for details on the giveaway and how you can save 10% during the pre release sale.

Davina

Saturday, March 21, 2020

Party Animal with Reverse Confetti

Hello Crafty friends! I’ve got another Fetti Friend project to share with you, and it’s bright and fun, just what we need in these crazy times. Most people are getting cabin fever with the social distancing and self quarantine, but I, as a card maker and crafty-holic, am living my best life. Creating and cooking all day haha. I might get too comfy and not go back to work when all of this is over.
I made a sweet and simple birthday card to add to my stash using a combination of new and old Reverse Confetti products. Some of the products I used are from the very recent March release like Chalk it up stamps and dies, and the Double Stitched Window cover panel Confetti Cuts. I also used the Party Animals stamps and dies and some star and circle garland dies that are so vintage, they aren’t even on the website any longer. And that birthday typed paper in the background is from before they ever offered patterned paper pads, and sold little packs of Quick Card Panels. It’s crazy what you find when you digging through hoarded bins of crafty treasure!
I used the Quick Card Panel to pull my color choices from, then found some beautiful magenta cardstock to cut with my cover panel. Using white embossing powder, I heat embossed the sentiment towards the bottom of the panel. Then I cut the garlands from some scrap glitter cardstock and vellum, and adhered it in the window using double stick tape on the back. Next, I attached the typed paper behind as well.
I stamped and colored my images using black ink and copic markers, and after die cutting with the coordinating dies, I cut them again from fun foam. I glued the shapes together and held them down under an acrylic block to dry flat. I like to add white dotted highlights after the die cutting process, to prevent any smudges, then adhered my stamped images to the foreground of my card. I love the 3D look the fun foam gives.

I finished it up with a few Matte Gold sequins and some clear glaze on the noses and eyes. Thanks for  stopping by and I hope you and your loved ones stay safe and healthy,
Davina

Monday, March 16, 2020

Stock Your Stash with Reverse Confetti


Hello crafty friends! Today I’m participating in the stock your stash challenge with Reverse Confetti as a Fetti Friend. The theme this month is Easter/Spring and I made something full of both.

My fun Easter card is a tall, slimline, card that I created combining the brand new Spring BunniesChalk it Up, and an older set Hippity Hoppity. I can’t say it enough, but I love the illustrations by Dawn Machell. They are cute, quirky, and absolutely adorable. But the best is that her style has stayed true and the stamps sets from years ago, can combine seamlessly with stamp sets from this release!

I stamped my images onto bright white Neenah cardstock, and colored them using a variety of Copic Markers. Next, I die cut my images using the coordinating dies, before adding small white dotted highlights.

I always make my slimline cards sized at 3.5 x 8.5, so I created some layers from colored cardstock and patterned papers in smaller increments. The striped patterned paper is actually a 6x6 piece paper from the Winter Solstice 6x6 pad that I carefully lined up to look longer. Then, I cut a piece of Bristol Smooth Cardstock down to 3 x 7.75 for the image panel and inkblended my background on it. Once I was happy with the inkblending, I splattered clean water, white ink, and gold metallic ink onto it. Once dry, I adhered my images using a variety of glues. I put the largest images up front so the perspective appeared natural, and my cute cloudy sun up high in my aqua sky.

Once all my goodies were in place, I realized I didn’t leave space for the sentiment banner I had cut, so I decided to go ahead and heat emboss the sentiment onto the scene in white. I finished it off with a sprinkling of iridescent sequins.

I really adore this scene and hope that you like it as well. Thank you for stopping by,
Davina

Saturday, March 14, 2020

Unicirns and Glitter

Hello my crafty friends. I’m ready to bring some glittery spring happiness to your day. Normally I would be posting a card to promote the beautiful March Moodboard, and talk about the color challenge that we are hosting on my blog and on Instagram. But, I received my new MFT in the mail, and could not hesitate to use it! So Unicorns and Glitter it is! (I’ll have some Mood Board inspiration for you very very shortly!)


I adore the fun Unicorn headbands and ruffled dresses so much on the images and loaded them up in pastel colors and glitter. I stamped these cuties with my stamp platform, and colored them with Copic Markers. After die cutting with the coordinating Unicorns and Glitter Die-namics, I added small white dot highlights and tons of sparkly Spectrum Noir Sparkle glitter pen to the images.

Next, I cut two panels of Bristol Smooth Cardstock using MFT wonky Stitched Frames. I trimmed one down using MFTs Grassy Fields Dies to create a grass layer 1 1/2 inches high. I inkblended my background onto these panels using Distress Oxide Inks in Peacock Feathers, Tumbled Glass, Twisted Citron, and Mowed Lawn. Then I splashed them with clean water and white ink.

I adhered my images using a combination of liquid Lawn Fawn Glue Tube and foam tape. Then, instead of getting out some sequins, I stamped the sparkle/stars with Peacock Feathers DistressOxide Ink and quickly heat embossed them with Wow Clear Sparkle Embossing Powder . I mounted my inky layer onto some textured Lavender cardstock, then the whole piece onto my card base using scor tape.

I love the final results and I feel like this came together rather quickly. Probably, because I was so excited to use these stamps. I hope that in these difficult times you take some time to create something lovely that makes you smile.

Thank you so much for stopping by,
Davina

Sunday, March 8, 2020

Reverse Confetti New Release Blog Hop


Hello crafty friends! Today is release day for Reverse Confetti and they are celebrating their 50th release with a Blog Hop. I’m so honored to be participating this release as a Fetti Friend. I am a long time fan of this great company. I’ve shared many cards over the past few day using the new products and I have a new card to share today using a combination of images from several sets.

I wanted to make a fun Crafty Card that I could send, and although it wasn’t my intention to make a Valentine-ish card, it sort of resembled one when I was done. But that’s ok, everyday is the perfect day to send a hug and some handcrafted love.I stamped several cute critter characters and craft supplies from multiple sets. Chalk it Up, Crafty Critters, and the large pencil from School Days. I colored all of the images with copic markers in colors to match with a sheet of Sweet as Sugar  patterned paper. After die cutting with the coordinating dies, I added small white dot highlights. I stamped a sentiment onto a little white banner using worn lipstick distress oxide ink, then mounted the banner and several of the small accessories onto die cut fun foam shapes. I love creating these thick 3D sticker like images. They give so much dimension.

I gently inked a little antique linen ink onto the edges of a small white panel, then splattered with watery distress oxides. Then I layered this panel onto some textured pink cardstock, and finally onto the patterned paper. I arranged my images and adhered them with liquid glue. Using the adhesive backing of the fun foam to mount my “thick” foam shapes. I finished it off with a small sprinkling of iridescent clear sequins.

I love how this turned out and how all of Dawn Machell’s illustrations work perfectly together. Here is a recap of the previous cards I shared during the countdown to Confetti. Make sure you hop along the Design Teams posts, to see this entire release, in its glory.


Make sure to hop along to see all of the incredible inspiration!


Thank you for stopping by,
Davina

Saturday, March 7, 2020

March BRIMoodboard Color Challenge

Hello my Inky fingered friends. I was hoping to have this up a few day sooner, but I have been completely swamped. I’m so sorry. With that being said, let’s get down to business

There is a new Moodboard available this March and the colors are so fresh full of Spring. I can’t wait to see what you create with the Canary Yellow, Rose Pink, Cobalt Blue and a deep Midnight Blue.
I’ve  used this color board already several times for my DT posts with Reverse Confetti, but for this post, I created a fun Lawn Fawn nighttime stargazing scene. This was actually the first time I had a chance to play with my newest Lawn Fawn haul. I used Super Star, and Dandy Day for this card, and    I am so happy with the results.

I started this project by inkblending a piece of Bristol Smooth Cardstock with  Distress Oxides inks in the colors Tumbled Glass, Blueprint Sketch, and Chipped Sapphire. I splattered it with clean water, white ink, and metallic gold ink.

Next, using dark navy cardstock, I cut two panels from the new Lawn Fawn Meadow Backdrop. I only purchased the landscape as of now, but I was able to use a regular rectangle stitched Die to trim the landscape grassy hill to fit my scene. I kept one piece together, with washi tape on the backside, and removed the upper portion from the second piece. I heat embossed a sentiment to the bottom of the shorter piece and used a little metallic gold water color to fill in the letters. Then, I gently blended some Scattered Straw Distress Oxide ink on to the the very edges, to give the grassy hills a soft glow. I used liquid glue to adhere the taller layer onto my inkblended panel, then I used foam tape to attach the shorter layer above that.

I stamped images from both sets onto Bright White Neenah cardstock and colored with Copic markers. I used YG23 for the green stems of the dandelions, and went over the green with B95 to tone it down to a nighttime shade.  I also heat embossed some gold constellations and colored the insides in with the same gold watercolor from earlier. After using the coordinating dies to cut everything out, I highlighted with small white dots.

Finally, I adhered all of my images with Lawn Fawn Glue Tube making sure to create depth and dimension by using all of the layers and panels. I staggered the dandelions behind the first grassy layer, and the critters onto the hills.

Now it’s your turn to put your creative wheals in motion. This month I will be hosting another Color Challenge here on my blog! Starting today and lasting til the end of the month, use the Inlinkz button to add your projects to this blog post. I will pull a random winner on the 1st of March to receive a $20 gift card to Butterfly Reflections Ink online store.

There are a few simple guidelines to my color challenge. Use the hashtag #brimoodboard when you post your project on social media. Using the current color board, please upload new and original cards, scrapbook pages, journal entries created by you (up to 4 entries per person). Any brand that Butterfly Reflections Ink carries is welcomeand any medium. Please be kind, this is no place for judging or rude comments.

I will be sharing entries in my stories on Instagram and please tag me @popsiclesticks ! Let’s spread the word and make this challenge huge!

Thank you for dropping by,
Davina
You are invited to the Inlinkz link party!
Click here to enter

Countdown to Confetti Day #3


Hello my inky fingered friends. Today is Day 3 of the countdown to Reverse Confettis 50th Release! I have 3 cards to share with you today all featuring the incredible critter Illustrations by Dawn Machell.

I used the same color palette for all three cards,  it used variations of colors in each. For example, the pink is a different shade of pink in each card, giving each project a different feel, even though the same four colors are used. Pink, sunshine yellow, blue , and navy.

For the first card I inkblended a rosy pink onto my card panel and splattered it with water, white ink, and shimmer. I stamped my images from School Days  onto bright white Neenah Cardstock and copic colored. After cutting out with the School Days Confetti Cuts, inadded white dot highlights.

I adhered the images onto my inkblended panel then added a heat embossed banner strip. I finished it off with a sprinkling of clear iridescent sequins.

On my second card I used the new Chalk it Up stamp set and matching dies. I also used a new cover panel  die called Double Stitched Window, it reminded me of a decorative Polaroid photo, so I created a shaker card with it.

I trimmed 1/8th inch off of each of the four sides and adhered some clear acetate on the back. I framed it out with thick Tombow foam tape, and prepared my panel.

I inkblended my background in sky blues and green before splattering with the same combination as my first card. Then I stamped and copic colored all of my images. I gave a playful dotted texture to these images before highlighting and glueing down my images.

I added a generous pile of sequins to the center and mounted my “Polaroid” over top. Then I mounted the entire shaker upon some pink textured cardstock. I love that the glossy heat embossed texture is shiny right next to the reflective acetate.

On my third card, I used the new Spring Bunnies stamps and dies. I inked my sky onto the upper portion of the panel creating a crisp deep sky. I loved the sunny cloud from Chalk it Up so much, I used it here too.

I created a little butterfly catching scene and adhered it over a pink embossed banner. I used a trio of hearts from the Huggable stamp set, and used those instead of sequins. I really love this trio of cRds. I used so many of the same elements and colors and techniques. Yet achieved such different results in each card.

There will be a $15 Reverse Confetti gift certificate  for one lucky blog commenter, who hops along and comments on each Designers Countdown to Confetti Sneak Peeks. Comments will be closed on the 7th at noon with a winner announced at 5pm CST. There’s a second prize for those who comment on the Reverse Confetti FB so head on over Reverse Confetti Facebook 

Eileen Ong
Thank you for stopping by, Davina 

Friday, March 6, 2020

Countdown to Confetti Day #2


It’s day 2 of the Countdown to Confetti, and I have a new project to share with you. I feel like I checked so many boxes with this bold Easter Card, and it wasn’t intentional.

One of the great new stand alone confetti cuts this release is this incredible Diagonal Scallop Cover Plate. It’s perfect for creating backgrounds. I had planned to use the colors from the brand new March MoodBoard for this project, so when it was time to pick a color scheme, there was very little question.

 I selected a deep blue cardstock to cut my panel from, and inked around the edges with chipped sapphire distress oxide ink. It’s not overly noticeable, but I wanted the center to be slightly lighter in color. Next, I inked up some white Bristol Smooth Cardstock in shades of pink and yellow to create a soft ombré background to peek through the scallops. I splattered the panel with clean water, and white and gold ink.

I stamped the beautiful tulip flowers and vases from the new set Tulips, and colored them all in in shades of soft yellow, pinks, and blue with my copic markers. After diecutting, I added white dot highlights to my images. I mounted some of the images onto die cut fun foam to make thick, 3D like stickers. I use this technique often, I love the dimension it gives my projects.

I played with the placement of the images, and had originally planned on using one of the sentiments on a banner. But after seeing the the available space on my card front would accommodate another stand alone die, I couldn’t resist! I used the Happy Easter confetti cuts to cut out this fantastic single piece shape. I cut it from gold cardstock and from some more fun foam to balance out the card.

The scripty font is wonderful, and as I’m typing this up, I realized it’s the same font as yesterday’s Perfect Timing set. I adhered everything to my card front using simple liquid glue. Once it was all in place, I used some more of my favorite luxury matte gold sequins.

Thank you so much for dropping in. I hope you stop by again tomorrow and don’t forget the big blog hop on the 8th.

There will be a $15 Reverse Confetti gift certificate  for one lucky blog commenter, who hops along and comments on each Designers Countdown to Confetti Sneak Peeks. Comments will be closed on the 7th at noon with a winner announced at 5pm CST. There’s a second prize for those who comment on the Reverse Confetti FB so head on over Reverse Confetti Facebook 


Thank you,
Davina