Showing posts with label Christmas card. Show all posts

Friday, November 15, 2024

Mama Elephant November Stampede


Welcome to the Mama Elephant Design Team blog hop!

Our newest release is now live and available for purchase in the store!

www.mamaelephant.com


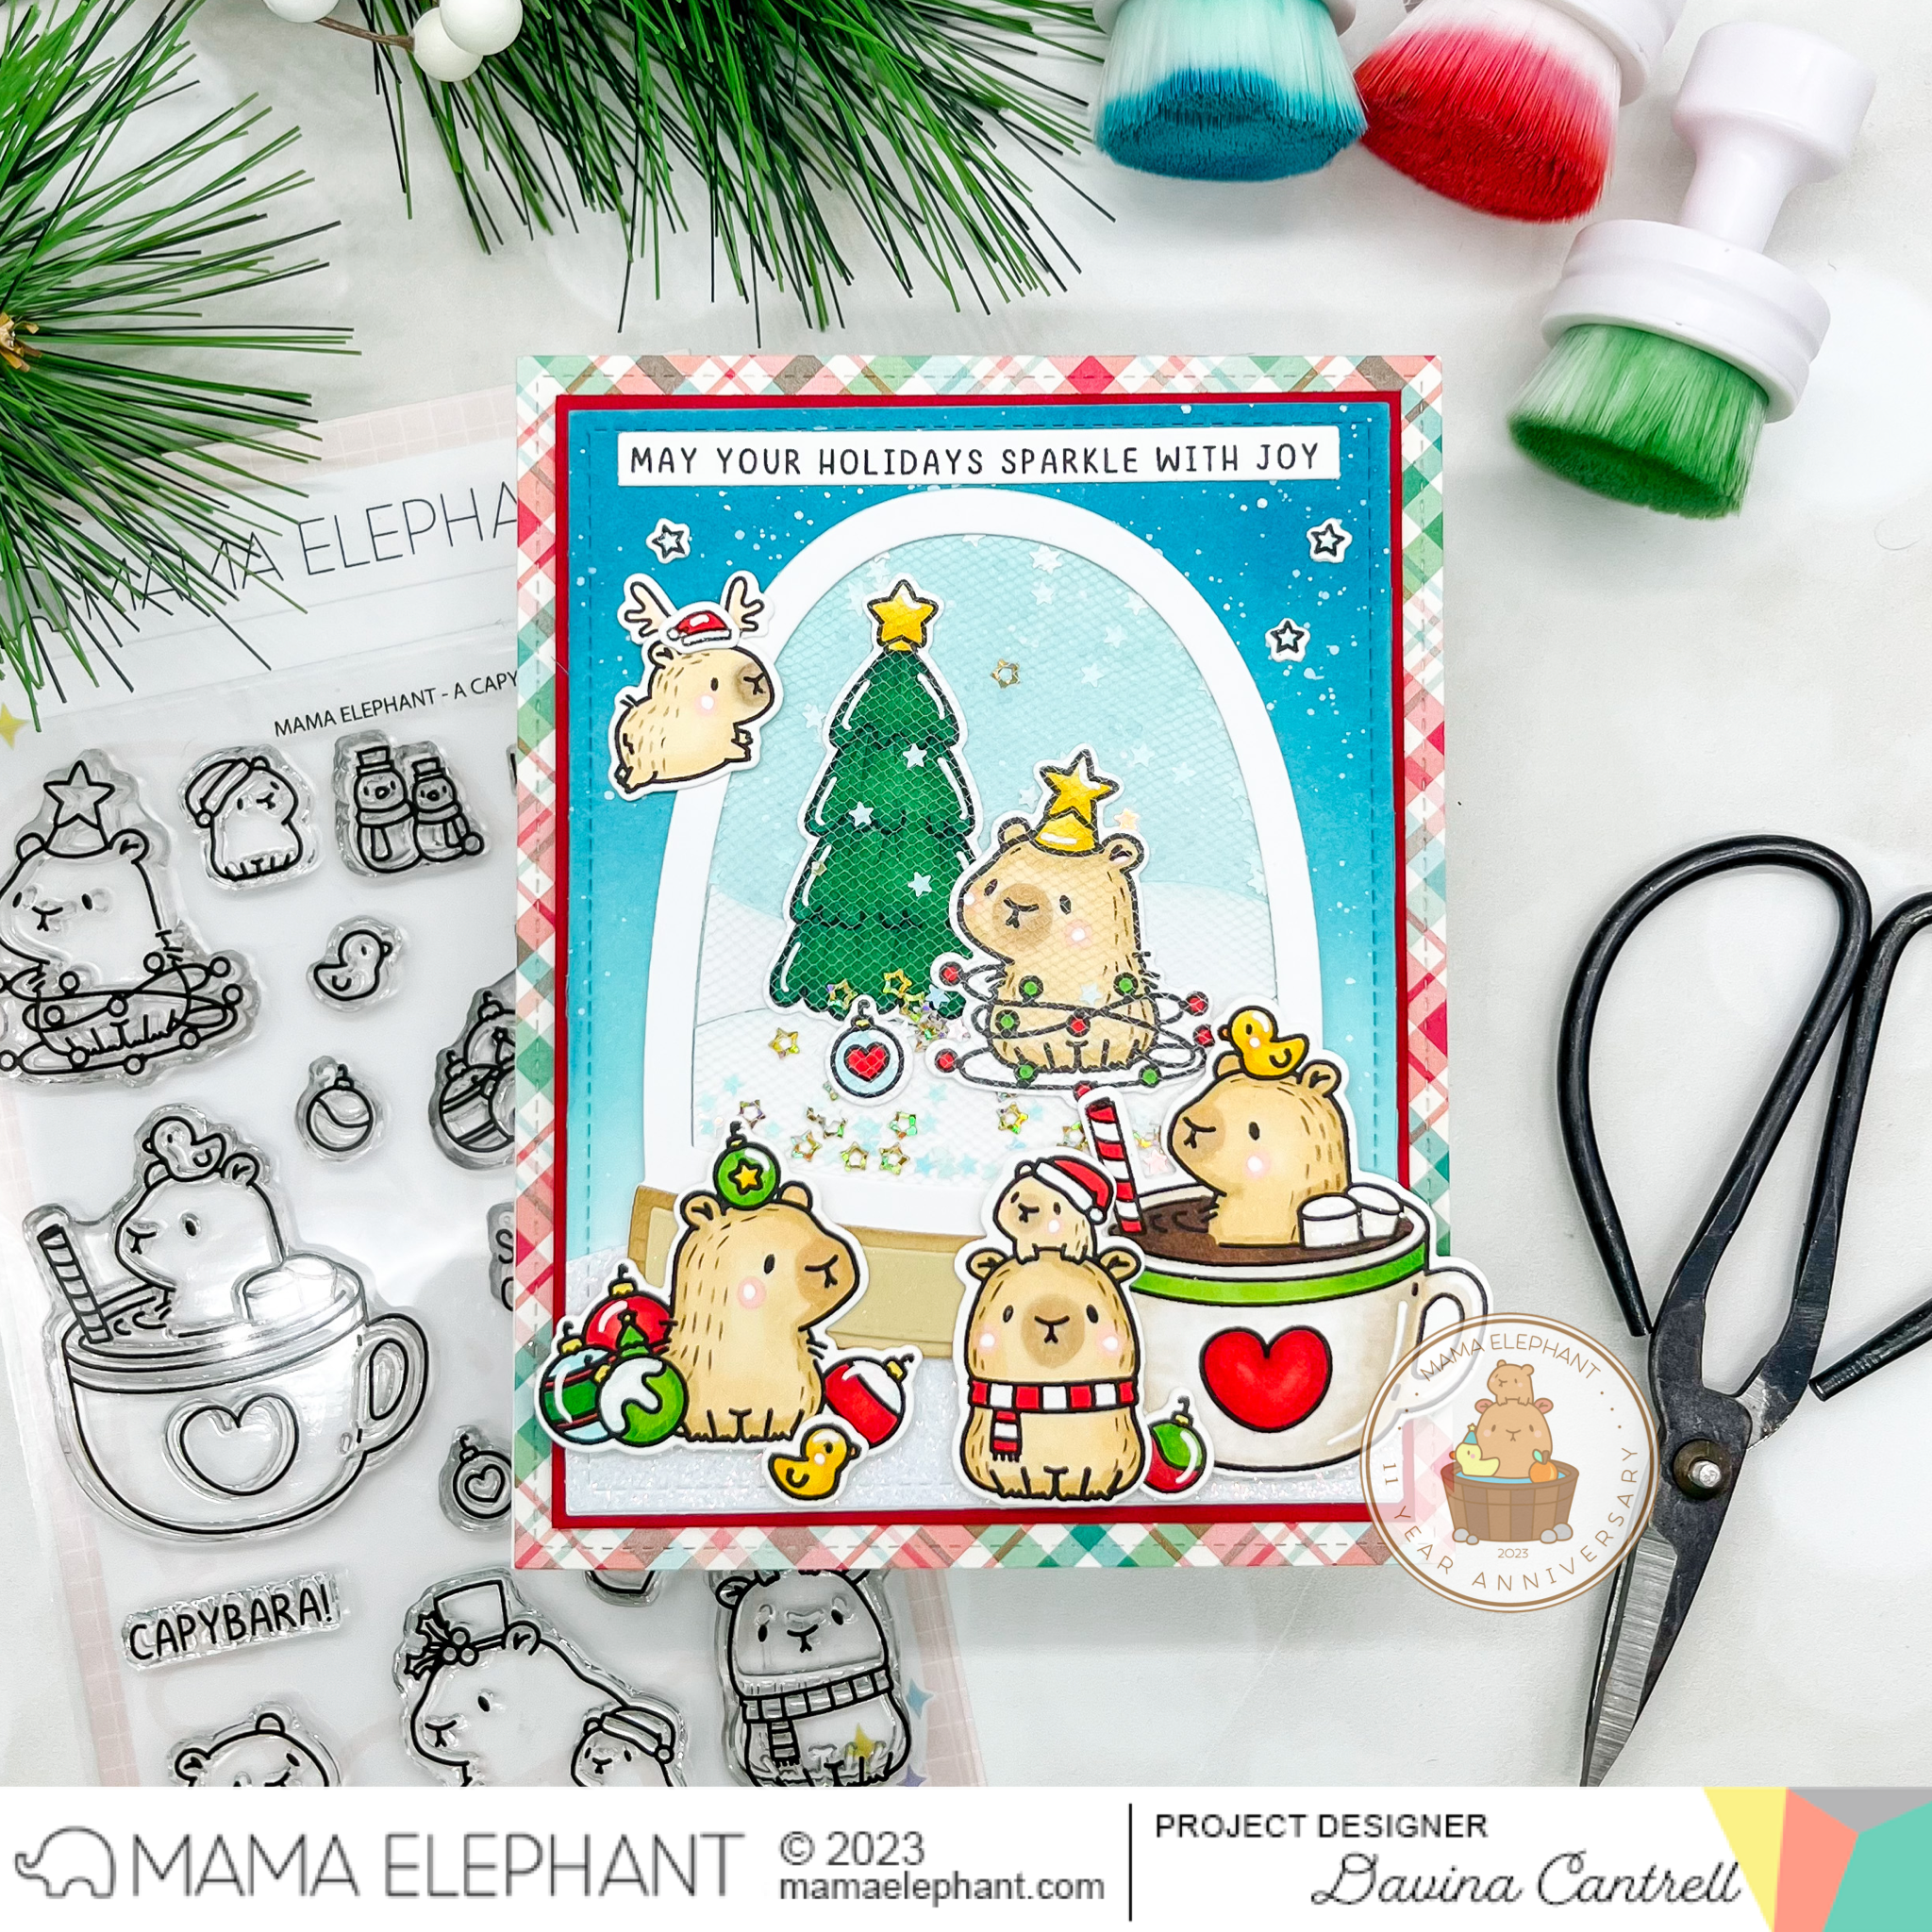
Today I’m sharing a bright and vibrant holiday card using a mix of new and classic Mama elephant products. I used the new Little Elephant Agenda stamps and arranged them onto my Ornament grid background. I put some very busy patterned paper behind the openings, so I decided to layer my die cut sentiment with multi colored cut outs. This sentiment was part of the Penguins Waddle stamp and coordinating die set. 


Check out the rest of the hop for amazing inspiration from our Design Team!


To celebrate the new release, Mama Elephant is picking 1 winner to win a prize pack (winner will be notified in their comment on Instagram, Facebook or YouTube)! Open to Domestic & International (winner pays for shipping)


» 1. Leave a comment on the collective Design Team's Instagram Stampede post
» 2. Leave a comment on our Facebook Stampede post
» 3. Leave a comment on any of the Introduction videos on YouTube
 
Each action qualifies for one entry, max 3 entries per stampeder please and good luck!
(Winner will be announced and notified directly as a reply to the winning comment)
 
Check out the rest of the hop for amazing inspiration from our Design Team!
 
@mamaelephant
@vera_rhuhay
@nicholspohr
@dasmimz
@popsiclesticks
@cre8iveli
@kaliscards
 
Thank you for stopping by! Have a great day from all of us!

Thursday, October 24, 2024

October Mama Elephant Designer Series: Happy Holiday Mail

Hello crafty friends. Davina here with my October Designer Series Project. I’m calling this my “Happy Holiday Mail” card, and used a fun mix of new and previously released products. With the holidays upon us, I wanted to get into the spirit with a bright pile of gifts.

I used images from the new set called Surprise Gi fts and the coordinating dies as the focal point of my scene.  After stamping and coloring my images, I cut them out and got to work on the rest of my scene. The cutie llama with his letter inspired me to make a post box type card. I don’t have any mail box dies, so I created a DIY post box using the B2B Arches Creative Cuts die set. I chose a medium sized arch and die cut it from red carstock, then selected a smaller size and cut another red arch. I removed about a half inch from the middle and it left me with two sections. One arched for the top and a rectangle for the bottom. I inked each piece and adhered them to the larger arch. I stamped and heat embossed letters to form the word “mail” using Layla Letters and the coordinating dies and glued them in place on the top portion. 


I kept up with the postage theme by using the Postage Frame Creative Cut die set, and adhered my mailbox, stamped images and a sentiment word bubble onto some pretty patterned paper in the stitched frame. I then added two more paper layered to build up my card front. With only the top portion of my card looking empty, I wanted to add something pretty.


I stamped some boughs of holly leaf garland and greenery using colored ink, onto both white a green colored cardstock. The recent Holly and Leaves stamps and CC were perfect for layering and creating a lush swag of greenery. I used the boba ball die cut from the Boba Shaker Combo CC to cut a bunch of red berries in only two passes of the die machine. Once all assembled and looking great, I added some glittery Wink of Stella sparkles to the berries. 


I love all of the bright and bold colors, combined with glittery dimension on this card. I also had so much fun mixing and matching my older and new supplies together, that is always my favorite card making technique. I hope this inspires you to give some new life to your craft stash. Thank you for stopping by, Davina 

Tuesday, October 15, 2024

Mama Elephant October Stampede Blog Hop


Welcome to the Mama Elephant Design Team blog hop!

Our newest release is now live and available for purchase in the store!

www.mamaelephant.com


The shaker card I’m sharing today was so simple using the new Serenity Ornament Creative Cuts die set. I added lots of snowy sequins to the center and a cute gnome couple using the previously released Little Gnome Agenda stamps. I built the scene on a dainty scalloped layer from the new Pull Paper Slider Creative Cut die set and finished it off with a Winter Banner Greetings sentiment strip. 


Check out the rest of the hop for amazing inspiration from our Design Team!


To celebrate the new release, Mama Elephant is picking 1 winner to win a prize pack (winner will be notified in their comment on Instagram, Facebook or YouTube)! Open to Domestic & International (winner pays for shipping)


» 1. Leave a comment on the collective Design Team's Instagram Stampede post
» 2. Leave a comment on our Facebook Stampede post
» 3. Leave a comment on any of the Introduction videos on YouTube
 
Each action qualifies for one entry, max 3 entries per stampeder please and good luck!
 
Check out the rest of the hop for amazing inspiration from our Design Team!
 
@mamaelephant
@vera_rhuhay
@nicholspohr
@dasmimz
@popsiclesticks  (you are here)
@cre8iveli
@kleo_arter_ego
@wienerhoneymooners
 
Thank you for stopping by! Have a great day from all of us!

Sunday, October 6, 2024

Mama Elephant Designer Series

Hello crafty friends! Davina here with you to share my Designer Series project. Today I have a bursting at the seem box card, that I made using some of the newly released products, and a few images from a couple of christmases ago. 


I really wanted to capture a festive North Pole candy land type scene and the new Little Agenda Sweets was the inspiration for my card. Initially, I didn’t plan on making a box card, but I stamped out most of the images before I had a design in place. Next, I cut out the larger arched panels using the B2B Arches CC die set. After coloring my images and die cutting with the Coordinating dies, I quickly realized I was going to need more real estate. I used some dies from my stash to cut the side panels and stitched layers from remnants of cute patterned papers I had accumulated, and assembled the box card onto the B2B Arches. Next, I cut some inserts from more matching papers and began adhering the images into place. 


The large gingerbread house went in the back since it would take up all of the space, then I put the little cart in the middle with the adorable llama perched in the opening. I surrounded the cart with large staggered candy canes, and placed the cutest little trio onto the first layer. I added Santa & Mrs. Claus (with a reindeer) from the set called Secret Santa, along with Santa’s bag of toys and a glittery candy. 


To finish this box card off, I used a shimmery white wavy banner from Winter Banner Greetings CC die set, that i surrounded completely with candy and the shop sign from the Little Agenda Sweets set. I love being able to stamp the sign with colored ink (pro tip- use distress oxide ink for small sentiments so it doesn’t stain your stamps pink!) Every single layer of this card is glittery with both chunky glitter accents and sparkly Wink of Stella. 


I hope you love this little card as much as I do, thank you for stopping by, 

Davina 

Saturday, September 14, 2024

The Greeting Farm September Release Blog Hop


The September 2024 New Release is now available for purchase in The Greeting Farm Store! This month we introduced 3 new stamp sets. Our first set called WICKED ANYA has Anya dressed as a witch with her jack-o-lantern candy bucket and cute kitty companion. In our next set, PUMPKIN SPICE SEASON, we have big Anya and Ian enjoying their pumpkin spice lattes because life is better with a lil' spice! Finally, we introduced HOLIDAY ANYA 12 in a new winter outfit with a festive reindeer headband delivering gifts with her little reindeer friend and snowman buddy.

I’m using the beautiful HolidayAnya 12 on this soft and festive card  I just love her poofy pigtails and that pretty reindeer . I paired the images with the largest sentiment from the set, that I framed on a die cut label, and also added some pine branches and a bow. 

To celebrate this release we are having a short BLOG HOP! One lucky fan will take home the entire release!! You have until September 18th, 12pm CST/1pm EST to leave your comments on each Designer's Blog. Then head back to The Greeting Farm Blog to let us know you completed the hop. **Remember to qualify for the prize you MUST leave a comment on each Designer's Blog AND The Greeting Farm Blog letting us know you completed the hop.

NOTE: Comments on The Greeting Farm Blog are admin approved so it may take a day for your comment to be visible. Please only comment once, and use the same name on all the blogs when leaving a comment. Do not pick the Anonymous option (otherwise we won't be able to verify that it's you). We will announce the random winner later in the week on the Blog and in our Facebook Group: The Greeting Farm Fan Page.

TGF Design Team:
Cynthia
Davina
Elisabete
Meg

This is a short hop and definitely worth playing along! If you want to grab your favorites now, you can purchase the new stamps HERE. We will have more cards featuring the New Release from our Design Team Leaders starting on the 17th so be sure to stop by The Greeting Farm Blog to see more inspiration.

Happy Hopping!

Monday, October 23, 2023

October Mama Elephant Designer Series

Hello crafty friends! Davina here to share my Designer Series project using the incredible October release from Mama Elephant Stamps. This release is so fun and festive, with all of the holiday themed sets. I especially love the little bundles of goodies from the Deliver Winter Joy set, and how you can shop your stash to find stamps that go along with each image. 


First, I stamped the amazing vintage truck from the Deliver by Truck stamp set. Next, I stamped the bundle of toys and the Christmas tree from Deliver Winter Joy . I found that the adorable elves and toys from Busy Elves and Oh Merry Tree coordinated perfectly for my scene. I couldn’t leave out Santa, and the perfect one was from the Secret Santa set. 


After everything was colored, die cut, and highlighted, I created my base layers. I used the Magic Snow Cover Creative Cuts layered over some patterned and colored cardstock for my foundation. I gave it some gentle inkblending and a few splashes of ink. I wanted this card to be full of dimension, so I popped the images up with foam tape making sure to leave room for my bold sentiment. I used the Everything Nice sentiment set and stamped with red ink for a cheery look. I die cut the sentiment and a piece of foam tape to pop up my word strip instead of glueing many together. 


I finished this off with a sprinkling of snowflakes that I adhered with glue dots to keep them lifted off of the background. I think Santa delivering toys in his pick-up is just as cute as any sleigh, and I hope that you enjoy this little joy filled card. Thank you for stopping by, 

Davina

Wednesday, October 11, 2023

Mama Elephant Designer Series Project

Hello crafty friends! Davina here to share my Mama Elephant Designer Series project, using adorable products from the 11th Anniversary release. I made a winter scene with flat mesh shaker using the Arch Snow Globe and the cute A Capybara Christmas Stamps and Creative Cuts. 


I started by building my snow globe and inkblending the parts and pieces. Once getting the background piece assembled with the snow drifts, I stamped and colored images from A Capybara Christmas. I wanted a tall tree so I stamped one using Busy Elves. I adhered the tree and a capybara onto the snowdrifts then placed a pile of small flat star shaped glitter in the center. On the backside of the snow globe front, I outlined 1/8 inch scor tape. I removed the paper liner and adhered a piece of mesh tulle, making sure to really secure the mesh into the glue. Then I added a second layer of tape over the mesh before trimming the tulle around the globe. Once that is complete I layered it onto the glittery background. The stars move around, but the card is not as bulky as a traditional shaker, and mails much easier. 


I arranged my snowglobe onto a glitter cardstock snow drift and surrounded the base with cute Christmas themed capybaras and ornaments. The top was looking so neglected and empty so I created a tiny capybara with reindeer antlers using two Little Agenda sets, Little Capybara Agenda and Little Reindeer Agenda. I placed him flying over the snow globe and finished it off with an Easy Xmas sentiment strip and a few stars. 


I layered everything onto some Christmas colored plaid patterned paper and think its just the cutest. I love how well everything came together and hope that you do too. Thank you for stopping by, 

Davina 


Thursday, September 21, 2023

Mama Elephant Stamp Highlight Decorate the Tree

Hello friends. We are continuing the Mama Elephant Stamp Highlights for their 11th anniversary release. Today we are featuring the stamp set Decorate the Tree and creative cuts. I adore this set so much. The big tree is wonderful for surrounding with the cute characters and adding the garlands. 


I stamped my images and colored with copic markers before cutting out with the coordinating dies. While planning my scene, I decided on some festive foiled paper as the background. I cut a snowy hillside to layer on the bottom half, and used the new large Marquee Letters creative cuts to spell out Jolly on the bottom with gold glitter cardstock. 


I thoughtfully arranged my colored images as the focus of my scene and added small white highlights and glittery Wink of Stella to some of the images. To finish this off, I added two word bubbles from Let’s Chat Creative Cuts and the tiny typed sentiments are from an old set called Let’s Go Caroling. 

Please head over to the Mama Elephant Blog to see all of the incredible inspiration from the Design Team. Thank you for stopping by, Davina