Tuesday, May 21, 2019

May Mood Board with Davina

Hello crafty friends. I’m here today to talk about inspiration, and share a card I made using Mama Elephant stamps and the gorgeous Butterfly Reflections Ink  May Mood Board.

When we sit down to create something, whether it be small or a large project, we sometimes know right away what we want to make. And other times we know we want to make something, but need a little help or a jumping off point. When we are inspired by something we see, hear or experience we can quickly make a beautiful project. As a crafter/ maker I often find inspiration in many different places. One of my favorites is mood and/or color boards. Every month Butterfly Reflections Ink posts a Color Board and encourages you to play along by making a project and sharing it on the SM platform you like best, and tagging them and using #BRImoodboard. Inspiration is interpreted differently by every single person. They are a starting off point, not the finish line. If I see a photo and one thing really speaks to my heart, that is what I will make my card about. You don’t have to use every single item, or in the way you see it displayed. Color is so fluid also, if I see navy, that doesn’t mean I’m only going to use one shade of Navy. I’m going to pull out every single Copic I have in the same color family and use them all together
                                    

The colors this month are jewel tones and rich in glorious color. Navy, lime green, grape purple, and teal. Which means I had like 80 markers on the table. Neutral and metallic colors are also not to be forgotten or left out.

Once deciding I was going to use the Wild Roar  stamp set I realized my critters were going to have more of a black light Avatar feel to them. I had to wipe my mind clear of traditional animal colors and accept there is no right or wrong. I stamped the image carefully several time with my stamping platforms to get nice even ink coverage. I then used a black Copic multiliner to fill in any blank spaces that needed a little help. I was too scared to keep going over with the platform and risk ruining the image. I then got work coloring all of my animals with colors that I felt fit the mood board the way I interpreted it.

Once everything was colored and cut out using the matching Creative cuts I blended my background with Distress Oxide inks. I gave it a little splash of water and white ink and trimmed it down to 6 x 3.25 I played with my image placement and decided to pop up some of the smaller details with fun foam so they didn’t get lost in the colorful background. I glued everything down using a LawnFawn Glue tube , and the foam adhesive, then finished it off by layering it over a black panel, before mounting it on my 6.25 x 3.5 card base. I decided it needed a little glam so I added a few iridescent sequins in the sky.

I really love how this card turned out and wish I had a black light to see if it really does glow, it probably doesn’t since I used normal markers, but the illusion it gives makes me think that it will.

Thank you for stopping by and I hope that you are inspired to make a project using the May Mood Board offered by Butterfly Reflections Ink. Don’t forget to use the hashtag #BRImoodboard
Please check back to see my new projects,
Davina

Wednesday, May 8, 2019

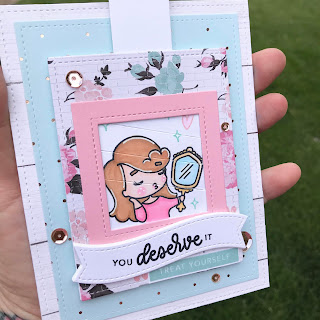
Treat Yourself with the Letter Lingo

Hello everyone, today I want to share a magic picture changing card that I made using stamps from the Letter Lingo. This was first time using the magic picture changing die from LawnFawn, and I was nervous since I’m not always the best at interactive cards.  But, I watched a couple videos on YouTube and I was ready to give it go.

If you follow me on Instagram you know that I recently cleaned and organized my craft supplies including all of my colored cardstock and patterned papers. I have vowed to not buy anymore, and to start using my paper.
I started by selecting a pretty pad of aqua, pink, and rose gold accented papers, and pulled out a couple sheets that I liked. I cut them with the dies and got to work with the fun stuff. I stamped the adorable images from Treat Yourself  with black momento ink, onto white Neenah solar bright white 80lb paper, then colored them with Copic markers. I wanted my girl to be in the bath for the first “before” picture, and glamorous and sparkly for the second “after” picture. So in a light aqua ink I stamped the little bubbles around bathing face, and used the same light aqua ink for the sparkles around the other image. I also used the little heart stamp inked with pink.

I lined up the changer dies over the faces where I felt they would look best then ran them through the sizzix. I assembled the pieces, while watching the video again, and using 1/8 inch score tape. I also used a ton of EK Success Powder tool so everything would glide easily. Once the mechanism was assembled I got to decorate it with the papers I cut earlier. I framed the images, and popped up the slider on foam tape, so the Pull tab would be easier to handle, then adhered it onto the aqua polka dot paper. I found a half of a sheet of white shiplap paper that I decided to use for the foundation of my card face and glued it all down on my card base with score tape.

I stamped the cute sentiments on a banner and framed it all with a sprinkling of rose gold sequins. I’m actually pretty shocked that I did it on my first try, and I love the shabby chic/farmhouse look.

Thank you so much for stopping by,
Davina

Tuesday, May 7, 2019

Hello Bluebird Fairy Garden for Butterfly Reflections Ink

Hello friends, I’m here with my very first post for Butterfly Reflections Ink . I’m so excited to be joining this team of extremely talented cardmakers, and couldn’t wait to make a project to share.

Currently my favorite card designs have been the tall slimline cards, that I have been creating a lot of lately. But only a couple weeks go I trimmed down the design to make a shorter slimline card. The measurement is 6.25 x 3.5 (the exact size of an iPhone plus) and it is perfectly sized to fit in your hand, and a regular sized envelope (3 5/8 x 6.5).
                                       
I came across a piece of vintage looking botanical paper in my stash and was instantly inspired to use the new Fairy Garden set by Hello Bluebird. I wanted the patterned paper to to be relevant, so after cutting down the paper to 6 x 3.25, I layered a piece of Lawn Fawn Vellum that was trimmed a half inch smaller on top. I stamped my images using my stamp platform, then colored with Copic markers using colors I found in the paper, then die cut using the coordinating Fairy Garden Dies. I also cut the same images out of a scrap piece of fun foam so that I could make thick mounted images. I always attach my die cuts to fun foam using Lawn Fawn Glue Tube then place under an acrylic block so they
can dry nice and flat.

I stamped the sentiment onto a piece of colored card stock then cut out a banner using Lawn Fawn Lawn Cuts. I used a tape runner to attach the banner to the vellum, then used tape runner on the back of the vellum (under the banner) to adhere it to the paper panel. Then I attached the images using the fun foam adhesive back. I carefully pulled the vellum back and used some liquid glue where the images were, so that it would not be visible from the front. I added a light sprinkling of beautiful metallic Pretty Pink Posh Gold Jewels to finish it off.

I was so happy with how different this looked compared to what I’ve been making recently, and decided to add the coordinating botanical palm paper into the simple plain envelope for a little
“extra”. I traced the envelope with a pencil then cut out with my paper trimmer. Then I trimmed a half inch off of the top so the envelope adhesive would be useable. Now my little set is perfect and ready for gifting.
                                     
Thank you for stopping by and I hope you have enjoyed seeing how I made this card ,
Davina

Wednesday, May 1, 2019

Squeeze the day with The Letter Lingo

Hello crafty friends,
Thank you for joining me on my very first blog post for Crafts by The Letter Lingo.

Today I’m sharing a masculine card for either a birthday or even early Father’s Day card. I used an adorable set called Citrus Crush, that is  available now in their first product release. The image sizes are great and make coloring a breeze, and there are so many little cute and punny sentiments that accompany them.

I made a tall slimline card that is sized at 8.5 x 3.25 and has quickly become one of my favorite sized cards to make. I started by cutting and inking my panels. I knew I wanted to cut some letter alphabet dies at the bottom so I colored the area at the bottom as well on my water panel. Then I flicked some clean water, which I blotted up with a tissue. Followed by some opaque white ink and put aside to dry.

I stamped then colored my images using black momento ink and Copic markers. Then added a few white highlights with a gel pen. Then I ran the images through my scan n cut.


I used a ruler to lightly draw a pencil line to make sure my letters were straight, then cut out DAD while making sure to save the inside pieces. Then, I heat embossed the sentiment underneath. I used liquid glue to attach the water layer to the base. Then I used foam tape to attach my beach. I bought this huge roll of foam tape at a local hardware/automotive type store that I came across during home renovation. It was only $18 dollars! Which is less than half of the cost as the Scotch foam tape. It is the exact same size and yardage, but a little trickier to work with as the backing doesn’t come off as easily. But hey, I couldn’t beat it. I cut some tiny pieces to pop up the centers of the letters.

I attached my images using a combination of glues and foam tape then finished off with a sprinkling of sequins. Thank you for stopping by and I hope you enjoy this card.
Davina