Wednesday, November 30, 2022

Pretty Pink Posh Holiday Week


Hello crafty friends! Today I’m very excited to be participating in the Pretty Pink Posh Holiday Week! I just love creating with Pretty Pink Posh products, I really appreciate the cute illustrations and how wonderfully the stamp sets coordinate with previously released products. The cute Christmas Boxcard that I’m sharing today has a blend of Holiday sets from present to past. 


I built this boxcard with mint colored cardstock and some patterned papers that have red, pink, green, and mint. For the background panel, I inkblended some pretty pink shades and splattered with water and white ink. Then I used the Layered Snowflake stencils  to create a pink and white blizzard which includes some  raised embossed snowflakes. 


I like to focus my coloring, to match with my papers, so that it all feels themed. I stamped many images from Happy Santa and Reindeer Friends. After coloring the images and using the coordinating die cuts to perfectly cut my images, I added small white dot highlights. I adhered my images throughout the layers of my boxcard making sure that none were completely hidden. Then I heat embossed some snowflakes on vellum and tucked them into the scene on skinny acetate strips so they look like actual snowfall. 


To finish off the boxcard, I used gold embossing powder for the scripty “Joy” sentiment from the new Pine Wreath stamp set (I love that it has a coordinating die!) and mounted it onto a white banner that reads “to the world” from an older Joy stamp set. I think the bright red cardstock really packs a punch for the front. 


Finally, I stamped my sentiment onto the back and added a few little details and one more reindeer to make this beautiful from all angles. I hope that you enjoy this festive and bright card, make sure that you visit the the PPP shop to see the incredible products and take advantage of all of the holiday deals! 

Thank you for stopping by,

Davina 

Saturday, October 1, 2022

Pretty Pink Posh Halloween Week


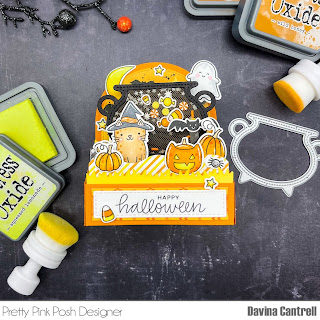
Hello Crafty Friends! I’m so excited to be participating in the Pretty Pink Posh Halloween Theme Week. All of their products are so wonderfully illustrated and designed, that it is a breeze to pull multiple stamp sets, stencils and dies together to make the cutest cards and decor. I did just that for this bright and bold shaker boxcard. 


I stamped images from newer and older sets to build this scene. Halloween PalsGhost FriendsHalloween friends, and Giving Thanks to name a few. I always use the coordinating dies to achieve a clean and polished look to my images. 


Before assembling this card, I created a flat mesh shaker using the new Cauldron Shaker Die. I cut the shaker twice, added a few stamped images along with some glow in the dark mini stars and some clay confetti pieces from the Halloween Party Mix. I sandwiched a small piece of orange tulle mesh to make a flat shaker using 1/8 double sided tape. 


For the background I inkblended an orange ombré sky and used the Spooky Sky Stencil to ink the bats and emboss the clouds onto my Bristol cardstock. I gently splattered with water and black ink to distress and “spookify” the sky. 


I was excited to use up several pieces of patterned paper remnants, that I had in my stash, for each of the layers and side panels of the box. I adhered my images and shaker through the layers and even made sure to have some floating pieces using acetate strips. I finished this up by stamping a sentiment on the back and adding a final pumpkin. 


I hope you love this fun and spooky card and appreciate you stopping by to see how I created it. Now is the perfect time for you to stock up on your Halloween supplies at Pretty Pink Posh, all of the Halloween items are on sale so don’t miss out! 
Davina 


Friday, September 23, 2022

Mama Elephant Stamp Highlights Joyful Greeting


 Hello crafty friends! I’m so happy to be participating with the Mama Elephant team once again. Todays “Stamp Highlight” is the wonderful Holiday sentiment set called Joyful Greetings. This tasteful and pretty set is full of Christmas messages that would be perfect for the front of a card or even the inside message. Each sentiment has a coordinating die so you can place the sentiment over a busy background like I have with my “Jolly” card. 


I wanted a soft yet bold background for this gingerbread man filled card, so I used alcohol inks on white photo paper for a textured looking background. I created a postcard frame using the Postage Frame Creative Cuts and fit my inky background inside. I stamped and cut images from the Gingerbread Cookies Stamp set using brown ink soft pastel Christmas colors. 


I finished this card by stamping my “Joyful Greeting” with Taupe ink and centering in the top of my card. I really love the results and think that these sentiments will coordinate well with any holiday themed stamp set. 

Please make sure to head over to the Mama Elephant Blog to see the inspiration from the entire DT for all of the amazing new products. You won’t want to miss out on the sale and free item promotions! 


Monday, September 19, 2022

Pretty Pink Posh September Release


Hello crafty friends. Davina here, to celebrate, the Pretty Pink Posh September Release. I’ve made several cards using these beautiful fall products and I am participating in the Instagram Hop today! Hop along leaving comments at each stop, for your chance to win $30 to the Pretty Pink Posh Shop


Every set in this release is gorgeous, and they all mix together with wonderful results. This release has several stencils, stand alone dies sets, and stamp sets that could not get any better. I used the Fall Basket Die Set as the centerpiece for this card. I blended the wooden strips with light brown ink and tiny splatters, then cut the pumpkins from orange cardstock that I accentuated with lighter and darker oranges. I used several of the cute mice from the Mouse Friends stamp set to bring an element of cuteness to this scene. Then, I assembled everything on top of a stenciled background that I created with the Layered Foliage Stencils. 


It’s so easy to make stunning backgrounds using the many detailed stencils that are offered by PPP. I created a completely different look with the Falling Branches stencil, that I used white embossing paste over a soft inkblended background. I assembled a sunflower filled scene using the new Fall Envelopes stamps combined with Potted Sunflowers and the Thanks  stand alone scoot die. 


My final card is super cute and uses the pretty Fall Borders stamps set. I layered the pumpkin strip over a Fall Tree die cuts and some falling leaves and sentiment from the  Autumn Wreath  set. I finished this card off with the adorable pup from the Halloween Critters.

Thank you so much for stopping by, don’t forget to visit the Pretty Pink Posh Blog to see the Inspiration from the entire team. 

Davina 

Mama Elephant Stamp Highlights Busy Elves


Hello crafty friends! Today I’m honored to be participating in the Mama Elephant Anniversary Stampede. The “Stamp Highlights” begin today and and we are showcasing the cutest elves around from the set called Busy Elves. These adorable images are beautifully illustrated and just as cute as their smaller counterparts from the Little Elf Agenda set. 


I stamped and colored these cuties using brown ink and pastel Christmas colors like pink, coral, mint, and yellow. I assembled my images on top of some glittery snowy hillsides with a die cut snowy background using the Galactic Cover Creative Cuts. 


In my soft pink sky I adhered a large sentiment that stamped with Everything Nice stamp set, I love that they have coordinating dies to make these sentiments really stand out. And over some of the busy elves I placed sentiments from the set, in little word bubbles. 

Head on over to the Mama Elephant website for all of the details about their anniversary specials and the freebie sets that are available with purchase. There is so much cuteness that you want to miss out.  Thank you for stopping by, Davina                


Saturday, September 17, 2022


Welcome back to day 3 of Stampede! Today we continue our celebration with fabulous project ideas and inspiration!


I’m so honored to be participating with the Mama Elephant team and this gorgeous holiday release. I created a fun winter wonderland using the new Busy Elves Stamps that I nestled into a soft pink pop up boxcard. I created the 3D Pop Up Box  with sturdy colored cardstock that I layered with fun patterned papers and images. I stamped my elves with brown ink before coloring with copic markers and assembling them into the inserts. On the front flap I used my favorite Everything Nice Sentiment Stamps that have the best coordinating dies, and paired it with one of the cute images. 


Check out the entire release at www.mamaelephant.com and don’t forget to hop along to see all of the amazing inspiration.


Check out the rest of the hop for amazing inspiration from our Design Team and Friends!


To celebrate the new release, Mama Elephant is picking 1 winner to win a prize pack! 


» 1. Leave a comment on the collective Design Team's Instagram Stampede post
» 2. Leave a comment on our Facebook Stampede post
» 3. Leave a comment on any of the Introduction videos on YouTube
 
Each action qualifies for one entry, max 3 entries per stampeder please and good luck!
Open to US entries only.
 
Check out the rest of the hop for amazing inspiration from our Design Team!

Laura Bassen @laurafadora

Davina Cantrell @popsiclesticks
 
Thi Lam @lemonteacrafts
Thank you for stopping by! Have a great day from all of us!
 
Don't forget our Anniversary Promotion!


Tuesday, June 21, 2022

Pretty Pink Posh June Release

Hello crafty friends. Davina here, “ Stomping by”, with a fun dinosaur filled slimline card using the amazing June Release. There are two new dinosaur sets full of the cutest images and accessories. I used both Dinosaur Friends and Dinosaur Additions to create this card. 


I stamped and colored my images with bold primary colors, before using the coordinating dies to cut out my pieces. Next, I used a large stitched slimline die to cut layers for my background. I inked the layers and background using distress oxides in bold bright colors. Then I used Ranger Grit Paste and the Dinosaur Layer Stencils to emboss the footprints into my shorter layers. 


I arranged the images onto the layers, and adhered them throughout, after stamping a sentiment toward the bottom, with the addition of the new “Hello” word die. Once everything was in place I finished it off with some sparkling sequins and layered it onto a red card base. 


I had so much fun creating with the new playful release and I can’t wait to see what you come up with! Thank you for “stomping” by,

Davina 

Friday, June 17, 2022

Pretty Pink Posh June Blog Hop


Hello crafty friends! I’m so happy to be participating in the June New Release Blog Hop with Pretty Pink Posh. This release is so special and fun as it was inspired by their incredibly sweet son, and all of his favorite things. I am so tickled by these adorably cute dinosaurs, cars, and truck sets. 


I used the wonderful Construction Trucks set for this card. I wanted it to look like a scene in the yard where toys were abandoned at meal time. I inked a bright blue sky and embossed stars by using the Dino Dig Stencil. I mixed a few drops of a yellow copic reinker into a teaspoon of white embossing paste to get those bright yellow stars. Then, I heat embossed my sentiment into the open area.  Next, I cut a grassy layer that I stenciled the road onto by using the Layered Roads 3 piece Stencil and more of the yellow embossing paste for the dashes. Before adhering the grass with foam tape, I used a random blobby die to cut a “hole” in front of where I wanted my tractor. I inked the background brown under the area so it had depth. 


Finally I adhered my construction images and little cute cones throughout my scene and finished with a few sequins before layering in onto some blue patterned paper. 

Hop along during the 3 day blog hop, leaving a comment at each stop, for your chance to win one of 3 $30 gift certificates to Pretty Pink Pink. The comments will be open until 6/23/22 at 11:59 pm. Winners will be announced on the Pretty Pink Posh Blog

BLOG HOP DAY 2: 
Davina Cantrell (you are here) 

Friday, June 10, 2022

Magic Shop Signs by Popsiclesticks

 Hello crafty friends. I hope you are here to download a pdf of the Magic Shop Signs. I was so happy to create my Photopolymer Clear Stamps. Due to copyright infringement I could not put the proper and desirable shop names onto the stamps. But I have created a document that has the sign names for you. 

1. Stamp and color your images. Cut out by hand or using a scan n cut. 

2. Print this document using your favorite white cardstock on either a Laser or Inkjet printer. (The same paper that you use to stamp) This is an 8.5 x 11 sized document. Do not resize or fit to screen. Each sign is sized to be adhered directly on top of the blank sign. Color and cut out the signs you need. I have all the signs separated into sets and labeled. 

3. This is how I have always used these images  the dimension looks great and I think you will like it. I put three sets on one page so you are not always having to print stuff up. 

4. I included some of the word bubbles. Those teeny letters don’t always stamp clear. That was my mistake and I apologize. The small word bubbles from many other brands fit into these bubbles as well so feel free to play around with your available sets! 

Here is an example of two of my cards using this technique,


Please download the files and enjoy! Thank you, Davina 💕

Tuesday, May 17, 2022

Pretty Pink Posh May Release Blog Hop


Hello crafty friends! I’m so excited to be a guest this month for Pretty Pink Posh Design Team. Today we’re celebrating the May release at with a blog hop and fun giveaway. There are 3 days of hops, and 3 $30 gift certificates up for grabs. So make sure to visit each stop and leave a comment along the way. All comments must be left by by 11:59 pm PST on 5/22/22 and winners are announced on the PPP blog. 


This release is full of tons of crafty fun and pretty spring florals. The card I’m sharing, uses the sweet Spring Flowers and Crafty Sentiments  sets. I began by stamping all of the pretty flowers onto bright white Neenah cardstock. I colored everything with copic markers and cut our using the coordinating dies. Next, I used an older die set to cut out the little blocks called Mini Storybook Die, and it created the perfect little place to arrange the Spring Floral images.


I inkblended a small panel of cardstock to place under the cut outs, then adhered the flowers into the openings. Some I glued down flat, and some I popped up with foam dots. I decided to add a few little bees from an older set called Bee Friends, and they really made the difference. I used one of the wonderful sentiments from the Crafty Sentiments set under the flowers, then layered the panel on top of some pretty patterned paper.  


This little card came together relatively quickly but it packs a punch! I think these florals are so cute and can be combined easily with many of the flower images from other PPP sets. Make sure to visit the Pretty Pink Posh Blog  to see the inspiration from the entire Design Team and Guests, and to participate in the different hops for your chance to win. 

BLOG HOP DAY 2 (May 17)
Davina Cantrell (you are here) 

Tuesday, March 15, 2022

Pretty Pink Posh March Release Blog Hop


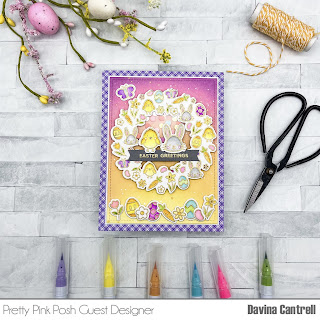
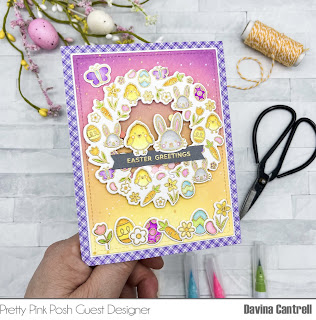
Hello crafty friends! I’m very excited to be participating with the incredible Pretty Pink Posh design team this month, as a guest designer. This release is available now and full of the cutest spring and Easter themed stamp and die sets, as well as several generous giveaways. I’ve created quite a few projects with them, but for todays blog hop, I would like to share a fun gold embossed shaker card with you. 


For this inky beauty, I stamped and heat embossed the grand image from Easter Wreath, along with many of the smaller images, then I colored them with Zig Real Brush markers. After using the coordinating dies to cut out my images, I adhered a circle of acetate behind the wreath. I mounted it upon an inkblended background that I splattered with white and gold ink. I added a heaping teaspoon of spring colored clay confetti to the center before securing firmly with foam tape. I used a patterned paper layer to ground the scene, then created a row of images along the bottom. To finish this off, I stamped the sentiment from the set into a straight line, then heat embossed with more gold. I really love how bold this turned out. 


And now for the juicy details of the blog hop! There will be 3 $25 gift certificates awarded, one winner each day. Winners will be chosen randomly along the blog hops, so make sure you leave a comment at each stop. Comments must be left by 11:59 pm est on 3/20/2022  and the winners will be announced on the PPP blog. 

Thank you so much for stopping by, Your next stop along the blog hop is Elaine 
Pretty Pink Posh blog 
Mona Toth
Rebecca Keppel
Davina Cantrell ( you are here)
Elaine Wakeling
Dana Kirby
Jeanne Jachna


Sunday, March 6, 2022

Mama Elephant Designer Series- Celebration Hamsters Center Window card


Hello crafty friends! I’m very excited to share this next project with you. Sadly, it is my last project as a guest designer for the incredible Mama Elephant team, so I wanted to make something with Pop! I created a nice big Center Window Card using the cute images from Celebration Hamsters and the new larger B2B Slimline CC die set. I have made cards like this before, using a specific die set, but they were much smaller. So since I was familiar with the workings of the pieces, I was able to create this with just a few dies and my paper trimmer. 

I started by cutting the bases for this card. Using the two largest frames from the B2B Slimline CC I cut 3 pieces of cardstock. For the outer layer, I used the largest die and some colored cardstock. For the inner portion, I cut 2 pieces of white cardstock with the 2nd die.  I measured, scored, and folded each piece in half  the long ways. Using one of the smaller white panels, carefully trim 1.5 inches from each side, then score at about 1/3 inch from each new side. The center portion should now be about 4 inches with the fold in the middle. I used the 3rd largest circle die from Circle Combo CC die set to remove the center portion for the “window”. 


It is easiest to color the inside before attaching the window. Whether you choose to add patterned paper or inkblend the 2 white panels, now is the time to do that.  I added glitter cardstock cut with a grassy border to look like the hay inside a hamster cage.  I did add that over and under my window. It takes fiddling, and created tons of bulk. If you are planning on mailing a card like this, I would recommend not adding extra thick glitter cardstock haha. 


Once your background in finished, measure your window for placement. With the tabs folded and creased in, turn window right side facing into the crease of the base, and lightly mark with a pencil where the edge is. It should be approximately at the 2 inch point. Then, face the window forward and adhere with double sided scor tape, making sure the fold line is at the pencil mark. The center of the window should not extend beyond the edges of the base when closed. I also added two layers inside of the window to attach images to. I used a remnant scrap piece of white cardstock that I trimmed 1/2 inch tall long strip. I did the measurements in the same way I did the window. Fold in half, measured 1.5 inches, score, and trim after 1/3 inch. I did this on both sides of the center fold. I made another that is 3/4 inch long. I covered mine with more glittery cardstock (after attaching) but you could use one long piece of colored cardstock (instead of using plain white card and covering) with a decorative edge, instead of layering all the paper like I did. As I mentioned before it was a little too bulky. 


Once all of my layers were adhered, I stamped and colored images from Celebration Hamsters and Little Hamster Agenda. I added the images throughout my scene and used some strips of acetate to give a floating appearance. I adhered my decorative center into the larger folded panel, then decorated the front. I layered some pretty papers and created a golden sentiment using the Wishes Enclosed stamps and dies and gold embossing powders. I added one more little hamster and finished it off with a few sparkling sequins.


If you made it this far, I thank you very much! I really enjoyed engineering this explosion of a party, and I hope you give it a try yourself. Thank you again,

Davina