Tuesday, June 25, 2019

Oracle Octopus with Trinity Stamps

Today I am sharing another sneak peak at Trinity Stamps summer release. I’ve used two sets for this card,  the lovely Oracle Octopus, and the Reef Building set. I really love having lots of supporting images to create my scenes and couldn’t be happier with all of the ocean themed sets that Trinity is releasing. Not only stamps and dies but stencils as well. And they always have the best confetti and card candy to finish off your projects.

I started by inkblending my base layers with distress oxide inks. I cut several stitched panels from Bristol Smooth cardstock and trimmed one down for my sand layers. I actually only used one panel for both sand layers. I cut a shorter portion off of one side then rotated it and cut the remaining for the taller piece. I think cheated on this one and added an extra half inch strip of paper to the bottom of my lower layer for a little extra height. I am extremely ocd when it comes to my cards and I like all the layers to got to the bottom from the side view that way they isn’t weird lumps or card “panty lines” haha.

I used a ray stencil for the light rays in the water then splattered all of my layers with clean water and white opaque ink, followed by perfect pearls for a little glimmer. I put all of this aside to dry and pulled out my stamp supplies. I stamped my images with momento black ink on Neenah solar bright white cardstock before Copic coloring. I added the little heart shrimp into the crystal ball for a love themed sentiment that I stamped before attaching that shortest sand layer with foam tape for some oomph.

After cutting everything out I went to work with placement. I really wanted my mystic lady to be in the center, so I surrounded her with lots of corals and one cute seahorse. Once everyone was adhered using a variety of glues, I decided that I wanted to use the Berry Blue Jelly Heart Mix for heart shaped water bubbles and I adore how they turned out.

I hope you are as excited as I am for this release. There is so much amazing inspiration on the Trinity Stamps Blog and please check out all of the fabulous cards from the talented DT on Insta. I’ll have another card to share tomorrow and the big day in on Thursday! Thanks for dropping in,
Davina

Stay Sweet with Penguin Palace

Today I have sweet and summery card to share that is full of ice cream and watermelons. Both summertime necessities in my opinion. I used a combination of two stamps sets to create my scene, Rabbit Cafe  and Summer Sunshine both available from Penguin Palace. 

I started my project by choosing a color palette inspired by a pad of patterned papers that is full of wonderful ice cream colors. Then I stamped out all of my images using my stamp platform on smooth bright white Neenah solar cardstock. I colored all of my images using Copic markers and highlighting with a white gel pen. I transformed my cafe into a candy shop by attaching a piece of candy to the roof and adding some images to the window. Then I wrote the words Candy Shop on the sign. 

I die cut my stitched layers from Bristol smooth cardstock and inked a pink sky that blends into a mint green. I then cut a grassy layer from another stitched layer and inked it in the same minty green. I splattered the inked panels with clean water followed by white opaque ink and then a coppery metallic ink. 

I cut the beverage from my far right image and adhered a towering ice cream into her hands, and gave the little rabbit waiter a candy and a slice of watermelon. I felt that the kitty had to be up front also with his sundae so I made sure there was enough room for everyone before attaching my pieces. I used a strip of foam tape under my grassy layer then glued down my background images. After the bistro and cafe were down I added my characters and finally the banner and clouds. I decided I wanted some brighter pink to match the watermelon so I used some coordinating colored cardstock to  layer under the image panel. Then adhered to the striped green paper with Scor Tape. Finally I added some coppery (supposed to be rose gold) jewels from Pretty Pink Posh that matched the coppery (supposed to be rose gold) ink splashes. 

I just adore how well these sets all work together and love making these cute little scenes. I hope by now you have seen the release and purchased a few sets! Thank you for dropping in, Davina 


Monday, June 24, 2019

Fairy Wonderful with Trinity Stamps

Calling all Fairy and Succulent lovers, I have something very magical to share today. It is day one of Trinity Stamps summer sneak peaks, leading up to their huge First Birthday Anniversary release party and blog hop on Thursday June 27th. This is going to be a huge release with so many stamps, dies, and stencils, and many of these sets are very special to me because I illustrated them and I hope that you love them.

Over a year and a half ago when I first purchased an iPad Pro I drew up these images of  what I feel was my own little invention. Fairy Moths... Who flutter over  beautiful pastel succulents and crystals. I’m so excited that these are finally making their debut and have become actual stamps. There are few different kinds of fairy moths in the set called Fairy Wonderful, but I think my favorite in the Luna Moth fairy. The second set I’ve used on this project is Succulent Sparkle and it is full of freestanding succulents perfect for layering and an assortment of jewels and crystal points.

These stamp like a dream and are so fun to color. I started by stamping my images using my stamp platform. I used nearly every single image in both sets because I wanted a long slimline card. And pulled out my Copics. I find color inspiration everywhere and for this I pulled up a gorgeous Instagram account that also sells live succulents called Fairy Blooms I just love scrolling through looking at the beautiful photos.

I stuck with mostly lavenders and soft jade greens but of course added pops of pink and darker greens. I then added some sparkle to the wings and crystals using a glitter Wink of Stella pen. I cut everything out with my scan and cut as I don’t have the dies... yet. But since the images stamp so nicely they cut out perfectly with no trimming needed. I inkblended a 8.25 x 3.25 panel of Bristol smooth cardstock with Shaded Lilac, Spun Sugar, and Cracked Pistachio for my soft background then splattered with clean water, white opaque ink, and Metallic Gold Ink.

I used Trinity Stamps Hello Senti Mini to cut out the pretty script “Hello” and I stamped the sentiment from the Fairy Wonderful set underneath. Then used a variety of glues and foam tape to build my scene. Then I mounted it on white card stock and finally using Scor Tape, mounted it to my card base which measures at 8.5 x 3.5

I hope you enjoy these images as much as I do and please check out all the incredible inspiration shared with the entire team all week. Thank you for dropping by,
Davina

Friday, June 21, 2019

Home Sweet Home With Penguin Palace

It’s Friday, and that means I have another project  from the 
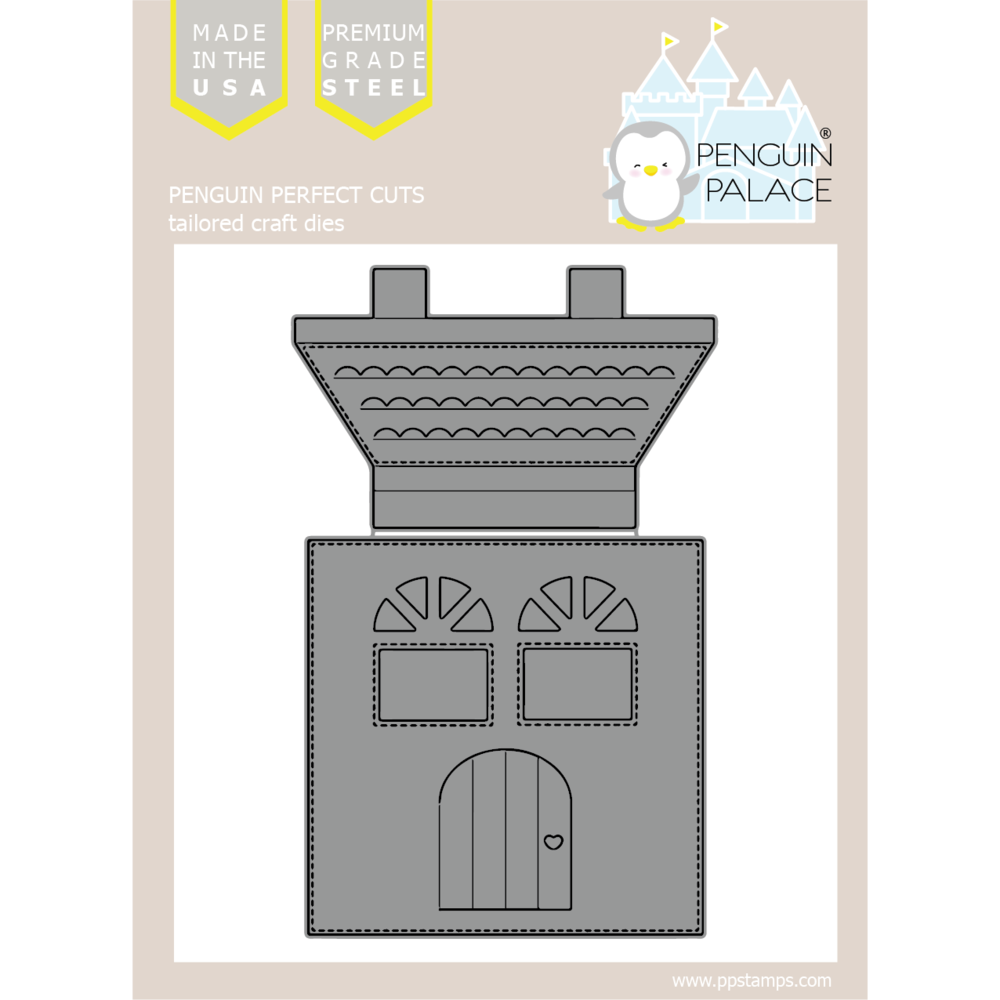
Penguin Palaces new release to share with you today. Today I am featuring one of their stand alone dies called Home Sweet Home. This large die makes the cutest large house with pop out roof for the front of your card. Not only does it feature stitched detailed windows and a little front door that swings open, but the roof comes with score lines and tabs to make a pop out statement, or they can be trimmed off to use flat. I love that the roof also has small shingle scallops, that very nicely catch the ink while blending, for a nice 3D color effect.

I cut my paper pieces out first, and reinforced the score lines on the roof with the small pointy end of my bone folder. Once I carefully folded and scored the lines, making sure not to score on the stitching, I got to work coloring the roof. I inkblended with Distress Oxide inks in a shade of blue called Faded Jeans. Then I masked off the door and used the same technique to color the house a soft yet bright yellow called Scattered Straw. I’m pretty sure my brush was still saturated with enough Squeezed Lemonade to add some more vibrancy to the yellow. Inked the door a solid brown color called Brushed Corduroy than splattered some water and white ink across my pieces.

While those dried I stamped some characters from the Fun Adventure set and Copic colored those in bright primary colors. The Little girl looks like Madeline to me from those old cartoons based off of the book series with the same name. And that’s where I turned to get my color palette. I backed my windows with some dotted patterned paper to resemble wall paper, and die cut the door handle heart from some gold glitter cardstock that I pieced in.
I prepared my card panel by inking it  to look like the sky and adding some clouds, and die cut a grass strip to layer out front. I mounted the house and pop out roof,  then tucked my puppy behind the door before using foam tape to add the grass out front. It prevents the little door from opening up all the way, but it is not glued shut either.  I carefully tucked in the plants and added my cute girl and suitcase out front. I stamped the sentiment “Let’s Go!” also from the Fun Adventure set, onto a banner, and adhered it on top of the windows since I felt there was enough open space to accommodate everything.

I really love how this project turned out, it is so different then anything I’ve made before and it is so bright and colorful. Please head over to the Penguin Palace website to see the full release and check out the blog to find so many beautiful and inspiring projects by the team. Thank you for stopping by,
Davina


Thursday, June 20, 2019

Rabbit Cafe with Penguin Palace

Hello crafty friends and thanks for dropping in. Today I’m sharing another card from the gorgeous Penguin Palace  release and this is an extra fun set. It’s called Rabbit Cafe and the images are just too fantastic. It features three characters and a shop front and an entire little patio bistro setting.

I colored my images in a very limited color scheme of pink, green, and light blue, and turned my shop into a little coffee shop. I hand wrote the word matcha in the window banner since I made my bunnie’s drink a jade green matcha latte. But included in the set are a candy, cupcake, and coffee so you could also turn this into a sweet shop or bakery.


I inkblended my background layers and with tumbled glass, mowed lawn, and antique linen to create the scene. Then I splattered with water and white ink. Finally, I die cut the panels with stitched layers and hills, and mounted the bottom layer on foam tape to create an illusion of dimension. My characters are hanging out up front on the bottom while my bistro set is sitting pretty in the middle. There is very gently a bit of squeezed lemonade morning sunshine peeking out over the grassy hill behind the cafe.

I used a variety of adhesives to mount my images and once again die cut my characters from fun foam to make thick sticker like images. It is one of my favorite techniques that I don’t think I’ll ever get tired of. It works only if you have the matching dies to the images so I’m always every stores favorite client, because not only do I have full set syndrome, but I always buy the dies.

I finished this up with a little sparkle by adding some iridescent jewels from Little things from Lucy’s Cards. I hope you enjoy this little scene and head on over to the shop to see the full release. Don’t forget to check out the blog and see the other DTs incredible cards for more inspiration. Thanks for stopping by,
Davina

Wednesday, June 19, 2019

Penguin Agenda with Penguin Palace Stamps

It’s day three of release week over at Penguin Palace stamps and I’ve been having a blast playing with the new stamps and dies. Today I’m sharing a fun little card featuring the  Penguin Agenda set. I know many of you out there do agendas and weekly planning, unfortunately my brain is not advanced enough to plan out my life any further than tomorrow. I have seen so many companies create such darling stamps to fill up those cute little books and I wish I could do it. Honestly I can’t even grocery shop properly for a week,  because I don’t know what I’m going to make, so after I do a huge trip to the store, I still go back once or twice a week for items I need or forgot haha. I’m the worst....
But I accept my flaws, and will still spend more time crafting than cooking or cleaning, and not even feel the slightest bit of shame, when my husband comes home from work and I am still in my pajamas with ink all over my hands.

That being said I’m excited to share this birthday card that I made using the happy penguins and their castle. I was hoping that it resembled one of those jump-jump houses that kids have their parties, and that it also resembled the Palace from the Penguin Palace logo! Have you noticed a theme with my projects this release? I wanted to use lots from of my patterned paper stash, and lots of thick layers. It is my favorite look and probable one of my signature design elements. I colored these cuties with grey Copic markers and matched the accessories to the paper colors. I wanted some sparkle so I cut my taller hill from glitter cardstock and mounted a lightly inkblended snowdrift on top of foam tape to create an illusion of distance after dusting the top with more glitter.

One of my favorite items to make dimensional is my main character images. I love cutting them out of fun foam and making thick stickers of them. I adhered my trio of party goers to the white panel after stamping Make A Big Wish upon the bottom with my stamp platform. This is a great sentiment from the Birthday Unicorn set.

I finished it up with a sprinkling of a sequin mixture from Lucy’s Cards and love being able to find the perfect colors of sequins and jewels to add to my projects. Please head over to the Penguin Palace website and blog to see the full release and check out the gorgeous projects from the rest of the team. I’ll be back tomorrow to share my next project, thanks for dropping in,
Davina

Tuesday, June 18, 2019

Fun Adventure! With Penguin Palace Stamps

Today I have another colorful card to share with you using new stamps from the Penguin Palace Summer release. I used a very different color palette than I normally would thanks to a very unique pad of pattern papers from My Minds Eye called Wander, and the super adorable new stamp set called Fun Adventure, featuring a little traveling girl and her pup, ready to take on the world.

I chose my colors for the card by matching up my Copics to the stripes on the paper, and selected a rarely used sage green Distress Oxide for the background. I dabbed some ink from my Bundled Sage distress oxide pad onto some scrap acetate and using a spritz of water I went about making a splashed background on some Bristol smooth cardstock. Then I gently splattered a little metallic blush ink on top.

While those were drying I stamped and colored my images with Copic markers and used a white gel pen for highlights. I added a little Wink of Stella to the clouds & mountain tops, and used a gold gel pen for the buttons and brass corners of the suitcase. I then die cute the girl and sign from fun foam to mount my colored images and placed under an acrylic block to dry.

Once everything was dry I adhered my mountains, trees and clouds to the image panel. I stamped my Bon Voyage sentiment to the bottom using my stamp platform, then applied my fun foam images. I added the little airplane with dimensional glue dots so it would have a little oomph.

Finally, I die cut my card layers using stitched frame dies, and trimmed a piece of yellow cardstock to barely show under my striped layer. I tied a piece of coral and white bakers twine to the stack before using Scor Tape to attach my image layer. I once again used Scor Tape to attach my card front to my card base.

Please head over to the Penguin Palace website to see all the fabulous new products, and the Penguin Palace blog to see some more great inspiration from the talented team. I’ll be back tomorrow with another project and post, Thank you for dropping in,
Davina


Monday, June 17, 2019

June Mood Board for BRI

Hey there crafty friends, I’m here with  Butterfly Reflections Ink Blog sharing a shiny gold embossed card using the current June Mood/Color board.  I wanted to do something a little different than my normal, and feel like I stepped out of my typical creative style enough to experiment, but still be recognizable.  This is the first card I have made in a very long time that I did not use my Copic markers, and that I also used all embossing with no black ink.

I used an adorable newer stamp set called With Love by The Greeting Farm that I picked up from the Butterfly Reflections Ink website along with the Matching dies. I also used their super cute Hi Hello script die. I began my project by inkblending my background with several Ranger Distress Oxide Inks using the Pickett Fence Life Changing Bender Brushes onto Bristol smooth card stock. I used the colors worn lipstick, squeezed lemonade, and broken china for my background and splattered with clean water and white opaque ink.                              
While that dried, I embossed my images onto more Bristol smooth cardstock using gold Wow! Embossing powder and my powder tool. I really wanted to water color my images and thought to use my Zig Clean Color Brush markers. In all honesty, I have had the large 60 color set forever, and have only used once before. They have been on my shelf for like 2 years collecting dust, and I was seriously considering selling them. I always see such beautifully colored projects by Samantha Mann using them,  and I finally convinced myself to try again. I felt I had better results and control this time around, so maybe I will put them into my regular rotation of mediums. I love the coral I achieved 
using the pink and yellow combined, both from the the color board too! That was a bonus. 

After coloring and cutting all of my pieces including the word Hello, from glittery golden cardstock, I got to work layering and assembling. I used my trusty Lawn Fawn Glue Tube for the pieces that are directly on the panel, and for the pieces that are layered on top I used  a variety of glue dots and adhesives. I finished off my card face with a sprinkling of Pretty Pink Posh Metallic Gold Jewels and layered on top of some textured white cardstock that I had in my stash before mounting it onto my card base.
I hope you enjoyed this card and that you also get inspired by the very pretty June Color board this month. Please tag Butterfly Reflections Ink when you post your inspired projects and use the hashtag #BRImoodboard so we can see what you are creating. Thank you for stopping by,
Davina

Summer Sunshine with Penguin Palace

Thanks for stopping by, today I have some great news and a cute project to share. I have been invited to join the incredible team at Penguin Palace stamps. The new release is available today and very adorable too! My card for today is a full of layers and patterns and I just adore the characters and accents.

I used the set Summer Sunshine for the this beach scene and can’t believe the projects the team has come up with. I started with a piece of patterned paper and pulled my colors for the design from there. I diecut then inkblended my Bristol Smooth cardstock for the sky and sand layers, then splattered them with a gorgeous gold paint before I put those aside to dry.

I stamped my images onto Neenah solar bright white card stock and used the Copic markers that I felt  that fit my color pallet. I love the way these images stamp and the dies are great. The lines are nice and thick and they allow you to really get in there and color without the ink smearing out. Which is important to me because I love to really saturate my images. I also love the tiny little sun face that is included in the set and even put teeny little cheeks on it. I highlighted with white gel pen before die cutting and mounting some of the pieces onto die cut fun foam.

I played around with placement before adhering everything down using a combo of LawnFawn glue tube, and Ranger matte medium. The foam has an adhesive back so those apply like big custom stickers.

Please head over to the penguin palace blog to see some of the other projects that will be shared soon and the entire release that is now available, you don’t want to miss it! Come back tomorrow for another project, Thank you Davina