Showing posts with label Davina Cantrell. Show all posts

Monday, July 14, 2025

Mama Elephant July Designer Series

Hello Crafty friends! I’m super happy to be here with you,  on the Mama Elephant Blog, with my Designer Series project. The June release was large and full of so many wonderful designs. I especially loved the cute new Halloween sets, as spooky cards are my very favorite to make. The card I'm sharing today uses many stamp sets, but the main focus are the cute new witches from the stamp set called Bewitched


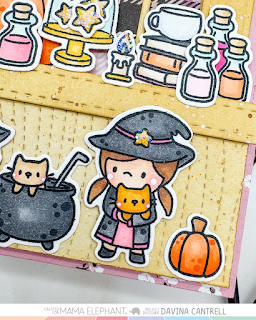
I wanted to create an apothecary type scene full of potion bottles and spooky cute elements. I used the new  Arch Shop Window die set to make a faux hutch that I could fill with all of my images. I cut and inked the pieces from the die set, then just trimmed a piece of cardstock, to fit across the bottom of the card, about 4x1.5 inches. I used the Woodgrain cover to give some texture before ink blending, then topped with a piece of trimmed paper, cut from the long side of a stitched frame, to make the countertop. Once assembled, I backed with some plaid patterned paper that was gently distressed with black ink to make it look deep.


I stamped out many potion bottles from the Magical Wizards set, and the candles, stars, and witches hat from the Big Boo stamp set. I also got the books from the set called Keep Cozy (which is on sale right now). I had so much fun layering all my images together and stocking the shelves of my cabinet. I stuffed the glass dome from Bakery Bears with glittery stars and finished it with a colorful banner from the Tree Hugging cover plate die. 


I adhered my witches with their cute kitties and cauldron, across the bottom, and love that they look like young witchlings playing in the shop. I hope you enjoy this pink Halloween scene and that you are inspired to make some not so spooky cards too. 

Thank you for stopping by,

Davina 

Sunday, June 15, 2025

Mama Elephant June Stampede


Welcome to the Mama Elephant Design Team blog hop!

Our newest release is now live and available for purchase in the store!

www.mamaelephant.com


Today I’m sharing a cutie shaker card I made using two of the new products, Bewitched and the scalloped Placemat Set. The Little Agenda Witches has long been a favorite of mine and I’m so excited for the new larger images in Bewitched and the amazing Witchy Tree House! I created a shaker frame with the lovely new Placemat Set creative Cuts, and don’t tell anyone my secret, but I used partial diecutting and the B2B Arches die set to cut out the center and make the frame. They worked wonderfully. 


I filled the shaker with bright shaker beads and iridescent stars, then layered a large die cut sentiment called Big Boo that I inked and painted with glitter paint. I surrounded the frame with images from the new Bewitched Stamp set and finished with a few sparkly sequins and jewels. 


Check out the rest of the hop for amazing inspiration from our Design Team!


To celebrate the new release, Mama Elephant is picking 1 winner to win a prize pack (winner will be notified in their comment on Instagram, Facebook or YouTube)! Open to Domestic & International (winner pays for shipping)


» 1. Leave a comment on the collective Design Team's Instagram Stampede post
» 2. Leave a comment on our Facebook Stampede post
» 3. Leave a comment on any of the Introduction videos on YouTube
 
Each action qualifies for one entry, max 3 entries per stampeder please and good luck!
(Winner will be announced and notified directly as a reply to the winning comment)
 
Check out the rest of the hop for amazing inspiration from our Design Team!
 
@mamaelephant
@vera_rhuhay
@nicholspohr
@dasmimz
@popsiclesticks
@cre8iveli

Thank you for stopping by! Have a great day from all of us!

Wednesday, May 28, 2025

Mama Elephant May Designer Series

Hello crafty friends! Davina here, bringing some fun summer inspiration. The May Mama Elephant release is here, and full of congratulations, adventure, and punny plant vibes. I am especially drawn to the two plant picks stamp sets, Build a Potted Plant & Plant Picks, and all of their punny sentiments. I always love adding small little sentiments and words to my cards, and these sets make it so fun to add many of those additions. I also wanted to use the new Insta Grid Creative Cuts that is a square cover plate measuring 4.25x4.25, and I decided to layer dies and make a shaker. 


I’ve been on a personal mission to focus on using some beautiful patterned papers and colors the whole month of May. I’ve been using all of the papers and their remnants for several weeks and I have such a sense of satisfaction at using up my hoarded papers and scraps. These colors are very beautiful to me and scream summer, so I’ve enjoyed seeing all of my coordinating projects. Creating is so much faster when you aren’t deciding on what colors to use and what matches. I’ve become very attached to not having to make so many choices and not spending so much time on making decisions. 


As my supply of patterned papers dwindles down to small remnants, I thought the small grid squares of the Insta Grid was perfect for putting my pieces to good use. Once assembled, I felt as it was a little too busy without some sort of border and I cut a creamy frame using another cover plate called Square Grid Cover. This die cut frame perfectly layered on top, giving my patterned squares some definition and detail. I cut another layer from dark pink cardstock, then carefully placed it in the Insta Grid Die Set to cut out the frame. I mounted that using foam tape and acetate to make a shaker. 


I stamped several small plants and cutie critters from the Little Succulent Agenda and It’s Okay stamp sets to make my plant shelves. Once colored and cut out I arranged my shelves and added their plant pick sentiments from Build a Potted Plant. I mounted my shaker onto a slightly larger peach colored layer sized at 4.5x4.5, and added a creamy sentiment banner from Spring Banner Greetings. These little die cut banners are one of my most favorite details to add to my cards. The contrasting color of the layers give the perfect pop of detail. 


I finished this card off with the addition of a layered die cut tag and piece of pink twine at the top. I love all the small gold details, from the gold foil on the paper to the gold sequins in the shaker, it really just makes me happy. I hope you enjoy this pretty pop of summer and hope you are as inspired by the new release as much as I am. Thank you for stopping by, 

Davina 

Thursday, May 15, 2025

May Release Mama Elephant Stampede


Welcome to the Mama Elephant Design Team blog hop!

Our newest release is now live and available for purchase in the store!

www.mamaelephant.com
 

This release is so diverse and hopefully you love the new plant themed sets as much as I do. The card I’m sharing today is featuring the new Plant Picks stamps and dies. I paired these up with last summers Little Farm Agenda to make a farm field full of critters waiting for their new crop to grow. Make sure to check out all of the incredible inspiration from the rest of the super talented team!

Check out the rest of the hop for amazing inspiration from our Design Team!


To celebrate the new release, Mama Elephant is picking 1 winner to win a prize pack (winner will be notified in their comment on Instagram, Facebook or YouTube)! Open to Domestic & International (winner pays for shipping)


» 1. Leave a comment on the collective Design Team's Instagram Stampede post
» 2. Leave a comment on our Facebook Stampede post
» 3. Leave a comment on any of the Introduction videos on YouTube
 
Each action qualifies for one entry, max 3 entries per stampeder please and good luck!
(Winner will be announced and notified directly as a reply to the winning comment)
 
Check out the rest of the hop for amazing inspiration from our Design Team!
 
@mamaelephant
@vera_rhuhay
@nicholspohr
@dasmimz
@popsiclesticks
@cre8iveli

Thank you for stopping by! Have a great day from all of us!

Saturday, May 10, 2025

Mama Elephant April Designer Series

Hello crafty friends! Davina here with my April Designer Series project. This new April Mama Elephant release is jam packed with so much “gaming” goodness, and fun “Vegas” vibes. I especially love the card making set called Playing Cards, with its cute Royal icons and all of the suits and numbers. Having grown up and lived in Las Vegas for the majority of my life, I’m very much drawn to this set. 


I wanted to make a poker themed card, but with a pretty custom deck of playing cards. I’ve had some beautiful patterned papers for the past several years, that remind me of the gorgeous Rifle Paper Co. products, and I knew the time to stop hoarding it was now. I made 5 playing cards for my poker hand, all double layered so they would stand out against the pattern, and stamped and colored the two face up cards. 


The card base for this card is 5x6.5 with a stitched A2 sized layer in the center, and a striped layer to fill some of the negative space. I wanted to make sure I had enough room to fit the cards fanned out, and add my poker chips. I stamped several poker chips from the new set Lady Luck, and arranged them on each side of my cards, to look like my bet. Finally, I made a long dovetail banner and stamped a custom sentiment using the Little Signage Agenda alphabet stamps. 


I really love the creamy undertones on this card, paired with the pretty patterned papers and small gold details. On the inside of the card I stamped a sentiment from the Let’s Game Sayings sentiment set. And to finish off the whole scene, I tucked a tag with twine behind the cards.  

I hope you like this card. I think it’s so pretty and nice to have a set that makes it simple to create more grown up cards, but still have the super adorable illustrations. Thank you for stopping by, Davina 

Monday, March 31, 2025

Mama Elephant March Designer Series

Hello crafty friends! Davina here, with a classic, yet still fun, scene using their recent March release. I know often I try hard to make super exciting and interactive cards. But sometimes I really crave a classic card, using pretty and fundamental skills, and lots of stamped images to create a heartfelt greeting. 


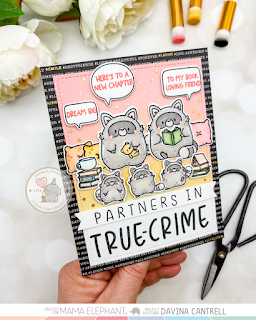
I wanted to use the adorably round raccoons from the latest release, and couldn’t decide between the two sizes. The ability to hold things in their hands make the larger ones a no brainer, but the teeny agenda ones are just full of too much cuteness to pass on. I think I spent more time trying to think of the perfect punny sentiment than I did coloring, but in the end I settled on the “Partners in Crime” theme. I wanted to make another “bookish” card so the “Partners in Crime” evolved into True-Crime. 


I began by stamping images from Playful Raccoons and Little Raccoon Agenda for the main focus. Next, I found books and pillow images in the Keep Cozy stamp set that were the perfect accessories. I colored in my images before using the coordinating dies to cut everything out. Next, I got out my brushes and inked up a sherbet inspired combination using colors like Saltwater Taffy and Scattered Straw. I intentionally blended to white leaving the bottom 1/3 portion white so i could stamp my sentiment. 


With the new Personal Letters alphabet stamps, I stamped True Crime directly onto the panel. Then using a smaller alphabet stamps I created a banner with the beginning of the sentiment. I mounted my ink blended panel onto some subtle text paper and then arranged and adhered my images using a variety of glue and foam dots. I stamped some small bookish sentiments into some speech bubbles using Storybook Sayings and Simple Friends Bubbles. I popped those up on foam dots so they would balance out the heavier bottom. 

As a finishing touch I added teeny gold stars onto the scene, loving how the gold highlighted the gold foil text on the patterned paper background. This ended up being very classy and perfect for an adult friend in my opinion. And I loved that it wouldn’t be too difficult for someone to replicate if they felt inspired to do so. 

Thank you so much for stopping by, and I hope you are inspired to be creative with your new stamps! Davina 

Wednesday, February 26, 2025

February Designer Series with Mama Elephant


Hello crafty friends! Davina here, with Mama Elephant, sharing my Designer Series project for February. I created a bursting pop up box of “Happy Mail” featuring a super cute new stamp set called Handle With Care. I always appreciate when a large block text stamp set has the coordinating dies and this set is not exception, and I especially love all the cute little panda bears that accompany the text. I combined a few other stamp sets to fill this card and love that the older Incoming Mail stamps are also mail themed and pandas! They were screaming for a fun collaboration. 


I decided to make a pop up box card using the 3D Pop Up Box Card Die set, and to make it look like a cute cardboard shipping box. I began by cutting the main box twice using Kraft cardstock and then gently inkblending all of the edges and folds with Distress Oxide Inks. I cut the inserts, using the included hill, from bright patterned papers and assembled the box using hot glue (always my favorite way of making secure box cards)

I stamped the sentiments from Handle With Care with colorful matching ink and cut out using the coordinating Creative Cuts. Then after cutting some panels for the flaps, I adhered and decorated the “box”. I used some small stamps the stamp sets Essential Tag Sayings for even more decoration on the outer box by stamping directly on the box with a taupe colored dye ink. 


For the inside of the pop up design, I stamped and colored the images from Incoming Mail, and arranged them onto my inserts, and also onto the fold down panels. I always adhere my images onto the inserts using hot glue because it sets up quickly and is sturdy enough to hold the images securely, without the risk of them slipping down or shifting on accident. I love how cute everything looks together and the way that the images all complement each other. 


I hope you enjoy this look at my “Happy Mail”, and pull out your older box card dies and make a bursting little box card for yourself. Thank you for stopping by, Davina 


Friday, January 24, 2025

Mama Elephant January Designer Series

Hello crafty friends! Davina here to share my first Designer Series project of the year. The January release was full of several fun birthday themed sets, and I am especially fond of the Birthday Block stamp set. I really love this gathering of cute celebrating friends and the two large sentiments. I decided I wanted to make an interactive card with the sentiment popping up from behind the grouping, sort of like a surprise party. 


I gathered up some colorful papers and got to work. I stamped and colored my images to match the pattern paper I selected. Then, using the Pull Paper Slider Creative Cuts I cut a panel from white cardstock and the larger folding strip. I folded the strip into the accordion shape and cut a pull tab from heavy cardstock before topping it with patterned paper. Then I glued the accordion shape to the bottom of the pull tab. Next, I ink blended my panel and splattered a little ink and gold paint onto it. 


I dusted my panel and the pull tab with embossing powder to make sure it would slide smoothly, then I fed the accordion through the slot. I adhered the sentiment onto the tab to determine where I needed to place the hills, and group of characters, in order to hide the sentiment when it is in the down position. I cut a hill from the Pull Paper Slider Creative Cuts and a second taller hill from an older die set called On The Hills. Both of these were glued together, then popped up on foam tape, so the sentiment could slide behind. 


I layered two different patterned papers beneath my scene, making sure to use a circle punch to remove a half circle from behind the tab, so it could be easily accessed. Finally, I decided I needed to fill in my pink sky so that it wouldn’t look empty when the sentiment was hidden, so I cut some puffy clouds from the Display A Card Creative Cuts die set. I arranged them into the sky portion and finished it off with a few of the icons from the stamp set. 


I love the bright colors mixed with the browns, it reminds me of chocolate desserts and just seems yummy. I hope you are inspired to get out your Birthday Block stamps and create a fun interactive card like I did. Thank you for stopping by, Davina 

Friday, November 29, 2024

Christmas is here with Davina

 Hello Crafty friends! Davina here, to share some fun Christmas cheer with you today. I’ve said it many times, and I’ll say it again, the Mama Elephant Little Agenda series is one of my favorite collections of stamps. I love being able to add many little cuties onto my scenes, and i especially love combining them onto cover grid backgrounds. 


The card I’m sharing today combines the new and adorable Little Elephant Agenda stamps, and the recent Elephant Cheer stamps. My favorite technique for using cover grid cover plates, is to layer a dimensional foreground at the bottom of the scene, while filling in the exposed grid with Agenda images. This is exactly how I built the card I’m sharing today. 


I cut two panels from white cardstock, using the Globies Cover Grid, and glued them together for a little more structure. I used some glittery Champaign colored cardstock for the snow globe bases and adhered them at the bottom of each snow globe. After mounting the cover grid over some winter themed patterned paper, I mounted the whole thing onto a slightly larger striped panel from the same paper pack. At the very bottom of the grid I mounted a glittery stitched hillside using some foam tape. I filled that hillside with stamped and colored images from Elephant Cheer, and added sparkling Wink of Stella to the stars. 


I added a Little Elephant Agenda image to each exposed snow globe window using a foam dot, and sprinkled a few die cut snowflakes around the card front. I finished the card off with the teeniest strip of a sentiment that I partially stamped from a different Mama Elephant Christmas set. I really love combining and mixing multiple sets onto my cards, and I always hope that my projects will inspire you to do the same. Thank you for dropping by, Davina 

Friday, November 15, 2024

Mama Elephant November Stampede


Welcome to the Mama Elephant Design Team blog hop!

Our newest release is now live and available for purchase in the store!

www.mamaelephant.com


Today I’m sharing a bright and vibrant holiday card using a mix of new and classic Mama elephant products. I used the new Little Elephant Agenda stamps and arranged them onto my Ornament grid background. I put some very busy patterned paper behind the openings, so I decided to layer my die cut sentiment with multi colored cut outs. This sentiment was part of the Penguins Waddle stamp and coordinating die set. 


Check out the rest of the hop for amazing inspiration from our Design Team!


To celebrate the new release, Mama Elephant is picking 1 winner to win a prize pack (winner will be notified in their comment on Instagram, Facebook or YouTube)! Open to Domestic & International (winner pays for shipping)


» 1. Leave a comment on the collective Design Team's Instagram Stampede post
» 2. Leave a comment on our Facebook Stampede post
» 3. Leave a comment on any of the Introduction videos on YouTube
 
Each action qualifies for one entry, max 3 entries per stampeder please and good luck!
(Winner will be announced and notified directly as a reply to the winning comment)
 
Check out the rest of the hop for amazing inspiration from our Design Team!
 
@mamaelephant
@vera_rhuhay
@nicholspohr
@dasmimz
@popsiclesticks
@cre8iveli
@kaliscards
 
Thank you for stopping by! Have a great day from all of us!

Tuesday, October 15, 2024

Mama Elephant October Stampede Blog Hop


Welcome to the Mama Elephant Design Team blog hop!

Our newest release is now live and available for purchase in the store!

www.mamaelephant.com


The shaker card I’m sharing today was so simple using the new Serenity Ornament Creative Cuts die set. I added lots of snowy sequins to the center and a cute gnome couple using the previously released Little Gnome Agenda stamps. I built the scene on a dainty scalloped layer from the new Pull Paper Slider Creative Cut die set and finished it off with a Winter Banner Greetings sentiment strip. 


Check out the rest of the hop for amazing inspiration from our Design Team!


To celebrate the new release, Mama Elephant is picking 1 winner to win a prize pack (winner will be notified in their comment on Instagram, Facebook or YouTube)! Open to Domestic & International (winner pays for shipping)


» 1. Leave a comment on the collective Design Team's Instagram Stampede post
» 2. Leave a comment on our Facebook Stampede post
» 3. Leave a comment on any of the Introduction videos on YouTube
 
Each action qualifies for one entry, max 3 entries per stampeder please and good luck!
 
Check out the rest of the hop for amazing inspiration from our Design Team!
 
@mamaelephant
@vera_rhuhay
@nicholspohr
@dasmimz
@popsiclesticks  (you are here)
@cre8iveli
@kleo_arter_ego
@wienerhoneymooners
 
Thank you for stopping by! Have a great day from all of us!

Monday, October 14, 2024

The Greeting Farm October Release Blog Hop


The October 2024 New Release is now available for purchase in The Greeting Farm Store! This month we introduced 3 new stamp sets. Our first set called MISS CHEEKY CHRISTMAS features 3 cheeky girls prepping for Christmas day. Next, we showcased SKATER COUPLE with our rad duo at the skatepark doing some sick, gnarly moves. In our last set called FROSTY KISSES ANYA, our winter-loving Anya had her heart melted by the cutest snowmen.


The card I’m sharing today features the new Frosty Kisses Anya, and I couldn’t love it more  the two cute snowmen are the perfect accessories for this sweet girl. I created a box card with lots of bright patterned papers and lots of glittery floating snowflakes. 


To celebrate this release we are having a short BLOG HOP! One lucky fan will take home the entire release!! You have until October 18th, 12pm CST/1pm EST to leave your comments on each Designer's Blog. Then head back to The Greeting Farm Blog to let us know you completed the hop. **Remember to qualify for the prize you MUST leave a comment on each Designer's Blog AND The Greeting Farm Blog letting us know you completed the hop.

NOTE: Comments on The Greeting Farm Blog are admin approved so it may take a day for your comment to be visible. Please only comment once, and use the same name on all the blogs when leaving a comment. Do not pick the Anonymous option (otherwise we won't be able to verify that it's you). We will announce the random winner later in the week on the Blog and in our Facebook Group: The Greeting Farm Fan Page.

TGF Design Team:
Cynthia
Davina
Elisabete
Meg

This is a short hop and definitely worth playing along! If you want to grab your favorites now, you can purchase the new stamps HERE. We will have more cards featuring the New Release from our Design Team Leaders starting on the 16th so be sure to stop by The Greeting Farm Blog to see more inspiration.

Happy Hopping!

Sunday, October 6, 2024

Mama Elephant Designer Series

Hello crafty friends! Davina here with you to share my Designer Series project. Today I have a bursting at the seem box card, that I made using some of the newly released products, and a few images from a couple of christmases ago. 


I really wanted to capture a festive North Pole candy land type scene and the new Little Agenda Sweets was the inspiration for my card. Initially, I didn’t plan on making a box card, but I stamped out most of the images before I had a design in place. Next, I cut out the larger arched panels using the B2B Arches CC die set. After coloring my images and die cutting with the Coordinating dies, I quickly realized I was going to need more real estate. I used some dies from my stash to cut the side panels and stitched layers from remnants of cute patterned papers I had accumulated, and assembled the box card onto the B2B Arches. Next, I cut some inserts from more matching papers and began adhering the images into place. 


The large gingerbread house went in the back since it would take up all of the space, then I put the little cart in the middle with the adorable llama perched in the opening. I surrounded the cart with large staggered candy canes, and placed the cutest little trio onto the first layer. I added Santa & Mrs. Claus (with a reindeer) from the set called Secret Santa, along with Santa’s bag of toys and a glittery candy. 


To finish this box card off, I used a shimmery white wavy banner from Winter Banner Greetings CC die set, that i surrounded completely with candy and the shop sign from the Little Agenda Sweets set. I love being able to stamp the sign with colored ink (pro tip- use distress oxide ink for small sentiments so it doesn’t stain your stamps pink!) Every single layer of this card is glittery with both chunky glitter accents and sparkly Wink of Stella. 


I hope you love this little card as much as I do, thank you for stopping by, 

Davina