Showing posts with label shaker card. Show all posts

Sunday, June 15, 2025

Mama Elephant June Stampede


Welcome to the Mama Elephant Design Team blog hop!

Our newest release is now live and available for purchase in the store!

www.mamaelephant.com


Today I’m sharing a cutie shaker card I made using two of the new products, Bewitched and the scalloped Placemat Set. The Little Agenda Witches has long been a favorite of mine and I’m so excited for the new larger images in Bewitched and the amazing Witchy Tree House! I created a shaker frame with the lovely new Placemat Set creative Cuts, and don’t tell anyone my secret, but I used partial diecutting and the B2B Arches die set to cut out the center and make the frame. They worked wonderfully. 


I filled the shaker with bright shaker beads and iridescent stars, then layered a large die cut sentiment called Big Boo that I inked and painted with glitter paint. I surrounded the frame with images from the new Bewitched Stamp set and finished with a few sparkly sequins and jewels. 


Check out the rest of the hop for amazing inspiration from our Design Team!


To celebrate the new release, Mama Elephant is picking 1 winner to win a prize pack (winner will be notified in their comment on Instagram, Facebook or YouTube)! Open to Domestic & International (winner pays for shipping)


» 1. Leave a comment on the collective Design Team's Instagram Stampede post
» 2. Leave a comment on our Facebook Stampede post
» 3. Leave a comment on any of the Introduction videos on YouTube
 
Each action qualifies for one entry, max 3 entries per stampeder please and good luck!
(Winner will be announced and notified directly as a reply to the winning comment)
 
Check out the rest of the hop for amazing inspiration from our Design Team!
 
@mamaelephant
@vera_rhuhay
@nicholspohr
@dasmimz
@popsiclesticks
@cre8iveli

Thank you for stopping by! Have a great day from all of us!

Wednesday, May 28, 2025

Mama Elephant May Designer Series

Hello crafty friends! Davina here, bringing some fun summer inspiration. The May Mama Elephant release is here, and full of congratulations, adventure, and punny plant vibes. I am especially drawn to the two plant picks stamp sets, Build a Potted Plant & Plant Picks, and all of their punny sentiments. I always love adding small little sentiments and words to my cards, and these sets make it so fun to add many of those additions. I also wanted to use the new Insta Grid Creative Cuts that is a square cover plate measuring 4.25x4.25, and I decided to layer dies and make a shaker. 


I’ve been on a personal mission to focus on using some beautiful patterned papers and colors the whole month of May. I’ve been using all of the papers and their remnants for several weeks and I have such a sense of satisfaction at using up my hoarded papers and scraps. These colors are very beautiful to me and scream summer, so I’ve enjoyed seeing all of my coordinating projects. Creating is so much faster when you aren’t deciding on what colors to use and what matches. I’ve become very attached to not having to make so many choices and not spending so much time on making decisions. 


As my supply of patterned papers dwindles down to small remnants, I thought the small grid squares of the Insta Grid was perfect for putting my pieces to good use. Once assembled, I felt as it was a little too busy without some sort of border and I cut a creamy frame using another cover plate called Square Grid Cover. This die cut frame perfectly layered on top, giving my patterned squares some definition and detail. I cut another layer from dark pink cardstock, then carefully placed it in the Insta Grid Die Set to cut out the frame. I mounted that using foam tape and acetate to make a shaker. 


I stamped several small plants and cutie critters from the Little Succulent Agenda and It’s Okay stamp sets to make my plant shelves. Once colored and cut out I arranged my shelves and added their plant pick sentiments from Build a Potted Plant. I mounted my shaker onto a slightly larger peach colored layer sized at 4.5x4.5, and added a creamy sentiment banner from Spring Banner Greetings. These little die cut banners are one of my most favorite details to add to my cards. The contrasting color of the layers give the perfect pop of detail. 


I finished this card off with the addition of a layered die cut tag and piece of pink twine at the top. I love all the small gold details, from the gold foil on the paper to the gold sequins in the shaker, it really just makes me happy. I hope you enjoy this pretty pop of summer and hope you are as inspired by the new release as much as I am. Thank you for stopping by, 

Davina 

Tuesday, October 15, 2024

Mama Elephant October Stampede Blog Hop


Welcome to the Mama Elephant Design Team blog hop!

Our newest release is now live and available for purchase in the store!

www.mamaelephant.com


The shaker card I’m sharing today was so simple using the new Serenity Ornament Creative Cuts die set. I added lots of snowy sequins to the center and a cute gnome couple using the previously released Little Gnome Agenda stamps. I built the scene on a dainty scalloped layer from the new Pull Paper Slider Creative Cut die set and finished it off with a Winter Banner Greetings sentiment strip. 


Check out the rest of the hop for amazing inspiration from our Design Team!


To celebrate the new release, Mama Elephant is picking 1 winner to win a prize pack (winner will be notified in their comment on Instagram, Facebook or YouTube)! Open to Domestic & International (winner pays for shipping)


» 1. Leave a comment on the collective Design Team's Instagram Stampede post
» 2. Leave a comment on our Facebook Stampede post
» 3. Leave a comment on any of the Introduction videos on YouTube
 
Each action qualifies for one entry, max 3 entries per stampeder please and good luck!
 
Check out the rest of the hop for amazing inspiration from our Design Team!
 
@mamaelephant
@vera_rhuhay
@nicholspohr
@dasmimz
@popsiclesticks  (you are here)
@cre8iveli
@kleo_arter_ego
@wienerhoneymooners
 
Thank you for stopping by! Have a great day from all of us!

Saturday, August 31, 2024

Pixie Dust Designs Magic Release

Hello crafty friends! Davina here to share a few projects with the magical new August release. I was so excited when I was asked to guest design with several of the new items, and I hope you love my projects just as much as I do. All of the new products are so amazing but I was especially drawn to the incredible Pyramid Box die set, and the Wizard World stamps set. I love how perfectly they work together and how cute the illustrations are. I decided to make a matching gift set for my first time using this release. I think purple is always very representative of magic and it is iconic when you think of the sweet “froggy” boxes. So, I went with a fun and lovely pastel color scheme.


I started by die cutting the Pyramid Box with purple cardstock and quickly assembled it with little dabs of hot glue to hold each tab in place. No instructions were needed as it was designed so perfectly. Then I used the stitched dies to cut decorative purple papers, making sure to center each die on my stripes. I wanted some gold edging and found the easiest way to get my desired look was to glue each die cut pice onto glittery gold cardstock, then cut out leaving barely a 1/16 edge visible. It was easy as the lines are mostly straight. After adhering them in place, I die cut the pieces for the inside using the same method. I cut the folded hexagons apart so I would have enough room for my clay frog, and mounted them inside using layered foam tape. 


I stamped the wizard boy image into the die cut frame and colored with copic markers. Then I adhered some holographic stars to the background. For the bottom portion, I created a faux chocolate frog with lightweight bakeable clay and a candy mold I had at home. I painted the froh with brown craft paint and used hot glue to mount it in place. Because I wanted to easily open the box without bending the frame, I used a loop of gold ribbon that I fed through a slit in the bottom, and glued on the inside. I covered it with the bottom hexagon and frog, but if you watch my reels on Instagram, you will see the ribbon pull. 


Once I was finished with my beautiful box, I started work on my shaker card. I used the same patterned paper for the background of my mini slimline. I stamped many of the images from Wizard World stamp set and colored with copic markers. I cut out the characters with my scan n cut, and adhered them on top of my shaker frame. I stamped one of the sentiments in a die cut speech bubble that I added shading to, and a few more of the holographic stars. I finished off the card with a few little banners and teeny letter from the Wizard Mug die set. 


I really how cute these products are and how well they were designed. I have so many magical ideas on other ways to use the little Pyramid Box die set. I hope these give you some inspiration for your own projects and make sure to check out the entire release from Pixie Dust Designs. Thank you for stopping by, 

Davina Cantrell @popsiclesticks

Saturday, June 8, 2024

Pretty Pink Posh Sneak Peek Outer Space

Hello crafty friends! Davina here with some “out of this world”, sneak peeks, featuring the June Pretty Pink Posh release. This playful release is full of imaginative play themed sets like construction, first responders, and space. I made a pair of cards that feature some of the space theme products and hope that you are as excited as I was. 

Both cards were created using the Outer Space stamp sets with the coordinating dies, and they are both shaker cards, using the new Shaker Beads mix called Beach Day. I felt like this color combo would be perfect for my space scenes and love the fiery gold and orange with the shades of blue. 


For the first card, I started by die cutting my background using the Pierced Star Plate from Bristol Smooth Cardstock. I inkblended my panel with a blue gradient starting with a light aqua and finishing with a dark teal around the edges. After splattering with several inks, including gold, I put it aside to dry while i worked on the other components. 


I made the shaker element using the new Planet Shaker Die Set. I inkblended the center using the warm colors, and cut the ring from holographic cardstock. I filled the shaker about 1/3 of the way full for maximum effect. Next, I stamped and colored my images using copic markers and added white highlights and some glittery Wink of Stella accents. I backed my star panel with some starry patterned papers I had in my craft stash, and assembled the cards with the shaker in the center. I finished the card off with a sentiment from the stamps set, on a bold white banner. 


I loved the results so much I decided to make a second version of the card but with the new Rocket Shaker Die Set, and the other images from the Outer Space stamp set. I backed this card in a dark navy blue version of the same patterned paper and used the larger more decorative sentiment from the set. I think the reflective holographic paper was absolutely the way to go with these shaker die sets, as the colors pick up so much from the copic colored images, and really bring the scenes to life. 

I hope you like this pair of cards as much as I do, and are inspired to stock up on the new release for these “out of this world” collection of products! Thank you for stopping by, Davina 

Sunday, April 14, 2024

The Greeting Farm April Blog Hop


The April 2024 New Release is now available for purchase in The Greeting Farm Store. This month we introduced 3 new stamp sets. Our first set called MERMAID ANYA 2 takes us under the sea with a gorgeous Anya and her fish and sea horse friends. Next, our furry friends went on a road trip in a caravan in a set called ADVENTURE PALS. Our final set called MISS ANYA STYLE has a beautiful Anya with 4 stunning dresses.


I’m sharing a shaker card I made using the beautiful Mermaid Anya 2 stamp set. I just adore how her hair flows across her face and large coral and starfish fascinator. I combined a few images from an older set called Happy to Sea You. I adhered everything on top of a scallop scale shaker that I’ve had in my stash for years and years and I like how the beachy patterned paper peeks through from behind.


To celebrate this release we are having a short BLOG HOP! One lucky fan will take home the entire release!! You have until April 18th, 12pm CST/1pm EST to leave your comments on each Designer's Blog. Then head back to The Greeting Farm Blog to let us know you completed the hop.

**Remember to qualify for the prize you MUST leave a comment on each Designer's Blog AND The Greeting Farm Blog letting us know you completed the hop.

NOTE: Comments on The Greeting Farm Blog are admin approved so it may take a day for your comment to be visible. Please only comment once, and use the same name on all the blogs when leaving a comment. Do not pick the Anonymous option (otherwise we won't be able to verify that it's you).

We will announce the random winner later in the week on the Blog and in our Facebook Group: The Greeting Farm Fan Page.

TGF Design Team:
Cynthia
Davina
Elisabete
Meg

This is a short hop and definitely worth playing along! If you want to grab your favorites now, you can purchase the new stamps HERE. We will have more cards featuring the New Release from our Design Team Leaders starting on the 16th so be sure to stop by The Greeting Farm Blog to see more inspiration.

Happy Hopping!

Wednesday, March 27, 2024

Mama Elephant Designer Series Capybara Party

Hello crafty friends! Davina here, with some slimline shaker card goodness. I loved the fun celebration theme of this latest release from Mama Elephant, and all of the balloons and cute critters. I wanted to make a shaker card using one of the new standalone die sets called Round Balloon Shaker CC , and I thought it would be nice to line up a few smaller ones on a slimline card base, and combine the Capybara Party stamps with it.


I cut my slimline base using the Slim Card Basics CC dies, and carefully marked where i wanted to place my balloons. I cut the balloon shape out 3 times and reserved the decorative pierced portion. I cut a second slimline base and lined it with pretty mint colored paper. Next, I created a frame with foam tape around the patterned paper portion, including two supports between the balloons. I filled the frame with lots of sequins, iridescent stars and pastel clay confetti. 


I gave the reserved die cut balloons pieces a quick coloring using a light minty COPIC marker, then glued them back into place on top of acetate, creating the windows. Then I carefully applied the top portion directly over the sequin filled frame. I was fortunate that it went on perfectly because I have had some mishaps in the past. Next, I mounted my shaker frame onto a scalloped layer (also from the Slim Card Basic CC die set) that I cut from a darker shade of minty cardstock. 

I stamped my images onto Bight White Neenah Solar Crest cardstock and gave them a very light pastel coloring that matched the confetti sequins. I added a few white highlights and my signature dots to the images before adhering them onto my scene. I felt as though it needed a little something extra to fill the negative space, so I created a small layered banner using the backside of the patterned paper, some stripes, and a glittery star. 


I really love how simple and pretty this turned out  and nothing beats a shaker card for excitement. I especially like how the teeny iridescent stars stay clinging to the acetate in the windows, so even if the other bits are at the bottom of the balloons, the little stars are still distributed all over. 

Thank you so much for stopping by, I hope this project brings a smile to your day,

Davina 


Wednesday, March 6, 2024

Pretty Pink Posh Spring Release Blog Hop


Hello crafty friends! Davina here to share Spring Joy with the new Pretty Pink Posh release Blog Hop. This beautiful release is full of Easter and Spring products sure to make you fall in love. As always there is a diverse amount of products from stencils and stamps to many new die sets and so many gorgeous butterflies! There are also add ons to our favorite lines, like the super cute themed cupcakes and playful train sets. Make sure to “Hop Along” and leave a comment at each stop for your chance to win one of 3 $30 gifts.


I made a Spring shaker card using a combination of several new items. I started by cutting a background using the Butterfly Cover Plate from heavy cardstock. I made it a shaker by mounting it with foam tape over a pretty pastel plaid backgroundand and filling it with the new assortment of shaker beads called Pastel Party. I’ve been adding an extra 1/4 inch to my cards recently, so that my pattered papers can extend beyond the A2 cover plates. So I’ve been cutting larger card bases from my extensive stash of 12x12 cardstock. 


I stamped and colored two of the spring themed cupcakes from Easter Cupcake Set, and die cut using the now de-tabbed coordinating dies! They are incredible. I also die cut several butterflies from the new Stitched Butterflies Dies that are so perfect and detailed for year around projects. I arranged my images onto my card and topped the cupcakes with a glittery “Spring” that I cut from the new Spring Script Die.

I finished off this card with an embossed sentiment from Ester Sentiments Strips Stamps Set on a layered Sentiment Strips Banner, and a few sparkling sequins. I hope you love this new release as much as I do and take a few minutes to participate in the blog hop. Make sure you leave a comment at each blog for your chance to win one of 3 $30 prizes. 

Pretty Pink Posh blog 
Nichol Spohr
Amy Rysavy
Marine Simon
Barbara Tarayao
Lindsey Larsen
Kristie Marcotte
Lea Lawson
Carly Minner
Davina Cantrell  you are here 


Monday, January 22, 2024

Designer Series: “Herd” It’s Your Birthday

Hello crafty friends! Davina here, to share my Mama Elephant Designer Series project. I am calling this slimline shaker card ‘Herd’ It’s Your Birthday, and I love the hot pink farm theme. The January Mama Elephant release is so adorable, with all of the farm themed products, and I combined quite a few on this landscape card. 


I used the Slim Card Basics CC die set to cut the card base from hot pink cardstock, the pink gingham top layer with windows, and the white scalloped frame. I’ve been on a mission to put a dent into the sequin collection I have amassed, so don’t be shocked when I make a million shakers. I inked a bright blue sky onto a back panel the same size as the gingham layer, and framed it in with foam tape after placing a little red farm house in the top left corner. I filled it in with lots of bright clay confetti and added a grassy strip over the acetate, but under the gingham.


I stamped the farm house, flowers, and hay bales from the Little Agenda House stamp set. I know the hay images were intended to be bushes, but they worked perfectly for my farm scene hay piles. Then, I added a white picket fence that I cut using the Farm House CC die set. I cut two and covered the seam up with a little cow image. Next, I stamped a bunch of adorable teeny cows from the Little Cow Agenda stamps, and colored each differently. I arranged them across the bottom of my scene and got to work on my sentiment. I made a custom punny banner using the smaller Little Signage Agenda stamp set. The letter size was perfect. Once adhered, I glued some tiny iridescent stars all around the top. 


Mixing and combining stamp sets is my favorite technique for making unique cards and scenes. I hope that you enjoy this scene, and thank you for stopping by,

Davina 

Friday, January 19, 2024

Mama Elephant Stamp Highlight: Surprise Boxes

Hello crafty friends! Today is the final day of the Mama Elephant Stamp Highlights, and we are going out with a bang. The card I made today features the Surprise Boxes stamps and Creative Cuts combined with the new Square Grid Cover Creative Cuts


This 9 grid cover plate makes it so easy and fun to make unique shaker cards. I added a cloudy border to the front of the grid, and made my sequin filled shaker atop an inkblended aqua panel. After stamping these adorable images and coloring with copic markers, I cut them out using the coordinating die cuts. I love the cute gift wrapping accessories and layered them across the bottom. I cut two speech bubbles from black card stock using the Simple Friends Bubbles CC, then heat embossed sentiments from Surprise Boxes stamp set.


I mounted this shaker grid onto a fuchsia 4.5 X 4.5 card base, and finished it off with a few of the assorted sequins. Make sure to head over to the Mama Elephant blog to see the entire release and more inspiration from the Design Team. Thank you for stopping by,

Davina 

Monday, January 15, 2024

Mama Elephant Stampede: Love You Moo-cho


Welcome to the Mama Elephant Design Team blog hop!

Our newest release is now live and available for purchase in the store!

www.mamaelephant.com


I just adore this entire release so much. The farm themed dies and Little Cow Agenda stamps just pull at my heart strings.  But the sweet face of the FBA (Favor Bag Accesory) Cow is just darling. I cut all of the components and gently inked some light tans onto the head, face, and horns. Then, I went back in with a sharp brown colored pencil to add a few shadowy hairs. I used copi markers to color the rosy pink areas in the ears and nose. Finally, I finished her off with some white dot highlights. 


I created a shaker card with kraft card stock and the Heart Grid Cover for my card base. I used a soft rosy ruled paper for the background and filled it up with a sparkly mix of sequins. After adhering the cow to the cover I made a banner for sentiment using the Kissie Letters Alphabet stamps and a partial sentiment from the Love Cupids stamp set. I finished this card off with a sprinkling of sparkly sequins and a small bakers twine bow on the bell. I hope you like this card and follow along to see more.


Check out the rest of the hop for amazing inspiration from our Design Team!


To celebrate the new release, Mama Elephant is picking 1 winner to win a prize pack (winner will be notified in their comment on Instagram, Facebook or YouTube)! Open to Domestic & International (winner pays for shipping)


» 1. Leave a comment on the collective Design Team's Instagram Stampede post
» 2. Leave a comment on our Facebook Stampede post
» 3. Leave a comment on any of the Introduction videos on YouTube
 
Each action qualifies for one entry, max 3 entries per stampeder please and good luck!
 
Check out the rest of the hop for amazing inspiration from our Design Team!
 
 
Thank you for stopping by! Have a great day from all of us!
 

Wednesday, October 11, 2023

Mama Elephant Designer Series Project

Hello crafty friends! Davina here to share my Mama Elephant Designer Series project, using adorable products from the 11th Anniversary release. I made a winter scene with flat mesh shaker using the Arch Snow Globe and the cute A Capybara Christmas Stamps and Creative Cuts. 


I started by building my snow globe and inkblending the parts and pieces. Once getting the background piece assembled with the snow drifts, I stamped and colored images from A Capybara Christmas. I wanted a tall tree so I stamped one using Busy Elves. I adhered the tree and a capybara onto the snowdrifts then placed a pile of small flat star shaped glitter in the center. On the backside of the snow globe front, I outlined 1/8 inch scor tape. I removed the paper liner and adhered a piece of mesh tulle, making sure to really secure the mesh into the glue. Then I added a second layer of tape over the mesh before trimming the tulle around the globe. Once that is complete I layered it onto the glittery background. The stars move around, but the card is not as bulky as a traditional shaker, and mails much easier. 


I arranged my snowglobe onto a glitter cardstock snow drift and surrounded the base with cute Christmas themed capybaras and ornaments. The top was looking so neglected and empty so I created a tiny capybara with reindeer antlers using two Little Agenda sets, Little Capybara Agenda and Little Reindeer Agenda. I placed him flying over the snow globe and finished it off with an Easy Xmas sentiment strip and a few stars. 


I layered everything onto some Christmas colored plaid patterned paper and think its just the cutest. I love how well everything came together and hope that you do too. Thank you for stopping by, 

Davina 


Saturday, October 1, 2022

Pretty Pink Posh Halloween Week


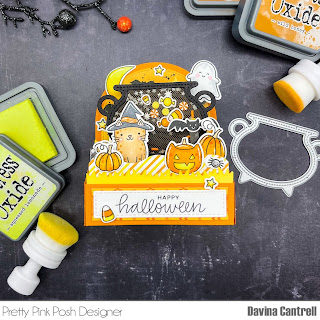
Hello Crafty Friends! I’m so excited to be participating in the Pretty Pink Posh Halloween Theme Week. All of their products are so wonderfully illustrated and designed, that it is a breeze to pull multiple stamp sets, stencils and dies together to make the cutest cards and decor. I did just that for this bright and bold shaker boxcard. 


I stamped images from newer and older sets to build this scene. Halloween PalsGhost FriendsHalloween friends, and Giving Thanks to name a few. I always use the coordinating dies to achieve a clean and polished look to my images. 


Before assembling this card, I created a flat mesh shaker using the new Cauldron Shaker Die. I cut the shaker twice, added a few stamped images along with some glow in the dark mini stars and some clay confetti pieces from the Halloween Party Mix. I sandwiched a small piece of orange tulle mesh to make a flat shaker using 1/8 double sided tape. 


For the background I inkblended an orange ombré sky and used the Spooky Sky Stencil to ink the bats and emboss the clouds onto my Bristol cardstock. I gently splattered with water and black ink to distress and “spookify” the sky. 


I was excited to use up several pieces of patterned paper remnants, that I had in my stash, for each of the layers and side panels of the box. I adhered my images and shaker through the layers and even made sure to have some floating pieces using acetate strips. I finished this up by stamping a sentiment on the back and adding a final pumpkin. 


I hope you love this fun and spooky card and appreciate you stopping by to see how I created it. Now is the perfect time for you to stock up on your Halloween supplies at Pretty Pink Posh, all of the Halloween items are on sale so don’t miss out! 
Davina 


Friday, February 18, 2022

Mama Elephant Stamp Highlights: Wishes Enclosed

 Hello crafty friends! The Mama Elephant new release Stamp Highlights continue with Wishes Enclosed. This fun sentiment set is my favorite set of the release. Which is odd because I never love sentiments so much. It matches the super cute Christmas set Everything Nice, which I also fell in love with. I used these great sentiments on almost every card sample I created for this release. 


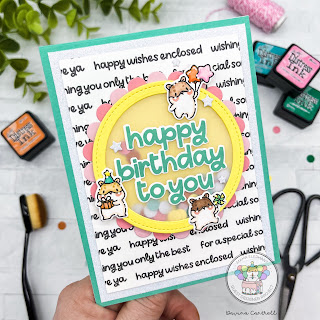
This bold shaker card uses all the small sentiments in addition to a large one. I created a patterned paper by lining up 3 sentiments, and stamping it every 3/4 of an inch down a piece of bright Neenah cardstock. Once I made it down the panel I alternated the sentiments and staggered them a little differently before repeating the process. Once it was done I pulled out some of the dies from the last release and got to work.

 Using the B2B rectangle CC dies, I used the 3 largest to cut an aqua, white glitter, and my printed panel. I adhered them all together and set aside. Using the Circle Combo CC dies, I cut two scallops from pink cardstock. I inked the edges of one a little darker, then adhered it to the unlinked one. Next I cut two yellow circles using the coordinating stitched die. I used the next size down to cut the center from one of those yellow circles. I backed it with vellum and skinny foam strips along the edge before layering it onto the first circle. I had made a little pile of paper confetti using the confetti die from the Party Scene Cover CC, then adhered it over the pink scalloped circle I made. 


I stamped HBTY using a Wishes Enclosed sentiment in Aqua ink, and die cut it with the coordinating die. I glued it to the center of the shaker and surrounded it with 3 adorable hamsters from the Little Hamster Agenda stamp set. I couldn’t love this more and will have a hard time giving it away haha. I hope you enjoyed this card as much as I do. Don’t forget to head over to the Mama Elephant Blog to see the inspiration from all the Design Team. Thank you for stopping by, 

Davina