Thursday, September 28, 2023

Mama Elephant Stamp Highlights Little Capybara Agenda

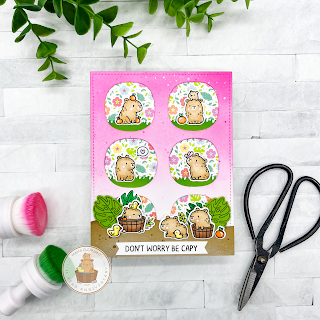
 Hello crafty friends. Today we continue the Stamp Highlights for Mama Elephants latest release. Today we are featuring the Little Capybara Agenda stamps and dies.


The agenda sets are always my favorite as I love adding a ton of little images to my cards. I used the Six Window cover plate for the base of this card, that I inkblended and backed with printed tropical paper. Then, I created a grounded layer to set the scene. I used the cutie capybaras and added some tropical leaves from The Wild Roar stamps as accessories. I then added some little grass and more capybaras to each window. 


I finished up this card with a banner across the bottom stamped with one of the sentiments from the Capybara Christmas stamp set. I hope you take the time to check out all of the Design Teams inspiration for this cute set. And thank you for stopping by,

Davina 
Monday, September 25, 2023

Mama Elephant Stamp Highlight Holiday Huggers

 Hello crafty friends! As the Mama Elephant Stamp Highlights continue, today we are featuring Holiday Huggers Stamps and Creative Cuts. This adorable set is especially cute with the chubby little critters and all of the items they can “hug”. The die set is great because it cuts out the hands to let the accessories tuck under.


I wanted to use all of the images from the set on my card. So I used the Comic Cover CC for the layout. I backed the frame with some teal holiday paper, and arranged a critter in arch section. I adhered some contrasting paper in the center space and popped up a fancy embossed sentiments from the Make it Merry stamp set.  


I finished this card off with some sparkly green jewels. I hope that you take the time to check out all of the inspiration from the Design Team. Thank you for stopping by,

Davina

Thursday, September 21, 2023

Mama Elephant Stamp Highlight Decorate the Tree

Hello friends. We are continuing the Mama Elephant Stamp Highlights for their 11th anniversary release. Today we are featuring the stamp set Decorate the Tree and creative cuts. I adore this set so much. The big tree is wonderful for surrounding with the cute characters and adding the garlands. 


I stamped my images and colored with copic markers before cutting out with the coordinating dies. While planning my scene, I decided on some festive foiled paper as the background. I cut a snowy hillside to layer on the bottom half, and used the new large Marquee Letters creative cuts to spell out Jolly on the bottom with gold glitter cardstock. 


I thoughtfully arranged my colored images as the focus of my scene and added small white highlights and glittery Wink of Stella to some of the images. To finish this off, I added two word bubbles from Let’s Chat Creative Cuts and the tiny typed sentiments are from an old set called Let’s Go Caroling. 

Please head over to the Mama Elephant Blog to see all of the incredible inspiration from the Design Team. Thank you for stopping by, Davina 

Wednesday, September 20, 2023

Mama Elephant Stamp Highlight Wonders of Winter

Hello crafty friends! Mama Elephant is celebrating their 11th anniversary and today we are featuring the Wonders of Winter  Stamps and Creative Cuts. This background stamp set is especially lovely to help create the background of any scene. It features some snowy hillsides, a trio of birch tree trunks, and a little cabin on a hill. 

I wanted to make a winter pond scene, and I thought the snowy hillside would be perfect to create a snowbank. I stamped the snowy hillside and colored it with COPIC markers. After die cutting, I rotated it upside down and layered it over an aqua inked panel that I would as my pond. I gently inked the new sky portion, then splattered with aqua ink. Next, I heat embossed the birch trees with white embossing powder on kraft cardstock and layered the die cut tree trunks over my inked pond. 

I stamped some adorable critters from the Snow Friends stamp set and arranged them onto the scene after heat embossing a holiday sentiment from the same sentiment into the sky. I centered my scene onto some plaid paper and finished it off with a few glittery snowflakes and a pair of little fluffy clouds. 

I think this set is very versatile and I hope that you head over to the Mama Elephant blog and Instagram feed too see the incredible inspiration from the entire Design Team. 

Thank you for stopping by, Davina 

Tuesday, September 19, 2023

Mama Elephant Stamp Highlight Capybara Christmas


Hello crafty friends. I’m so happy to be a part of Mama Elephants spectacular 11th birthday celebration release. Today we are kicking off the stamp highlights with the Capybara Christmas  stamps and Creative Cuts (CC). I really think this set is so cute and I especially love that they are themed with Christmas accessories making them perfect for fun and playful  holiday cards.


 I combined these adorable images with the new Sweet Shop Frame CC that has the sweetest tiny scallop edge detail, a candy mint and a set of tags. I also added a layered bow from the Mini Bow Box CC set. 

After stamping out the images I colored everything with COPIC markers and cut out using the coordinating Creative Cuts. I added small white highlights then adhered them onto my Sweet Shop frame that I cut out twice and glued together. I arranged the images towards the bottoms so my embossed sentiment would be visible. Then I added my pink inkblended bow. I finished this off by layering over some bright plaid-like patterned paper and adding few star sequins. 


Make sure to head over to the Mama Elephant blog and Instagram feed to see all of the incredible inspiration, and to hop along for your chance to win! 


Monday, July 10, 2023

Mama Elephant July Designer Series


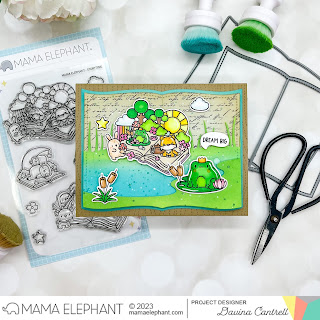
Hello crafty friends. Today I’m super honored to be sharing my first Designer Series project as a member of the incredible Mama Elephant Design Team. It’s such an honor to be considered part of this group of talented cardmakers. 


Being an avid reader, the Storybook products really stood out to me, for my first complex scene. I adore the playfulness of the little meadow themed book from Storytime, with the cute frog and fox. I combined this nice large image with a larger frog and cattails spray from Hello Froggy. I colored everything with bright citrus colors and die cut with the coordinating Creative Cuts. 


I used the beautiful Turn the Page Creative Cut die to make a full layered book. I cut layers from colored cardstock for the aqua base, and patterned paper for the smaller stitched layer. I also cut a stitched page from Bristol smooth cardstock, that I die cut with the Pond Scene Creative Cuts. After inkblending, I layered these together and adhered my images, often using foam tape. I folded a pice of plain copy paper into fourths, and die cut that as well with the stitched layer. I stapled those four pages to the aqua base, then gently distressed the edges, before adhering my decorated scene on top. It’s not noticeable on the photos but my book has a “real” appearance with many pages that are easily visible in person 


I finished off my little book scene with a small word bubble that I stamped with a “Dream Big” sentiment from the Storybook Sayings sentiment set. I love the playfulness of this scene, like a fantasy or daydream. 


I hope you enjoyed this card and find some time to Dream Big and get creative in the next few days, make sure to check out all of the inspiration from the Mama Elephant Design Team. Thank you, 

Davina 


Supply List: 

Storybook Stamps & CC

Storybook Sayings & CC

Hello Froggy & CC

Turn the Page CC

Pond Scene CC 


Wednesday, June 28, 2023

Mama Elephant Stamp Highlights Yummy Snacks


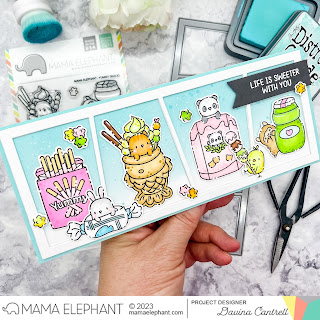
 Hello crafty friends. Today is the last day of a stamp Highlights from the Mama Elephant June Release, and today we are featuring the cutest Yummy Snacks. I absolutely adore these cute critters with all the delicious treats and had to use them all on one giant slimline. 

I stamped and colored all of the wonderful large images using bright happy colors. Then, I die cut them all using the coordinating dies. I made the slimline scene by cutting out the Slim Comic Strip  slimline die 3 times, then glued them together. I adhered the die sit strip to a gently inkblended background panel that I splattered with white and iridescent ink. I arranged the images in and around the scene, and finished it off with a heat embossed sentiment strip. I love how the Star candy looks scattered around like confetti. 

I hope you like this nice big scene, and take the time to see the rest of the incredible projects from the Design Team. Thank you for stopping by,
Davina