Saturday, August 31, 2024

Pixie Dust Designs Magic Release

Hello crafty friends! Davina here to share a few projects with the magical new August release. I was so excited when I was asked to guest design with several of the new items, and I hope you love my projects just as much as I do. All of the new products are so amazing but I was especially drawn to the incredible Pyramid Box die set, and the Wizard World stamps set. I love how perfectly they work together and how cute the illustrations are. I decided to make a matching gift set for my first time using this release. I think purple is always very representative of magic and it is iconic when you think of the sweet “froggy” boxes. So, I went with a fun and lovely pastel color scheme.


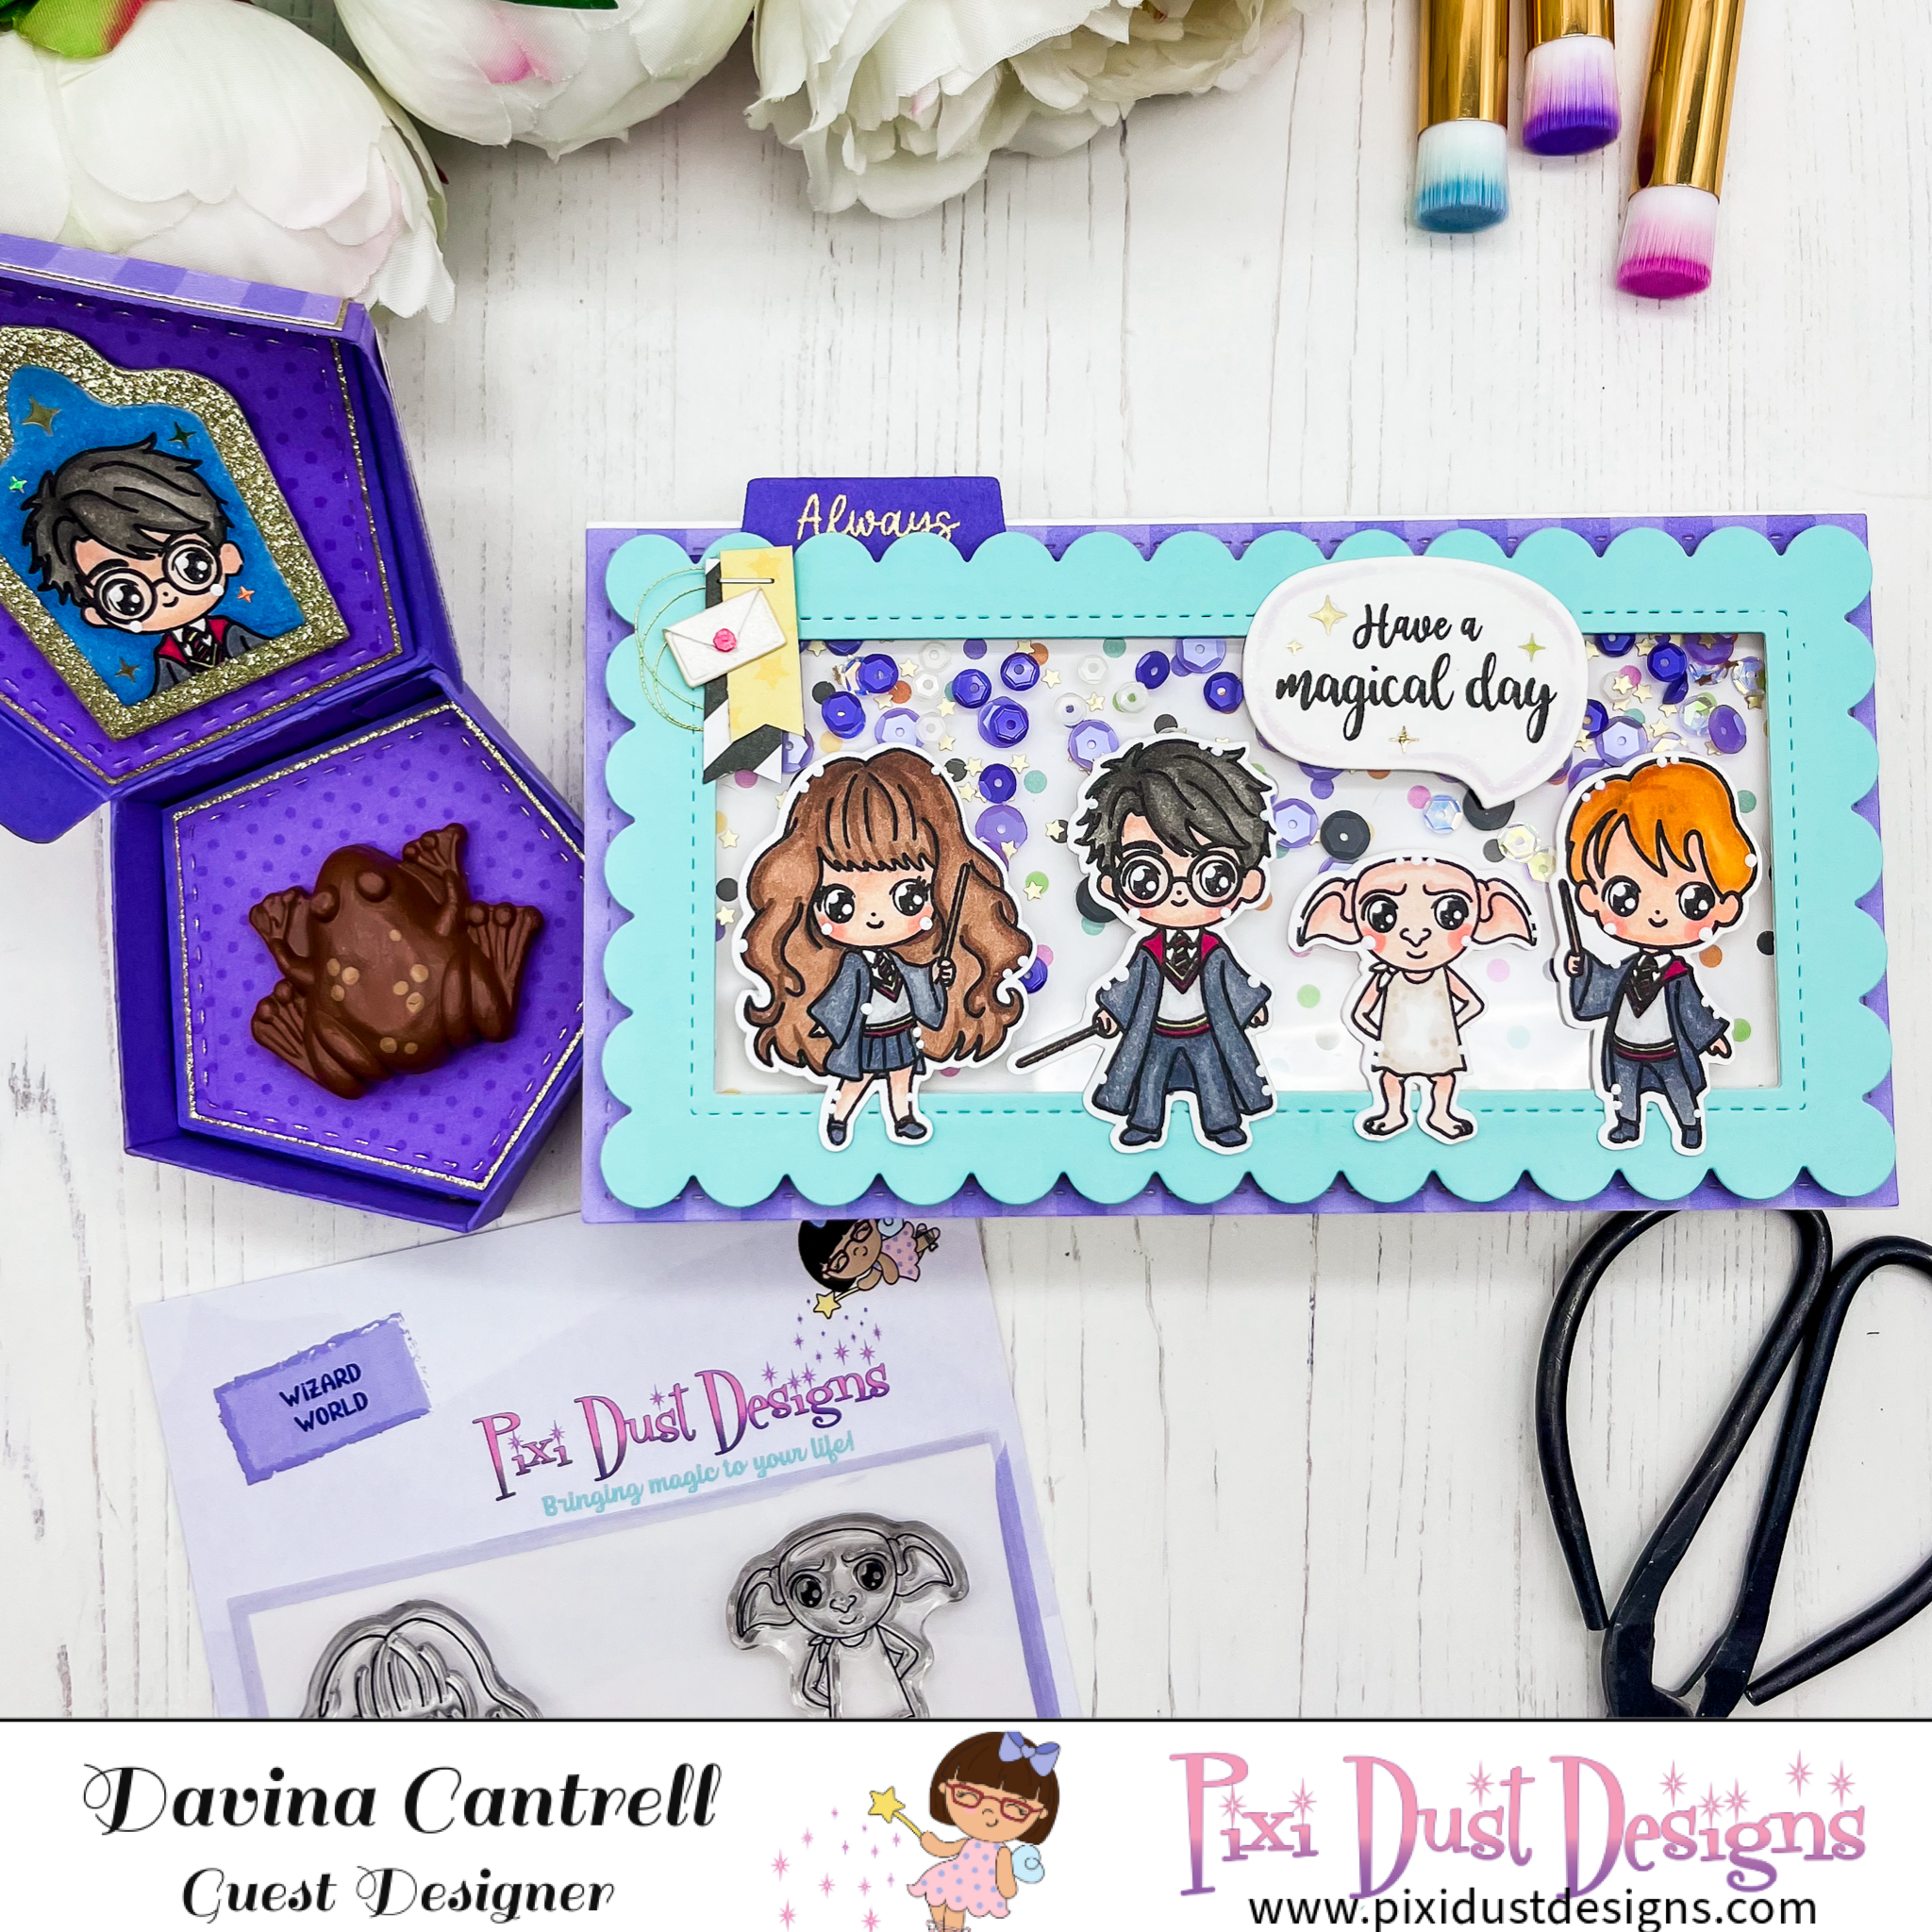
I started by die cutting the Pyramid Box with purple cardstock and quickly assembled it with little dabs of hot glue to hold each tab in place. No instructions were needed as it was designed so perfectly. Then I used the stitched dies to cut decorative purple papers, making sure to center each die on my stripes. I wanted some gold edging and found the easiest way to get my desired look was to glue each die cut pice onto glittery gold cardstock, then cut out leaving barely a 1/16 edge visible. It was easy as the lines are mostly straight. After adhering them in place, I die cut the pieces for the inside using the same method. I cut the folded hexagons apart so I would have enough room for my clay frog, and mounted them inside using layered foam tape. 


I stamped the wizard boy image into the die cut frame and colored with copic markers. Then I adhered some holographic stars to the background. For the bottom portion, I created a faux chocolate frog with lightweight bakeable clay and a candy mold I had at home. I painted the froh with brown craft paint and used hot glue to mount it in place. Because I wanted to easily open the box without bending the frame, I used a loop of gold ribbon that I fed through a slit in the bottom, and glued on the inside. I covered it with the bottom hexagon and frog, but if you watch my reels on Instagram, you will see the ribbon pull. 


Once I was finished with my beautiful box, I started work on my shaker card. I used the same patterned paper for the background of my mini slimline. I stamped many of the images from Wizard World stamp set and colored with copic markers. I cut out the characters with my scan n cut, and adhered them on top of my shaker frame. I stamped one of the sentiments in a die cut speech bubble that I added shading to, and a few more of the holographic stars. I finished off the card with a few little banners and teeny letter from the Wizard Mug die set. 


I really how cute these products are and how well they were designed. I have so many magical ideas on other ways to use the little Pyramid Box die set. I hope these give you some inspiration for your own projects and make sure to check out the entire release from Pixie Dust Designs. Thank you for stopping by, 

Davina Cantrell @popsiclesticks

Wednesday, August 14, 2024

The Greeting Farm August release blog hop


The August 2024 New Release is now available for purchase in The Greeting Farm Store! This month we introduced 3 new stamp sets. Our first set called ANYA LOVES SUSHI features Anya ready to devour all her favorite sushi dishes. In our 2nd set, EMMY SENDS, we have an adorable girl holding a bird who's ready to send off lots of sweetness your way. Lastly, we introduced ANYA DELIVERS with Anya driving by on her scooter with happy wishes to all. 


My project for today’s blog hop uses the super cute new set Anya Delivers. I adore how cute she is riding on the scooter making her deliveries. I created a basic pattern paper background with a grassy hill in front of a house die cut. I left it very simple so that the packages and cute pup would stand out and help my Anya really POP! Across the top i layered a large die cut sentiment that i painted with holographic glitter paint  


To celebrate this release we are having a short BLOG HOP! One lucky fan will take home the entire release!! You have until August 18th, 12pm CST/1pm EST to leave your comments on each Designer's Blog. Then head back to The Greeting Farm Blog to let us know you completed the hop. **Remember to qualify for the prize you MUST leave a comment on each Designer's Blog AND The Greeting Farm Blog letting us know you completed the hop.

NOTE: Comments on The Greeting Farm Blog are admin approved so it may take a day for your comment to be visible. Please only comment once, and use the same name on all the blogs when leaving a comment. Do not pick the Anonymous option (otherwise we won't be able to verify that it's you). We will announce the random winner later in the week on the Blog and in our Facebook Group: The Greeting Farm Fan Page.

TGF Design Team:
Cynthia
Davina
Elisabete
Meg

This is a short hop and definitely worth playing along! If you want to grab your favorites now, you can purchase the new stamps HERE. We will have more cards featuring the New Release from our Design Team Leaders starting on the 20th so be sure to stop by The Greeting Farm Blog to see more inspiration.

Happy Hopping!

Sunday, July 14, 2024


The July 2024 New Release is now available for purchase in The Greeting Farm Store! This month we introduced 3 new stamp sets. Our first set called FAIRY BDAY ANYA features a gorgeous fairy ready to wish your recipient a Fairy Happy Birthday. Next, we showcased IMPECKABLE with adorable birds, a garden box with flowers, and 3 sentiments. Lastly, we introduced SCHOOL COUPLE because August is right around the corner and kids are headed back to school.


Today I'm sharing a slimline card I made using the new School Couple set. I love how cute they are and especially Ians little Varsity jacket. I put these cuties onto a slimline scene that has 3 star shaped windows in the back ground. I filled each window with coordinating paper and added some cute accents.


To celebrate this release we are having a short BLOG HOP! One lucky fan will take home the entire release!! You have until July 18th, 12pm CST/1pm EST to leave your comments on each Designer's Blog. Then head back to The Greeting Farm Blog to let us know you completed the hop. **Remember to qualify for the prize you MUST leave a comment on each Designer's Blog AND The Greeting Farm Blog letting us know you completed the hop.

NOTE: Comments on The Greeting Farm Blog are admin approved so it may take a day for your comment to be visible. Please only comment once, and use the same name on all the blogs when leaving a comment. Do not pick the Anonymous option (otherwise we won't be able to verify that it's you). We will announce the random winner later in the week on the Blog and in our Facebook Group: The Greeting Farm Fan Page.

TGF Design Team:
Cynthia
Davina
Elisabete
Meg

This is a short hop and definitely worth playing along! If you want to grab your favorites now, you can purchase the new stamps HERE. We will have more cards featuring the New Release from our Design Team Leaders starting on the 16th so be sure to stop by The Greeting Farm Blog to see more inspiration.

Happy Hopping!

Friday, June 28, 2024

Trick or Treat with Mama Elephant

Hello crafty friends! Davina here, with a spooky cute pink Halloween card I made using the new Mama Elephant June release. I love that some not so spooky fall items were released so early in the year since Halloween cards are my favorite to make.


I wanted to make a neighborhood scene with ghost trick or treaters so I went into my stamp stash and pulled out the Little Agenda House set. I also stamped the ghosts, candy, and stars from the new Big Boo stamps, and the witchy ghost from Deliver Fall Fun. I colored the images using shades of pink, orange and charcoal then cut out with the coordinating dies. I felt like the houses needed a little Halloween decor which I found on the Little Witch Agenda stamp set. The teeny kitties and pumpkins were perfect. 


For the card base I die cut the Comic Cover Basics  cover plate from bristle smooth card stock and a dark charcoal textured card stock. I ink blended the white card in shades of pink, orange and black then gave a little splattering of black and iridescent ink. Then i cut some grassy layers from the remnants of the charcoal card stock and inked them even darker. I arranged the little scenes in the openings and mounted the heat embossed sentiments centered on top. The selection of Halloween sentiments from the new Be Scary sentiments are amazing as usual and never disappoint. 


I finished this card off with lots of tiny sparkly stars and some spiderwebbed pink patterned paper. I really love making pink Halloween cards and hope you enjoy this one. Thank you for stopping by, Davina  

Friday, June 14, 2024

The Greeting Farm June Blog Hop


The June 2024 New Release is now available for purchase in The Greeting Farm Store. This month we introduced 3 new stamp sets. Our first set called GONE GLAMPING features the cutest bunny and fox enjoying the scenic outdoors with an awesome camping set up. Next, we have CHEEKY ALOHA with two Hawaiian girls ready to sing and dance the night away. Lastly, we have Anya and Ian diving into summer in their inner tubes with POOLSIDE VIBES.


Today I’m sharing a sunny water scene using the new Poolside Vibes stamp set. I created a multi wave water layer and adhered it over an inky sun filled sky. I used the adorable floaty Ian with his water gun, and created a custom die cut sentiment. I love how you can make a pool or beach scene with this set.


To celebrate this release we are having a short BLOG HOP! One lucky fan will take home the entire release!! You have until June 18th, 12pm CST/1pm EST to leave your comments on each Designer's Blog. Then head back to The Greeting Farm Blog to let us know you completed the hop. **Remember to qualify for the prize you MUST leave a comment on each Designer's Blog AND The Greeting Farm Blog letting us know you completed the hop.

NOTE: Comments on The Greeting Farm Blog are admin approved so it may take a day for your comment to be visible. Please only comment once, and use the same name on all the blogs when leaving a comment. Do not pick the Anonymous option (otherwise we won't be able to verify that it's you). We will announce the random winner later in the week on the Blog and in our Facebook Group: The Greeting Farm Fan Page.

TGF Design Team:
Cynthia
Davina
Elisabete
Meg

This is a short hop and definitely worth playing along! If you want to grab your favorites now, you can purchase the new stamps HERE. We will have more cards featuring the New Release from our Design Team Leaders starting on the 17th so be sure to stop by The Greeting Farm Blog to see more inspiration.

Happy Hopping!

Saturday, June 8, 2024

Pretty Pink Posh Sneak Peek Outer Space

Hello crafty friends! Davina here with some “out of this world”, sneak peeks, featuring the June Pretty Pink Posh release. This playful release is full of imaginative play themed sets like construction, first responders, and space. I made a pair of cards that feature some of the space theme products and hope that you are as excited as I was. 

Both cards were created using the Outer Space stamp sets with the coordinating dies, and they are both shaker cards, using the new Shaker Beads mix called Beach Day. I felt like this color combo would be perfect for my space scenes and love the fiery gold and orange with the shades of blue. 


For the first card, I started by die cutting my background using the Pierced Star Plate from Bristol Smooth Cardstock. I inkblended my panel with a blue gradient starting with a light aqua and finishing with a dark teal around the edges. After splattering with several inks, including gold, I put it aside to dry while i worked on the other components. 


I made the shaker element using the new Planet Shaker Die Set. I inkblended the center using the warm colors, and cut the ring from holographic cardstock. I filled the shaker about 1/3 of the way full for maximum effect. Next, I stamped and colored my images using copic markers and added white highlights and some glittery Wink of Stella accents. I backed my star panel with some starry patterned papers I had in my craft stash, and assembled the cards with the shaker in the center. I finished the card off with a sentiment from the stamps set, on a bold white banner. 


I loved the results so much I decided to make a second version of the card but with the new Rocket Shaker Die Set, and the other images from the Outer Space stamp set. I backed this card in a dark navy blue version of the same patterned paper and used the larger more decorative sentiment from the set. I think the reflective holographic paper was absolutely the way to go with these shaker die sets, as the colors pick up so much from the copic colored images, and really bring the scenes to life. 

I hope you like this pair of cards as much as I do, and are inspired to stock up on the new release for these “out of this world” collection of products! Thank you for stopping by, Davina 

Tuesday, May 28, 2024

Mama Elephant Designer Series featuring Celebrate You

Hello crafty friends! Davina here with a fun interactive card featuring Celebrate You from the latest Mama Elephant release. The May release had two fantastic sentiment sets and I really love them both, but today I wanted to use the more delicate text on the Celebrate You set. I adore the pretty script paired with the signature “kissie alpha” font. I also really wanted to use the beautiful whales from last months release called Me and My Whale, and I knew they would be a perfect combination. I pulled out an older interactive set called Wiper Surprise and got to work designing this fun, moving, under water scene. 


I’ve been using pattern papers and marker combos from the same paper pack all month and I’m so happy to be able to achieve such different looks on every card. I die cut the card base from a dotted patterned paper, and two from a piece of pistachio colored cardstock. I die cut a wavy pattern on each piece of colored cardstock, at different hieghts, then ink blended some gradient ocean blues onto them. Before folding anything, I used scor tape to  adhere the taller blue paper to my full piece background. Then, I used my bone folder to really reinforce the scored fold line before finally folding the panel. 


I heat embossed my sentiment in white, onto the shorter panel, before gluing it in place for the front piece and making sure to apply the little tab on the inside first. Once assembled, I trimmed off a small amount of the tab that was extending beyond the bottom when closed. I watched an older YouTube video on the mechanics of the tabs before getting started. Just to make it easier since it had been so long since I used it. Sometimes you just need that refresher. 


I stamped my beautiful whales and some slightly larger mermaids from the Little Mermaiden Agenda stamp set, and colored them with copic and ohuhu markers. There was also some similar clouds in the Me and My Legend stamp set, and I used the double cloud image on my card. After die cutting and adhering the images to my scene, I added some water splashes using an acetate strip for a little extra oomph. Once it was all assembled I applied a sturdy piece of cardstock to the back so it wouldn’t bend or get warped.


I really love how this turned out, and hope it inspires you to get out some of your older die sets and use them with new stamps and accessories. It’s just much fun to blend all of your supplies together. Thank you for stopping by, Davina