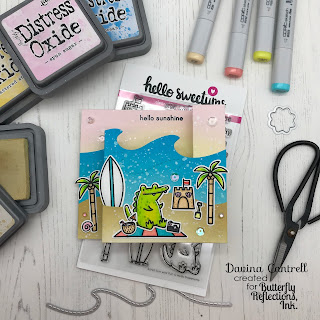
Hey there Crafty friends! Davina here with Butterfly Reflections Ink and I have a fun filled wiper surprise card today that I made using Hello Sweetums newest release
Sand Sun and Fun stamps set with matching dies. I also used the the Mama Elephants
Wiper Surprise Die for my card base.
I was so excited to receive my new haul of Hello Sweetums and I was not disappointed. The stamp quality is fantastic and I love that the dies come pre trimmed and ready to use. I’m so happy Vanessa started carrying them in the
Butterfly Reflections Ink shop.
This was my first time making a wiper card and I am so happy with how easy it was to build. I also found a picture tutorial online to show the placement of the images for each little arm so I could reference it when making decisions. I’m going to print it up and store it with the dies.
I started by cutting 3 panels of Bristol Smooth Cardstock with the wiper card base. I trimmed one down with large
Water Wave die then added some stitched details with the coordinating stitch wave die. Then I cut the second down with the smoother wave die for my beach layer. I left the 3rd whole for the card base. I then went ahead with my
Distress Oxide Inks and blended my layers. I always use at least 2 colors when inking my panels. First a lighter color, then a darker one on the edges for details. I splattered with clean water, then white opaque ink, followed up up by a shimmery pearl ink.
I stamped my images using black
Momento Ink and my stamp Platform. I use a Ranger stamp platform but both sized
Misty Platforms are available in the shop for a great price and super fast shipping. If you aren’t using one, you need to. It really improved your stamping by huge amounts and let’s you carefully arrange everything. After stamping and coloring with my Copic markers, I highlighted my images with a white gel pen.

I assembled my card base by scoring the folds of all of my panels, and used a liquid glue to attach my sand to the water layer. Then I used a very strong double sided tape (Tombow Extreme Adhesive) to attach the right portion of the wave panel to my base. I played with the image placement before adhering my images using a variety of glues. I glued down all of my colored pieces and found the perfect placement for my sun. I cut the wiper arm out of clear acetate so it wouldn’t be visible and attached that with the same extreme adhesive before attaching the left side of the panel. Once I had everything all together I put a little bling down, using a few sequins and glittering iridescent jewels, being careful not to put any where the fold would be laying flat.
I am so happy with how this turned out and hope that you make something beautiful today! Thank you for dropping in,
Davina


No comments:
Post a Comment