Tuesday, August 27, 2019

Let’s Party with Penguin Palace

Hello friends, today I’m sharing a colorful card using Penguin Palace products. I used a fall or boyish color palette that is so out of my ordinary, and I really adore it. I also used a few sheets of patterned paper that have long been in my stash the I loved and let inspire my color choices for the card.
I’ve been making an effort to use my hoarded collection of cover plate dies and really wanted to use my Home Sweet Home stand alone die. I cut it from a piece of Bristol Smooth Card stock. I then selected a cross stitched stackable die frame to cut card base from my patterned paper, and again from a lime green remnant of  cardstock. I used a grassy die to cut my little 1 inch hill from that same remnant, that way I could have a layered piece of “ground” that continued with the cross stitched pattern all the way around my card.
I used my Distress Oxides to ink my home in colors that matched my patterned papers. With my blending brushes I used Spiced Marmalade on the roof, making sure to saturate more deeply around the edges. I then used a Heffy Doodle brick stencil and some Pixie Spray to ink my house facade. I used Antique Linen first, then a very small amount of Brushed Corduroy around the edges for dimension. I folded the door behind the house while I was stenciling the bricks, so once I was complete I used several post it notes to isolate the door and inked it in Peacock Feathers. I finished up the house by trimming off the foldable flaps and backing the body of the house with banner paper. This way, the decor is visible through the windows. I adhered it to my card panel them mounted the roof with foam tape to the top.
Once the house was in place I used foam tape to mount the grassy hill to the bottom making sure that the bottom of the hill was flush with the bottom of the card panel. I got out my stamp platform and got to work with my images. Using the adorable stamps set  Birthday Unicorn and cocoa brown Momento ink I stamped my images onto Neenah Solar Bright White Cardstock, then I Copic colored my images with coordinating colors. I’ve finally realized that I should save the white highlights for after die cutting so that none of the gel pen rubs off during the cutting process. It’s hard to remember, it the effort paid off.
I glued down my images using a combination of Liquid Lawn Fawn Glue Tube and foam tape, making sure that the back of the images off of the grassy area had some foam support. Then I finished up with some luxurious cocoa sequins I’ve had in my stash. The brown ink combined with the browns in the patterned paper really give the whole project a fun and different look that I really enjoy.  I hope that you enjoyed this and thank you for dropping by,
Davina

Monday, August 19, 2019

Feel Better with Penguin Palace Stamps

Hello there, it’s Tuesday and that means I have a new Penguin Palace  Card to share with you today. I’m trying to get the most out of these last weeks of summer and wanted to use fun bright colors and mermaids. A few weeks ago I found an old 6 x 6 pad of patterned paper and I just really loved it so much that I decided to use it again for a little “pick me up” magic picture changer card. I used the images from Get Well Soon along with a few little accessories from Let’s Catch Up.
I’ve had the Lawn Fawn die set for the magic picture changer since it release, but I’ve only used it like two times. I recently made the personal decision to begin using all of the cover plates dies and interactive die sets that I have collected and hoarded, but not used. So be prepared for lots of die use from me.
I began by choosing 3 different sheets of patterned paper that I thought possessed a bright and cheery vibe. Then using the dies I cut the panels that would be needed from the patterned paper, then the slotted pieces from Neenah Solar Bright White. I found a small remnant piece of kraft paper for the little square frame and pull tab hoping that it would be a border, preventing any color difference from my scene and the aqua pattern floral, from being too obvious.
I stamped my images onto the die cut papers using my stamp platform, before realizing that I was supposed to stamp first then cut, doh! But I persevered and made it work. I stamped the images onto masking tape and fussy cut to make masks. Then used Cracked Pistachio and Peacock Feathers to ink blend the little scenes. Followed by simple tiny splatters with clean water then white opaque ink. Once dry, I used Copic markers to color in the little images, choosing colors found in the patterned paper.
I put my little slider together using 1/8 inch Scor Tape and lots of patience. Then I carefully mounted the floral paper on top, and using foam tape, I attached it all onto my paper stack. I stamped an cut my wavy banner and before adding my die cut bubbles (stamped in aqua), and my little pink sea horse.
It amazes me how many hours I saved by letting this fun patterend paper do all the work of backgrounds and negative space. This way I could let these darling images take the stage. I really love the inside message from the Get Well Soon set and hope that this card bring a smile and some happiness to my friend.

Thank you for dropping by and I hope to see you back soon,
Davina

Wednesday, August 14, 2019

Squeak Cheeks for Hello Sweetums

Hey there crafty friends! Davina here and I’m very excited to be guest posting for the incredible Hello Sweetums team. I felt so honored to be asked, that I knew I’d have to come up with something special. After sitting at my desk all morning experimenting with funny scraps of paper, I can say that I have earned my self-proclaimed degree in cardmaking engineering.

Using the squeaking cute stamp set Squeak Cheeks I created a double action slider card. I’m so pleased with how this turned out and although I don’t have exact directions or measurements,  I will give you a little peak into the crazy mechanics of this. Last week I made a homemade “teeter totter” action card that allowed two figures to jump up and down opposite of each other.  I wanted to alter that design to allow side to side sliding , and up and down motions at the same time. After much experimentation, I achieved my desired results.


First I die cut two stitched panels from Bristol Smooth cardstock, then I used some Dies from my craft stash to cut out the two sliding channels. Next I used a pair of  Hello Sweetums Water Waves dies to add a stitched wave to one panel, and to cut a wave from my second panel about 1/3 of the way from the top. I then used my blending brushes to inkblend my panels with Distress Oxide Inks. For the top portion I blended Tumbled Glass into white, then used Broken Chin very sparingly around the edges. For the main body portion that is representing my “straw”, I blended Scattered Staw (always heavier around the edges) and then just around the border Brushed Corduroy. I inked up my second shorter panel with the same color combo. I gently splattered with clean water followed by white opaque ink and put aside to dry.

I used my Stamp Platform to stamp the adorable images onto Neenah Solar Bright White Cardstock. I colored my images using Copic markers before cutting out with the coordinating Die set, followed up by white gel pen highlights. I stamped my sentiment across the bottom of the shorter panel then assembled my swinging arm slider. There was a lot of trial and error, and honestly, the most difficult part was finding the best location for the small mini brad that makes the swinging motion possible. Don’t tell anyone but there are a few extra holes in there behind the front panel. Once I was satisfied with the motion I layered my shorter panel over the top with foam tape (allowing enough room for my critter to pop up) then securing the sliding disc with glue and a circle of paper.

I adhered all of my images onto the scene, covering my disc with the hamster ball, and loved how well they all fit onto my card. I went back in with the brushed corduroy ink and the looped swirl stamp to put some motion behind the rolling ball, and really loved the results. To finish it up I needed to double up my foam tape all around the edges of the back of my card, making sure to leave open the areas that my motion arm would need to move freely. There were a few corners of the mechanism that I snipped away at to reduce the amount of space needed. Then I mounted in all onto some striped patterned paper, then onto my cardbase with Scor Tape.

I’m so happy with the results and hope that you enjoy seeing this guy in action. Please head over to my instagram @popsiclesticks to see a quick video of the motion.

Thank you so much for dropping by,
Davina

Monday, August 12, 2019

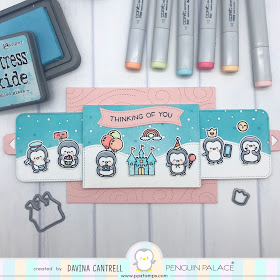
Thinking of you with Penguin Palace Stamps

Today I’m sharing a dusty pink and aqua interactive card featuring stamps from Penguin Palace Stamps. It is a double slider card, and I’ve only made two before, so this was quite an endeavor.

The idea was inspired by an interactive card I saw on Pinterest and I thought “That would be so cute with my penguin stamps” so I got to work. And I messed it up... so I had to start all over again. So this is doubly special cause it took a million hours haha.

I’ve been making an effort to use my collection of cover plate dies and I’ve used two different ones on this project. Some swirling wind on the pink background and some sparkles with dots on the blue panels. There are so many ways to make these sliding cards by hand, but since I have a die set, I used that and saved a lot of tedious measuring. I cut each panel multiple times since I knew I would be layering the ink blended pieces over solid white so it would look like it was snowing.


I used the clear plastic from some stamp packaging as my sliding material, but made sure to liberally apply powder from my embossing buddy to the center piece, so that it would slide easily. I also laid my pieces out before cutting the snow drifts to try and line them up a little so that when it was fully open it would match up. It doesn’t have to be perfect, but I wanted it close.

I used very simple ink blending to get a soft and solid look on the sky panels. Then glued all the layers together making sure to to put the pink pull tabs between the layers. I used 1/8 inch Scor Tape for the inner pieces of the sliding mechanism, but 1/2 inch score tape to attach the little panels to the mechanism. After having the slider built, I stamped and colored my cute Penguin Agenda  images with Copic markers in soft sherbet colors. Not wanting to make the same mistake I made last year, when I attached my images first, then realized my scenes were not completely visible due to the portion that says inside. That was a frustrating lesson that I will never repeat haha.
Once everyone was colored and cut out with the Coordinating Penguin Cuts I glued them down using Ranger Multi Medium Matte glue and layered on the little accessories. On both pull out scenes I wanted it to look like they were thinking of each other and communicating with either texts or mail and I made sure to really attach them well because I didn’t want any of the images to snag and get pulled off. Surprisingly it really does work well and is not fussy.

I attached the little word banner on top before mounting my little puffy pocket mechanism onto the pink stitched panel. Then using more Scor Tape I mounted the card face onto my card base. I’m really happy with how this turned out and hope that the recipient really enjoys it.

Thank you for dropping by,
Davina


BRI- August Mood Board

I'm enjoying a few days off work and spending my ME time crafting up a storm. I don’t always stop in and write a blog post for my projects unless I’m on a calendar, but today is the exception. I really do love using color boards for my color inspiration and the August Mood Board from the Butterfly Reflections Ink Blog is too stunning for me to resist.

These bold Jewel colors are so fun and remind me of deep oceans and Caribbean beaches. But I’ve used them completely out of context today. I’ve made an evening jungle scene and really worked my craft stash for this card. 

I have a bright and funky old pad of paper from Heidi Swapp, and it has a totally gaudy cheetah print with aqua glitter which I never thought I’d be ready to use, but I was wrong. And I don’t admit that often haha. I’ve also been on a mission to regularly put into use my extensive collection of cover plate dies that I purchase with the best of intentions, but don’t always follow through. 

All of the stamps and dies I’ve used are from Hello Bluebird stamps and are available on the Butterfly Reflections Ink online store and I can’t say enough wonderful things about the owner or the store. Her shipping rates are beyond fair and your items arrive in 2-3 days. Not weeks like that other place ... and I love supporting small businesses. Especially super awesome small businesses that carry all of my favorite things. If I lived in NH I would be working in this little store for sure! 

I went outside of the box and used the Skating Pond cover plate, but I created a river scene with it. I cut it out twice from Bristol smooth cardstock and began inking my pieces with Distress Oxide inks. From the bottom portion of one of the pieces I used a Grassy Knoll die to cut about an inch and a half  grassy hill. I colored everything with colors from the mood board and even the greenery is shades of teal and aqua not green. I laid out my inkblended pieces and splattered with water, then white shimmery ink, then metallic gold ink. 

Using my stamp platform I stamped images from two sets, Jungle Little’s and More Jungle Little’s. Then I softly colored all of my stamped images with Copics (I think I counted 24 colors used) and cut out using the coordinating dies. 

Piecing all the little background pieces together was no joke. I think it took longer than actually coloring. I used regular clear scotch tape on the back to hold it all together. Then I mounted it on black cardstock, and then mounted that on my fancy glitter cheetah print. Using foam tape I popped the grassy knoll at the bottom and got ready to attach all of my images. I started with my vines and canopy creatures, then moved to building my foliage across the bottom. Of course I forgot to stamp my sentiment so I had to carefully do it with my stamp platform but it was easy to flip the cover to rubber stamp depth, and I had no issues. 

Tucking my sneaky gator into the leaves I finished by adding my hippo into the river and my meerkats onto the beach. I decided to sprinkle some sequins  onto the card and tucked little tiny stars all about. I used a little mounted strip of cheetah print on the inside with some extra leaves and wish I took the time to finish the inside of all of my cards.  But alas, I am too lazy. I hope you like this vibrant card and use the augustbcolor mood board this month. 

Thank you for dropping in,
Davina 

Tuesday, August 6, 2019

Friends with Penguin Palace Stamps

I’ve got a late post to share with you today (Real life work is really getting in the way of my crafting time!)  using absolutely adorable stamps from Penguin Palace Stamps. This is a set I keep coming back to called Rabbit Cafe and its just full of great images. I have many of these cover plate dies that cut out little boxes and I never use them. I buy them with the best of intentions, and when I see other card makers use them I swoon, but when I sit down to create cards my brain doesn’t work in little squares. But... I’m going to make efforts to break out of my usual patterns and habits, and use my stuff.

The card I’m sharing today uses not only one of my cover plate dies,  it also has some older pieces of patterned papers that I love and have been hoarding.

I stamped my images onto Neenah Solar Bright White using my stamp platform, always wanting to make sure my images are crisp and black and nice.  Then I colored them in with Copic markers in colors that matched the papers. Once colored, I cut out using the Coordinating dies, then cut out the frame. I played with some arrangements of the images, then backed the frame with strips of foam tape. I added a piece of floral paper on top of the striped paper and made sure it would fit entirely in the bottom squares.

I mounted the frame and added the images into the upper potion. Weeks ago I used a blade to cut out the center banner from the cafe stamp. That way my window would be blank and empty, and I could use the smaller cafe images to personalize my cafe.  I cut it out carefully and in a square shape so that it could easily fit back into the image and be used in its entirety, and be stored together so that I wouldn’t misplace it. So you will notice I stamped the little coffee cup onto the window. I used a multi liner to hand write Coffee onto the store sign and overlapped the little plant to balance the scene.

I then added the characters to the bottom making sure to add some foam dots to the places where the images wouldn’t be supported, that way they don’t bend or sag. I used a scrap of textured patterned paper to cut the word “friends” out of, and also 3 tiny banners. I stamped the “let’s catch up” sentiment in matching Coral ink from the Let’s Catch Up mermaid set then cut out with the same banner.  I glued and layered all 4 together to create a thick chipboard like feel, then adhered to the top. Finally I attached the Friends word to the frame making sure to cut the “I” dot from fun foam so it would be the same height as the word, and glued down in its proper place.

I used Scor Tape to attach the panel to my card base and decided that there was no need for sequins. I know... shocker haha. I hope you like it ☺️

Thank you so much for dropping by, Davina